
Instruction Sheet


7
To Convert Oven Broil Burner
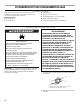
1. Remove the screws from the broil burner.
NOTE: Some models only have one screw and a locating pin.
Do not remove the pin.
2. Remove the broil burner from the broil burner orifice hood.
NOTE: The broil burner will hang in the back of the oven while
you are changing the orifice hood.
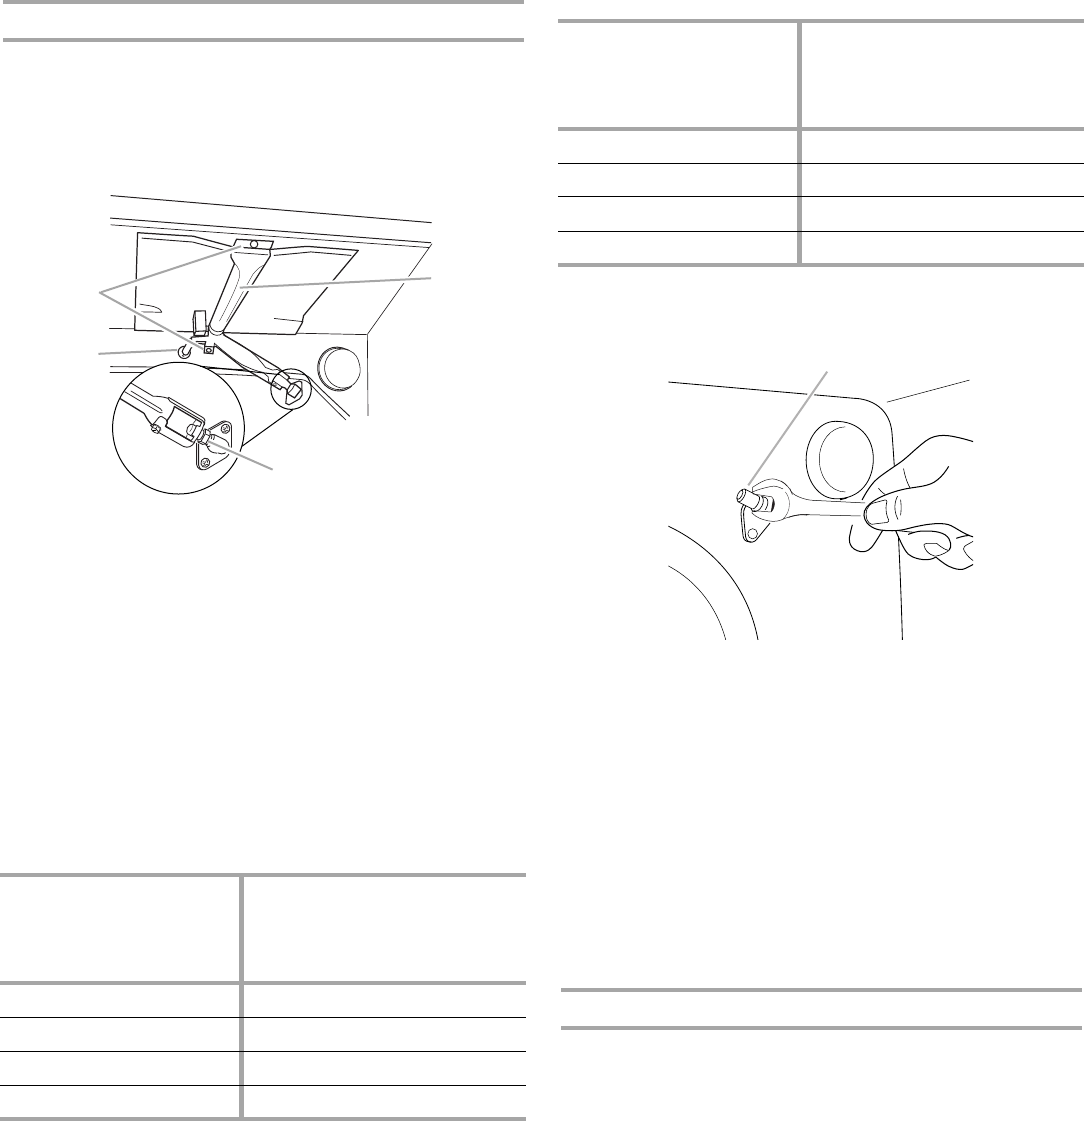
3. Use a ³⁄₈" combination wrench and turn the broil burner orifice
hood counterclockwise to remove. Save the replaced orifice
hood in a plastic bag or other container.
NOTE: The broil fitting for the range may have a female or a
male thread. This kit contains conversion broil fittings with the
correct orifice size with both male and female threads.
4. Refer to the nameplate on the range located on the front
frame behind the oven door or drawer front depending on
model. Identify the broil burner rating for this range from the
nameplate. Refer to the following chart for the gas to be used
after the conversion. Identify the correct replacement broil
burner spud using the nameplate burner rating. The ID
number is marked on the hex flats of the orifice spud.
Natural Gas Orifice Hood Chart for Broil Burners
LP Gas Orifice Hood Chart for Broil Burners
5. Install the replacement broiler burner orifice hood, turning it
clockwise until snug.
IMPORTANT: Do not overtighten.
6. Place the broil burner on the broil burner orifice hood and
insert the broil burner ceramic igniter in the hole in the rear of
the oven.
7. Position the broil burner against the top of the oven and
reattach it.
8. Replace storage drawer, warming drawer or premium storage
drawer. See the “Storage Drawer” or “Warming Drawer or
Premium Storage Drawer” section in the Installation
Instructions provided with the range.
9. Replace the oven door if it has been removed. See the “Oven
Door” section in the Installation Instructions provided with the
range.
10. Replace the oven racks.
Complete Installation
Refer to the Installation Instructions provided with the range for
proper burner ignition, operation and burner flame adjustments.
IMPORTANT: You may have to adjust the “LO” setting for each
cooktop burner.
Checking for proper cooktop, bake and broil burner flame is very
important. The small inner cone should have a very distinct blue
flame ¼" (0.64 cm) to ½" (1.3 cm) long. The outer cone is not as
distinct as the inner cone. LP gas flames have a slightly yellow
tip.
NOTE: Make sure to save the orifices that have just been
replaced in the conversion.
A. Broil burner
B. Screws
C. Orifice hood
D. Locating pin
Nameplate Burner
Ratings (sea level)
Replacement Hood - Natural
Gas (high altitude)
Natural Gas LP Hood
Thread
Size ID
Number
11,000 BTU 11,000 BTU Female 1.40 mm 140
10,000 BTU 9,000 BTU Female 1.35 mm 135
11,000 BTU 11,000 BTU Male 1.40 mm 0.055
10,000 BTU 9,000 BTU Male 1.35 mm 135
B
C
A
D
Nameplate Burner
Ratings (sea level)
Replacement Hood - LP Gas
(high altitude)
Natural Gas LP Hood
Thread
Size ID
Number
11,000 BTU 11,000 BTU Female 0.90 mm 090
10,000 BTU 9,000 BTU Female 0.80 mm 080
11,000 BTU 11,000 BTU Male 0.90 mm 090
10,000 BTU 9,000 BTU Male 0.80 mm 080
A. Orifice hood
x
.x
x
A