MICROWAVE HOOD COMBINATION BUMP OUT KIT INSTALLATION INSTRUCTIONS If cabinets are deeper than 14"(35.6 cm) but no more than 15"(38.1 cm), use the bump out mounting kit to replace the mounting bracket that comes with your unit. These installation instructions are only for the Bump out mounting kit, for full microwave hood combination installation, please refer to the installation instructions that came with the microwave hood combination.
MICROWAVE HOOD COMBINATION SAFETY Your safety and the safety of others are very important. We have provided many important safety messages in this manual and on your appliance. Always read and obey all safety messages. This is the safety alert symbol. This symbol alerts you to potential hazards that can kill or hurt you and others. All safety messages will follow the safety alert symbol and either the word “DANGER” or “WARNING.
SECTION I & II INSTALLATION REQUIREMENTS Tools and Parts Tools needed Gather the required tools and parts before starting installation. Read and follow the instructions provided with any tools listed here. ■■ Measuring tape ■■ Diagonal wire cutting pliers ■■ Drill ■■ ■■ Pencil ■■ Stud finder ■■ Masking tape or thumbtacks ■■ Scissors ■■ Keyhole saw ■■ ■■ 3/4" (1.9 cm) hole saw ■■ ■■ Duct tape 7/16" socket wrench (or box wrench) for 1/4" x 2" lag screws 1½" (3.8 cm) diam.
Locate Wall Stud(s) NOTE: If no wall studs exist within the cabinet opening, do not install the microwave oven. See illustrations in “Possible Wall Stud Configurations.” 1. Using a stud finder, locate the edges of the wall stud(s) within the opening. 2. Mark the center of each stud and draw a plumb line down each stud center. See illustrations in “Possible Wall Stud Configurations.
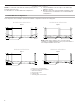
SECTION I only This section is used for around 17 /8" (43.5 cm) product height installation. 1 Installation Dimensions NOTE: The grounded 3 prong outlet must be inside the upper cabinet. See the “Electrical Requirements” section. A B 30" (76.2 cm) min. NOTE: To ensure good performance, do not obstruct top vent airflow. If cabinets are deeper than 14" (35.6 cm) but no more than 15" (38.1cm), use the bump out mounting kit replacing the I bar mounting plate from the wall.
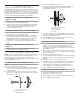
Mark Rear Wall The microwave oven must be installed on a minimum of 1 wall stud, preferably 2, using a minimum of 1 lag screw, preferably 2. 1. Using measuring tape, find and clearly mark the vertical centerline of the opening. A 2. Align the center markers on the wall template to the centerline on the wall, making sure it is level, and that the top of the wall template is butted up against the bottom edge of the upper cabinet.
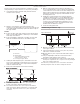
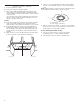
Drill Holes in Rear Wall In addition to being installed on at least 1 wall stud, the mounting plate must attach to the wall at both end holes. If the end holes are not over wall studs, use two 3/16-24 x 3" (7.62 cm) round-head bolts with toggle nuts; if 1 end hole is over a wall stud, use 1 lag screw and one 3/16-24 x 3" (7.62 cm) round-head bolt with toggle nut; or if both end holes are over wall studs, use 2 lag screws. Following are 3 installation configurations. 3. Position mounting plate on the wall.
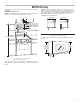
Prepare Upper Cabinet 1. Disconnect power to outlet. 2. Remove all contents from upper cabinet. 3. Place Upper Cabinet Template against the bottom of the upper cabinet, and attach with tape or thumbtacks. Make sure the template centerline aligns with the vertical centerline on the rear wall. The “rear wall” arrows must be against the rear wall so that the holes cut into the upper cabinet align with the holes in the top of the microwave oven.
SECTION II only This section is used for around 10 /16" (26.2 cm) product height installation. 5 Installation Dimensions NOTE: The grounded 3 prong outlet must be inside the upper cabinet. See the “Electrical Requirements” section. A B 30" (76.2 cm) min. NOTE: To ensure good performance, do not obstruct top vent airflow. If cabinets are deeper than 14" (35.6 cm) but no more than 15" (38.1cm), use the bump out mounting kit replacing the mounting plate from the wall.
4. Remove the mounting template and check the markings: 83 4 10 1 2 141 8 (35.9 cm) ■■ 141 8 (35.9 cm) The bottom edge line must be 101/2" (26.6 cm) from the bottom of the upper cabinet and must be level. The end holes must be 83/4" (22.3 cm) from the bottom edge of the upper cabinet and must be on a level line with each other. They must each be 143/16" (36 cm) from the centerline. 5.
Drill Holes in Rear Wall In addition to being installed on at least 1 wall stud, the mounting plate must attach to the wall at both end holes. If the end holes are not over wall studs, use two 3/16-24 x 3" roundhead bolts with toggle nuts; if 1 end hole is over a wall stud, use 1 lag screw and one 3/16-24 x 3" round-head bolt with toggle nut; or if both end holes are over wall studs, use 2 lag screws. Following are 3 installation configurations. 4.
Prepare Upper Cabinet 1. Disconnect power to outlet. 2. Remove all contents from upper cabinet. 3. Place Upper Cabinet Template against the bottom of the upper cabinet, and attach with tape or thumbtacks. Make sure the template centerline aligns with the vertical centerline on the rear wall. The “rear wall” arrows must be against the rear wall so that the holes cut into the upper cabinet align with the holes in the top of the microwave oven.
INSTRUCCIONES DE INSTALACIÓN DE KIT DE COMBINACIÓN DE MICROONDAS Y CAMPANA SOBRESALIENTE Si los gabinetes tienen una profundidad mayor a 35,6 cm (14") pero no mayor a 38,1 cm (15"), use el kit de montaje sobresaliente para reemplazar la placa de montaje que viene con la unidad.
SEGURIDAD DE LA COMBINACIÓN DE MICROONDAS Y CAMPANA Su seguridad y la seguridad de los demás es muy importante. Hemos incluido muchos mensajes importantes de seguridad en este manual y en su electrodoméstico. Lea y obedezca siempre todos los mensajes de seguridad. Este es el símbolo de alerta de seguridad. Este símbolo le llama la atención sobre peligros potenciales que pueden ocasionar la muerte o una lesión a usted y a los demás.
SECCIÓN II Y I REQUISITOS DE INSTALACIÓN Herramientas y piezas Herramientas necesarias Reúna las herramientas y piezas necesarias antes de comenzar la instalación. Lea y siga las instrucciones provistas con cualquiera de las herramientas detalladas aquí.
Ubique la(s) viga(s) de pared NOTA: Si no hay pies derechos de pared dentro de la abertura del gabinete, no instale el horno microondas. Vea las ilustraciones en “Posibles configuraciones de las vigas de pared”. 1. Ubique los bordes de las vigas de pared dentro de la abertura con un detector de vigas. 2. Marque el centro de cada viga y trace una línea a plomo hacia abajo desde el centro de cada viga. Vea las ilustraciones en “Posibles configuraciones de las vigas de pared”.
SECCIÓN I únicamente Esta sección se usa para la instalación de productos de una altura de alrededor de 171/8" (43,5 cm). Dimensiones de instalación NOTA: El tomacorriente de pared de 3 terminales con conexión a tierra debe estar dentro del gabinete superior. Consulte la sección “Requisitos eléctricos”. A B 30" (76,2 cm) min. NOTA: Para asegurar un buen rendimiento, no obstruya el flujo de aire de la ventilación superior.
Marque la pared posterior El horno de microondas deberá instalarse como mínimo sobre 1 viga de pared, preferentemente 2, usando como mínimo 1 tirafondo, preferentemente 2. 1. Con la cinta de medir, ubique y marque claramente la línea central vertical de la abertura. A 2. Alinee las marcas centrales de la plantilla de pared con la línea central en la pared; asegúrese de que esté nivelada y que la parte superior de la plantilla de pared esté a tope contra el borde inferior del gabinete superior.
Taladre orificios en la pared posterior Además de instalar la placa de montaje en al menos 1 viga, se la debe sujetar a la pared en ambos orificios de extremo.
6. Si se hace la instalación en una segunda viga de pared, inserte un tirafondo en el otro orificio taladrado en el paso 2 de “Instalación para una viga de pared en un orificio de extremo” en la sección “Taladre orificios en la pared posterior”. 7. Controle la alineación de la placa de montaje y asegúrese de que esté nivelada. 8. Apriete con firmeza los tirafondos y el perno. Vigas de pared en ambos orificios de extremo (figura 4) 1. Coloque la placa de montaje en la pared. 2.
SECCIÓN II únicamente Esta sección se usa para la instalación de productos de una altura de alrededor de 105/16" (26,2 cm). Dimensiones de instalación NOTA: El tomacorriente de pared de 3 terminales con conexión a tierra debe estar dentro del gabinete superior. Consulte la sección “Requisitos eléctricos”. NOTA: Para asegurar un buen rendimiento, no obstruya el flujo de aire de la ventilación superior.
4. Retire la plantilla de montaje y verifique las marcas: Parte inferior del gabinete superior 83 4 (22,3 cm) 141 8 (35,9 cm) Orificio de extremo de la placa de montaje ■■ 10 1 2 Línea central 22 Parte inferior del gabinete superior (26,6 cm) 141 8 (35,9 cm) 4"(10,2 cm) Línea central Parte inferior de la placa de montaje La línea del borde inferior debe estar a 101/2" (26,6 cm) de la parte inferior del gabinete superior y debe estar nivelada. Los orificios de extremo deben estar a 83/4" (22.
Taladre orificios en la pared posterior Además de instalar la placa de montaje en al menos 1 viga, se la debe sujetar a la pared en ambos orificios de extremo.
7. Controle la alineación de la placa de montaje y asegúrese de que esté nivelada. 8. Apriete con firmeza los tirafondos y el perno. Vigas de pared en ambos orificios de extremo (figura 4) 1. Coloque la placa de montaje en la pared. 2. Inserte los tirafondos en ambos orificios de extremo. 3. Controle la alineación de la placa de montaje y asegúrese de que esté nivelada. 4. Ajuste firmemente los tirafondos. Preparación del gabinete superior 1.
INSTRUCTIONS D’INSTALLATION DE LA TROUSSE DE MONTAGE DE BOURRELET POUR ENSEMBLE HOTTE/FOUR À MICRO-ONDES Si la profondeur des armoires est plus de 14 po (35,6 cm) mais pas plus de 15 po (38,1 cm), utiliser l’ensemble de montage de bourrelet pour remplacer la plaque de montage qui accompagner l’appareil.
SÉCURITÉ DE L’ENSEMBLE HOTTE/FOUR À MICRO-ONDES Votre sécurité et celle des autres est très importante. Nous donnons de nombreux messages de sécurité importants dans ce manuel et sur votre appareil ménager. Assurez-vous de toujours lire tous les messages de sécurité et de vous y conformer. Voici le symbole d’alerte de sécurité. Ce symbole d’alerte de sécurité vous signale les dangers potentiels de décès et de blessures graves à vous et à d’autres.
SECTIONS I ET II EXIGENCES D’INSTALLATION Outils et pièces Outils nécessaires Rassembler les outils et pièces nécessaires avant d’entreprendre l’installation. Lire et observer les instructions fournies avec chacun des outils de la liste ci-dessous.
Identification de la position des montants de cloison REMARQUE : S’il n’y a aucun montant de cloison dans l’ouverture d’encastrement de l’armoire, ne pas installer le four à micro-ondes. Voir les illustrations dans “Configurations possibles des montants de cloison”. 1. Utiliser un détecteur de montant pour localiser dans l’ouverture les bords des montants de cloison. 2. Marquer la position du centre de chaque montant de cloison et tracer l’axe de chaque montant à l’aide d’un fil à plomb.
SECTION I seulement Cette section est utilisée pour l’installation d’un produit d’une hauteur d’environ 17 1/8 po (43,5 cm). Dimensions d’installation REMARQUE : La prise de courant à 3 alvéoles reliée à la terre doit être située à l’intérieur de l’armoire supérieure. Voir la section “Spécifications électriques”. A B 30 po (76,2 cm) min. REMARQUE : Pour garantir de bons résultats, ne pas obstruer l’ouverture d’évacuation supérieure.
Tracé sur le mur arrière Le four à micro-ondes doit être fixé sur au moins 1 montant de cloison, mais de préférence sur 2 montants; on utilise pour cela au moins 1 vis d’ancrage, mais de préférence 2. 1. Utiliser un ruban à mesurer; déterminer et marquer clairement la position de l’axe central vertical de l’ouverture. A 2.
Perçage de trous dans le mur arrière En plus d’être fixé sur au moins un montant de cloison, on doit également fixer la plaque de montage sur le mur au niveau des deux trous d’extrémité.
6. S’il est possible de fixer également l’appareil sur un second montant de cloison, insérer une vis d’ancrage dans l’autre trou percé à l’étape 2 du paragraphe “Installation avec un montant de cloison coïncident avec un trou d’extrémité ” de la section “Perçage des trous dans le mur arrière”. 7. Contrôler l’alignement de la plaque de montage; veiller à établir un bon aplomb. 8. Serrer solidement toutes les pièces d’ancrage. Montant de cloison coïncident avec deux trous d’extrémité (Figure 4) 1.
SECTION II seulement Cette section est utilisée pour l’installation d’un produit d’une hauteur d’environ 10 5/16 po (26,2 cm). Dimensions d’installation REMARQUE : La prise de courant à 3 alvéoles reliée à la terre doit être située à l’intérieur de l’armoire supérieure. Voir la section “Spécifications électriques”. A REMARQUE : Pour garantir de bons résultats, ne pas obstruer l’ouverture d’évacuation supérieure.
4.
Perçage de trous dans le mur arrière En plus d’être fixé sur au moins un montant de cloison, on doit également fixer la plaque de montage sur le mur au niveau des deux trous d’extrémité.
6. S’il est possible de fixer également l’appareil sur un second montant de cloison, insérer une vis d’ancrage dans l’autre trou percé à l’étape 2 du paragraphe “Installation avec un montant de cloison coïncident avec un trou d’extrémité ” de la section “Perçage des trous dans le mur arrière”. 7. Contrôler l’alignement de la plaque de montage; veiller à établir un bon aplomb. 8. Serrer solidement toutes les pièces d’ancrage. 5.