Kitchen_kid ELECTRIC For questions about features, operation/performance, In Canada, call for assistance 1-800-461-5681, _ RANGE parts accessories or service, call: 1-800-422-1230 for installation and service, call: 1-800-807-6777 www.kitchenaid.com or visit our website at... or www.KitchenAid.ca Table of Contents ............................................................................................................
TABLE OF CONTENTS RANGE SAFETY ............................................................................. The Anti-Tip Bracket .................................................................... PARTS AND FEATURES ................................................................ COOKTOP USE .............................................................................. Cooktop Controls ......................................................................... Dual-Circuit Element ..........................
RANGE SAFETY Your safety and the safety of others are very important. We have provided many important safety messages in this manual and on your appliance. Always read and obey all safety messages. This symbol alerts you to potential hazards that can kill or hurt you and others. All follow the safety alert symbol and either the word "DANGER" or Thissafety is themessages safety alertwillsymbol. "WARNING.
iMPORTANT SAFETY iNSTRUCTiONS WARNUNG: To reduce the risk of fire, electrbal shock, injury to persons, or damage when using the range, foiiow basic precautions, inciuding the following: •, WARNING: TO REDUCE THE RISK OF TIPPING OF THE RANGE, THE RANGE MUST BE SECURED BY PROPERLY INSTALLED ANTPTIP DEVICES. TO CHECK IF THE DEVICES ARE INSTALLED PROPERLY, SLIDE RANGE FORWARD, LOOK FOR ANTPTIP BRACKET SECURELY ATTACHED TO FLOOR, AND SLIDE RANGE BACK SO REAR RANGE FOOT IS UNDER ANTFTIP BRACKET.
IMPORTANT SAFETY INSTRUCTIONS • Keep Oven Vent Ducts Unobstructed. For self-cleaning • Placement of Oven Racks - Always place oven racks in desired location while oven is cool. If rack must be moved while oven is hot, do not let potholder contact hot heating element in oven. • Do Not Clean Door Gasket - The door gasket is essential for a good seal. Care should be taken not to rub, damage, or move the gasket.
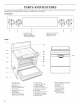
PARTS AND FEATURES This manual appearances covers several different of the features shown models. The range you have purchased may have some here may not match those of your model. or all of the items listed. The locations Control Panel 1 2 3 4 1. Left Rear Control 2. Left Front Control (Dual Circuit Element on ceramic glass models) 3. Electronic Oven Control 4. Right Front Control 5. Right Rear Control Range ....................................................................................
COOKTOP USE POWER ON Lights Each control knob has a POWER ON light. The light will glow when its control knob is on. FRONT I. POWER ON light Fire Hazard Turn off all controls when done cooking. Failure to do so can result in death or fire. The cooktop controls can be set anywhere between HI and LO. Push in and turn to setting. Use the following chart as a guide when setting heat levels• SETTING RECOMMENDED HI or MAX • Start food cooking• • Bring liquid to a boil. 6-8 • Hold a rapid boil.
The surface cooking area will glow red when an element is on. It will cycle on and off, at all settings, to maintain the selected heat level. It is normal for the surface of white ceramic glass to appear to change color when surface cooking areas are hot. As the glass cools, it will return to its original color. Wiping off the cooktop before and after each use will help keep it free from stains and provide the most even heating. For more information, see "General Cleaning" section.
IMPORTANT: Never leaveemptycookware onahotsurface cooking area,element orsurface burner. Idealcookware should haveaflatbottom, straight sides,awellfittinglidandthematerial should beofmedium-to-heavy thickness. Rough finishes mayscratch thecooktop. Aluminum andcopper maybeusedasacoreorbaseincookware. However, whenused asabasetheycanleavepermanent marks onthecooktop or grates. Cookware material isafactorinhowquickly andevenly heatis transferred, whichaffects cooking results.
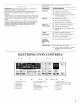
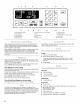
1 2 6 i DUG 3co.!.o_ ............. ++¸'% s/JH/ I _ '/_ i / 8 1. 2. 3. 4. 5. 9 10 Oven Display Symbol Heat Settings Oven Display Start/Stop Time Number Pads (..(I 11 12 13 6. Control Lock (on some models) 7. Start 14 11. Timed Cooking !2. Surface Light (Control Lock on some models) 13. Oven Light 14. Cancel Off 8. Oven Settings 9. Clock 10. Minute Timer _.{_(.
To Unlock: 1. 2. To Set Oven to Cook in Celsius: A single tone will sound and "CONTROL LOCK" and a picture of a lock will disappear from the display. 1. 2. Open the oven door. Press CANCEL OFE 3. 4. Press number pads 1,2 and 3, in that order. Press BROIL. 5. Press START. Press BAKE to confirm that Celsius is being used. Only the temperature and a flashing degree symbol will appear in the temperature display area when the oven has been set to cook in Celsius.
IMPORTANT: Do not line the oven bottom with any type of foil, liners or cookware because permanent damage will occur to the oven bottom finish. • Do not cover entire rack with foil because air must be able to move freely for best cooking results. • To catch spills, place foil on rack below dish. Make sure foil is at least 1 in. (2.5 cm) larger than the dish and that it is turned up at the edges. • Do not cover food with aluminum foil when convection cooking (on some models). 1. Removable Insert 2.
The bakeware material affects cooking results. Follow manufacturer's recommendations and use the bakeware size recommended in the recipe. Use the following chart as a guide. BAKEWARE/ RESULTS RECOMMENDATIONS Light colored aluminum • Light golden crusts • • Use temperature and time recommended in recipe. 1. Oven vent Even browning Dark aluminum and other bakeware with dark, dull and/or nonstick finish • May need to reduce baking temperatures 25°F (15°C).
To Bake or Roast: Before baking and roasting, position racks according to the "Positioning Racks and Bakeware" section. When roasting, it is not necessary to wait for the oven to preheat before putting food in, unless recommended in the recipe. 1. Press BAKE. Press the number pads to enter a temperature other than 350°F (177°C). The bake range can be set between 170°F and 500°F (77°C and 260°C). Broiling uses direct radiant heat to cook food.
BROILING CHART For best results, place food 3 in. (7 cm) or more from the broil element. Times are guidelines only and may need to be adjusted for individual tastes. Recommended rack positions are numbered from the bottom (1) to the top (5). For diagram, see the "Positioning Racks and Bakeware" section. RACK POSITION FOOD TEMP. • Choose cookie sheets without sides and roasting pans with lower sides to allow air to move freely around the food.
CONVECTION = =_ Food/Rack Position ="" _ I_11}(11)I£ ROASTING CHART Cook Time (rain. per 1 Ib [454 g]) Oven Temp. Internal Food Temp. Beef, Rack Position 2 Rib Roast rare medium well done Rib Roast (boneless) rare medium well done 1. Broil heat 2. Convection _n 3. Bake heat Convection roasting can be used for roasting meats and poultry, or for baking yeast breads and loaf cakes using a single rack.
Food/Rack Position Cook Time (min. per 1 Ib [454 g]) Oven Temp. Internal Food Temp. Turkey*, Rack Positions 1 or 2 Convect Full Meal lets you choose from 11 preset cooking cycles. A single pad includes an oven setting, an oven temperature, and a cook time or probe temperature. One pad is changeable to allow you to set your own cycle and save it for future use. Use the following chart as a guide. 13 Ibs. (5.85 kg) and under 10-15 300°F (149°C) 180°F (82°C) Over 13 Ibs. (5.
To Use: To Use: Before using Convect Full Meal, place food in oven. If temperature probe is required, insert probe into food and plug probe into jack. See "Temperature Probe" section for diagram. 1. Press CONVECT FULL MEAL. Before using convection temperature conversion for BAKED GOODS and OTHER FOODS, allow the oven to preheat before placing food in the oven. 1. Press BAKED GOODS, MEATS or OTHER FOODS. 2. Press number pads to enter standard cook temperature. 3.
2. 3. Open the oven door. Press BAKE, 4. Press 350°F 500°F Press 5. 6. 7. 8. the number pads to enter a temperature other than (177°C). The bake range can be set between 170°F and (77°C and 260°C). START. Press and hold number pad 6 for 5 seconds. "START?" will appear on the display. Press START. "SAb" will appear on the display. Close the oven door. To End the Sabbath 1. 2. 3. Mode: Open the oven door. Press and hold number pad 6 for 5 seconds. Close the oven door.
To Change Probe Temperature, Oven Setting: somemodds} The temperature probe accurately measures the internal temperature of meat, poultry and casseroles with liquid and should be used in determining the doneness of meat and poultry. It should not be used during maxi and econo broiling, convection broiling, dehydrating or proofing bread. Always unplug and remove the temperature probe from the oven when removing food.
4. Press START. RANGE CARE On some models, the start time, stop time, vertical bar countdown and minute time countdown will appear on the oven display. When the stop time is reached, the oven will shut off automatically and "End" will appear on the oven display. (os so_s_ ssod_/s If on, end-of-cycle tones will sound, then reminder tones will sound every minute. 5. Press CANCEL OFF or open the oven door to clear the display and/or stop reminder tones.
Prepare Cooktop and Storage Drawer: • Remove plastic items from the cooktop because they may melt. • On Canadian models, the rear surface elements will not work during the Self-Cleaning cycle. To Serf-Clean: Before self-cleaning, make sure the door is closed completely or it will not lock and the cycle will not begin. 1. Press CLEAN. Press the number pads to set a clean time other than 3 hours 30 minutes. The clean time can be set between 2 hours 30 minutes and 4 hours 30 minutes.
OVEN DOOR EXTERIOR CERAMIC GLASS (on some models) Do not use steel wool, abrasive powder cleansers, chlorine bleach, rust remover or ammonia because damage may occur. Always wipe with a clean, wet cloth or sponge and dry thoroughly to prevent streaking and staining, Cooktop Polishing Creme is recommended for regular use to help prevent scratches, pitting and abrasions, and to condition the cooktop. It may be ordered as an accessory. See "Assistance or Service" to order.
,_ _,._,_*j_ _,,.._ ......... 3. Pull up glass on front of backguard. 4. 5. Grasp both ends of the fluorescent tube. Turn the tube 90 ° in either direction until both ends come out of the receptacles. 6. Replace tube, replace top of the control panel. 7. Plug in range or reconnect power. i_ _ _ SURFACE LIGHT The cooktop light is a 20-watt cool-white fluorescent tube, and has 2 replaceable parts. The starter is a knob-shaped part located on the right side of the backguard, under the light bulb.
O The oven light(s) is a 40-watt appliance bulb. The light(s) will come on when the oven door is opened. The light(s) will not work during the Self-Cleaning cycle. When the oven door is closed, press OVEN LIGHT to turn the light(s) on or off. To Replace: Before replacing, make sure the oven is off and cool. 1. Unplug range or disconnect power. 2. Turn the glass bulb cover in the back of the oven counterclockwise to remove. To Replace: 1.
TROUBLESHOOTING Try the solutions suggested here first in order to avoid the cost of an unnecessary service call. Display shows messages • Nothing will operate • Is the power supply cord unplugged? Plug into a grounded 3-prong outlet. • Has a household fuse been blown or has the circuit breaker been tripped? Replace the fuse or reset the circuit. Is the display showing a letter followed by a number? Press CANCEL OFF to clear the display. See "Display(s)" section. If it reappears, call for service.
ASSISTANCE Before calling for assistance or service, please check "Troubleshooting." It may save you the cost of a service call. If you still need help, follow the instructions below. When calling, please know the purchase date and the complete model and serial number of your appliance. This information will help us to better respond to your request. If you need replacement parts If you need to order replacement parts, we recommend that you only use factory specified parts.
KITCHENAID ®COOKTOP, BUILT-IN RANGE WARRANTY ONE-YEAR OVEN AND FULL WARRANTY For one year from the date of purchase, when this appliance is operated and maintained according to instructions attached to or furnished with the product, KitchenAid will pay for factory specified parts and repair labor costs to correct defects in materials or workmanship. Service must be provided by a KitchenAid designated service company.