Kitchen_kid ELECTRIC ........ In Canada, call for assistance 1-800-461-5681, _ RANGE ( _)'_:_i:_: k for installation and service, call: 1-800-807-6777 or visit our website at... www.KitchenAid.ca CUISINIERE ELECTRIQUE Au Canada, pour assistance composez le 1-800-461-5681, pour installation ou service composez le 1-800-807-6777 ou visitez notre site web &... www.KitchenAid.ca Table of Contents/Table Models/Modeles 9758876A YKERI201 des matieres ..........................................
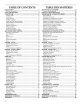
TABLE OF CONTENTS RANG E SAFETY ............................................................................. The Anti-Tip Bracket .................................................................... PARTS AND FEATURES ................................................................ COOKTOP USE .............................................................................. Ceramic Glass .............................................................................. Cookware ...................................
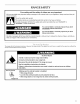
RANGE SAFETY Your safety and the safety of others are very important. We have provided many important safety messages in this manual and on your appliance. Always read and obey all safety messages. This symbol alerts you to potential hazards that can kill or hurt you and others. All follow the safety alert symbol and either the word "DANGER" or Thissafety is themessages safety alertwillsymbol. "WARNING.
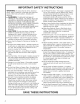
iMPORTANT SAFETY iNSTRUCTiONS WARNING: To reduce the risk of fire, electrical shock, injury to persons, or damage when using the range, follow basic precautions, including the following: ,, WARNING: TO REDUCE THE RISK OF TIPPING OF THE RANGE, THE RANGE MUST BE SECURED BY PROPERLY INSTALLED ANTI-TIP DEVICES. TO CHECK IF THE DEVICES ARE INSTALLED PROPERLY, SLIDE RANGE FORWARD, LOOK FOR ANTI-TIP BRACKET SECURELY ATTACHED TO FLOOR, AND SLIDE RANGE BACK SO REAR RANGE FOOT IS UNDER ANTI-TIP BRACKET.
IMPORTANT SAFETY INSTRUCTIONS • Keep Oven Vent Ducts Unobstructed. For self-cleaning ranges - • Placement of Oven Racks - Always place oven racks in desired location while oven is cool. If rack must be moved while oven is hot, do not let potholder contact hot heating element in oven. • DO NOT TOUCH HEATING ELEMENTS OR INTERIOR SURFACES OF OVEN - Heating elements may be hot even though they are dark in color. Interior surfaces of an oven become hot enough to cause burns.
PARTS AND FEATURES This manual covers several different models. The cooktop you have purchased may have some or all of the items listed. The locations and appearances of the features shown here may not match those of your model. Control Panel (Model YKERA205) A B C D E F i i_ sim_+r J iii' oF, OFF 0% 88 \ G H A. Surface indicator B. Left rear simmer on/off switch C. Cooktop power on indicator light J G. Left rear control knob D. Oven display E. Oven control panel F.
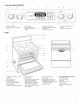
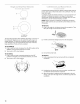
Control Panel (Model YKERI201) A C B D J ,9 E B L J oo o_o ji _¸_l_d o o _] F I G A. Surface indicator B. Cooktop power on indicator light / C. Oven display D. Oven control panel E. Right front simmer on/off switch R Left rear control knob G. Left front control knob (dualsize element) H. Right front control knob J I, Warm zone element on/off switch J, Right rear control knob Range F G A B A. Warm zone element (on some models) B. Dual-size element C. Anti-tip bracket D.
COOKTOP USE Use flat-bottomed cookware for best heat conduction and energy efficiency. Cookware with rounded, warped, ribbed or dented bottoms could cause uneven heating and poor cooking results. The surface cooking area will glow red when an element is on. It will cycle on and off, at all settings, to maintain the selected heat level. Wiping off the cooktop before and after each use will help keep it free from stains and provide the most even heating.
Use the following characteristics. chart as a guide for cookware material COOKWARE CHARACTERISTICS Aluminum • Heats quickly and evenly. • Suitable for all types of cooking. • Medium or heaw thickness is best for most cooking tasks. • Heats slowly and evenly. • Good for browning and frying. • Maintains Cast iron heat for slow cooking. Ceramic or • Follow manufacturer's Ceramic glass • Heats slowly, but unevenly. instructions. • Ideal results on low to medium heat settings.
Coil elements should be level for optimal cooking results. Burner bowls, when clean, reflect heat back to the cookware. They also help catch spills. Cookware should not extend more than 1" (2.5 cm) over the coil element. If cookware is uneven or too large, it can produce excess heat causing the burner bowl to change color. For more information, see the "General Cleaning" section. A ..................... A.
The Simmer feature is an adjustable heat setting for more precise simmering. It is the right front (and left rear on some models) surface cooking areas or elements. When the Simmer feature is not on, the right front surface cooking areas or elements will function as usual. The lift-up cooktop provides easy access for cleaning beneath. Do not drop the cooktop. Damage could occur to the finish and the cooktop frame. For more information, see the "General Cleaning" section.
ELECTRONIC OVEN CONTROL Style I Electronic Oven Control (Convection - Models YKERA205 and YKERI204) B C Maxi Bake Ecor Broil A E F G Bread Broll ilooo© D Proof Low Self Clean Cook Duration -=10 Stop Time TIMER Set/Start Off Clock get/Start High H J A. Convection oven settings B. Oven settings C. Proof bread setting D. Oven display E. Clock/time of day display K L N M F. Number pads G. Options selection pad H. EASY CONVECT TM conversion I. Self-clean L. Timer M.
Style 3 Electronic Oven Control (Non-Convection A Model KERI201) B G D E / ! Bake Broil _ ©®® ®®® ©®® © Bread Proof ....1o o o 350 o 4000 425 o Self Clean G A. Oven settings B. Proof bread setting C. Oven display D. Clock/time of day display E. Number pads Cook Duration H Stop Time TIMER Set/Start I Off J Clock Set/Start \ M K F Options selection pad G. Self-clean J. Timer K. Clock set/start H. Cook time (length of cooking time) I. Stop time L. Oven light ON/OFF M. Off N N.
If not pressed within 4 minutes, the display will return to the time of day mode and the programmed function will be canceled. The Timer counts down the set time. On models with electronic oven control Style 1, the timer can be set in minutes and seconds or hours and minutes. NOTE: The Timer does not start or stop the oven. 1. Press TIMER SET/START. On models with electronic oven control Style 1, press again to switch from MIN/SEC and HR/MIN.
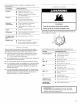
OPTIONS- STYLES 2 AND 3 Preheat Completion Tone One beep indicates a preheat cycle has been completed. The OPTIONS selection pad allows you to access special functions within the Electronic Oven Control that allow you to customize the product to your needs. These special functions allow you to change the oven temperature between Fahrenheit and Celsius, turn the audible signals and prompts on and off and adjust the oven calibration. The Sabbath Mode is also set using the OPTIONS selection pad.
OVEN USE Odors and smoke are normal when the oven is used the first few times, or when it is heavily soiled, IMPORTANT: The health of some birds is extremely sensitive to the fumes given off, Exposure to the fumes may result in death to certain birds. Always move birds to another closed and well ventilated room, On models without a temperature probe, always rely on a meat thermometer to determine doneness of meat and poultry. The internal temperature, not appearance, is what counts.
To Use: Before using, insert the probe into the center of the thickest portion of meat or into the inner thigh or breast of poultry, away from fat or bone. Place food in oven and connect the temperature probe to the jack. Keep probe as far away from heat source as possible. Close oven door. iI A A. Oven vent (on some ceramic glass models) -- A. Temperature probe jack B. Temperature probe 1. 2. Press the number pads to enter a probe temperature.
BAKEWARE IMPORTANT: Do not place food or bakeware directly on the oven door or bottom. Permanent damage will occur to the porcelain finish. To cook food evenly, hot air must be able to circulate. Allow 1" (2.5 cm) of space around bakeware and oven walls. Use the following chart as a guide. RACKS NOTES: • Position racks before turning the oven on. • Do not position racks with bakeware on them. • Make sure racks are level. NUMBER OF PAN(S) POSITION ON RACK 1 Center of rack.
Broiling uses direct radiant heat to cook food. Use MAXI/ECONO (on some models) for broiling regular-sized and smaller cuts of meat, poultry and fish. Broil MAXl uses both top elements for maximum browning coverage of foods. Broil ECONO uses the inner element for browning coverage of a smaller area. Before broiling, position rack according to Broiling Chart. It is not necessary to preheat the oven before putting food in unless recommended in the recipe.
4. Press START. "CHECK FOOD AT" and the stop time will appear on the oven display. In a convection oven, the fan-circulated hot air continually distributes heat more evenly than the natural movement of air in a standard thermal oven. This movement of hot air maintains a consistent temperature throughout the oven, cooking foods more evenly, crisping surfaces while sealing in moisture and yielding crustier breads.
2= Press START. CONVECTION "Lo °'' will appear on the oven display if the actual oven temperature is under 170°F (77°C). When the oven temperature reaches 170°F (77°C), the oven display will show the actual oven temperature until the set point is reached. When the set temperature is reached one preheat completion tone will sound if tones are turned on. 3. Press OFF when finished cooking.
During convection broiling, the broil elements will cycle on and off in intervals to maintain oven temperature, while the fan constantly circulates the hot air. The temperature is preset at 450°F (232°C) on models with electronic oven control Style 1 and 500°F (260°C) on models with electronic oven control styles 2 and 3, but can be changed to a different temperature. Cooking times will vary depending on the rack position and temperature and may need to be adjusted.
To Regularly Set, Untimed: 1. Press BAKE, Press the number pads to enter a temperature other than 325°F (163°C), The bake range can be set between 170°F and 500°F (77°C and 260°C). The Sabbath Mode sets the oven to remain on in a bake setting until turned off. A timed Sabbath Mode can also be set to keep the oven on for only part of the Sabbath. When the Sabbath Mode is set, only the number and start pads will function, no tones will sound, and the displays will not show messages or temperature changes.
Temperature Change The oven temperature can be changed when the oven(s) are in the Sabbath Mode. No tones will sound and the display will not change. The heating elements will not turn on or off for a random time, anywhere from 16 to 24 seconds. It may take up to 1/2hour for the oven to change temperature. Number pads 1 through 0 represent temperatures. following chart as a guide.
RANGE CARE How the Cycle Works IMPORTANT: The heating and cooling of porcelain on steel in the oven may result in discoloring, loss of gloss, hairline cracks and popping sounds. The Self-Cleaning cycle uses very high temperatures, to a powdery ash. burning soil The oven is preset for a 2 hour 30 minute clean cycle; however, the time can be changed by selecting one of the cleaning levels.
To Delay Start Self-Clean: Before delay starting Self-Clean, make sure the clock is set to the correct time of day. See "ClocWTimer Display" section. Also, make sure the door is closed completely or it will not lock and the cycle will not begin. 1. Press SELF CLEAN. To set a clean time other than 2 hours 30 minutes, press SELF CLEAN until the desired time is reached. The clean time can be set between 2 hours 30 minutes and 4 hours 30 minutes. 2. Press STOP TIME. 3. 4.
CONTROL PAN EL Do not use abrasive cleaners, steel-wool pads, gritty washcloths or some paper towels. Damage may occur. • Glass cleaner and soft cloth or sponge: Apply glass cleaner to soft cloth or sponge, not directly on panel. COIL ELEMENTS The oven light(s) is a 40-watt appliance bulb. The light(s) will come on when the oven door is opened. The light(s) will not work during the Self-Cleaning cycle.
For normal range use, it is not suggested to remove the oven door. However, if removal is necessary, make sure the oven is off and cool. Then follow these instructions. The oven door is heavy. Before Removing: 1. Use a putty knife or screwdriver corner of the door stop clip. To Replace: 1. Grasp the door on the sides with your fingers on the front of the door and your thumbs on its inside surface. 2. Hold oven door so that the top edge of each hinge hanger is horizontal.
TROUBLESHOO NG Try the solutions suggested here first in order to avoid the cost of an unnecessary service call. Display shows messages Nothing will operate • Is the power supply cord unplugged? Plug into a grounded outlet. • Has a household fuse blown, or has a circuit breaker tripped? Replace the fuse or reset the circuit. Cooktop Is the display showing a letter followed by a number? Press OFF to clear the display. If it reappears, call for service. See "Assistance or Service" section.
ASSISTANCE OR SERVICE Before calling for assistance or service, please check "Troubleshooting." It may save you the cost of a service call. If you still need help, follow the instructions below. When calling, please know the purchase date and the complete model and serial number of your appliance. This information will help us to better respond to your request. If you need replacement parts If you need to order replacement parts, we recommend that you use only factory specified parts.
KITCHENAID ®COOKTOP, BUILT-IN OVEN AND RANGE WARRANTY ONE-YEAR FULL WARRANTY For one year from the date of purchase, when this appliance is operated and maintained according to instructions attached to or furnished with the product, KitchenAid will pay for factory specified parts and repair labor costs to correct defects in materials or workmanship. Service must be provided by a KitchenAid designated service company.
P P %. SECURITE DE LA CUISINIERE Votre s6curit6 et celle des autres est tr6s importante. Nous donnons de nombreux messages de s6curit6 importants dans ce manuel et sur votre appareil m6nager. Assurez-vous de toujours lire tous les messages de s6curit6 et de vous y conformer. _ Ce symbole d'alerte de s6curit6 vous signale les dangers potentiels de d6c6s et de blessures graves & vous et & d'autres. oici le symbole d'alerte de s6curit6.
llVIPORTANTES iNSTRUCTiONS AVERTISSEMENT : Pour r6duire le risque d'incendie, de choc 61ectrique, de blessures ou de dommages Iors de I'utilisation de la cuisini_re, Jl convient d'observer certaines pr6cautions 616mentaires dont les suivantes : [] AVERTISSEMENT : POUR MINIMISER LE RISQUE DE BASCULEMENT DE LA CUISINIERE, ELLE DOlT €:TRE BIEN iMMOBILIS¢:E PAR DES DISPOSITIFS ANTIBASCULEMENT CORRECTEMENT INSTALLES.
IMPORTANTES INSTRUCTIONS [] Ne pas tremper les el6ments de chauffage amovibles - Les el6ments de chauffage ne doivent jamais 6tre immerges dans I'eau. [] Ne pas faire cuire sur une table de cuisson endommagee - Si la table de cuisson est brisee, les solutions de nettoyage et les renversements peuvent pen6trer dans la table de cuisson brisee et creer un risque d'un choc electrique. Contacter immediatement un technicien qualifie.
PIECES ET CARACTERIS QUES Ce manuel couvre articles enumeres. plusieurs modeles differents. La table de cuisson L'emplacement et I'apparence des caracteristiques que vous avez achetee peut comporter quelques-uns ou tousles illustrees 3euvent ne pas correspondre a ceux de votre modele. Tableau de commande (ModUle YKERA205) A B C D G C H I A. Indicateur de surface B. Commutateur marche/arr6t de la zone de mijotage arriere gauche C. T_moin lumineux d'alimentation de la table de cuisson D.
Tableau decommande(ModUle YKERI201) A B C D L ,i J E \ ,\ B A ,f ooo o o OFF OFF F 000 • 0 G A. Indicateur de surface B. T6moin lumineux d'alimentation de la table de cuisson C. Afficheur du four D. Tableau de commande du four ooQ o o ® H E. Commutateur marche/arr_t de 1'616ment de mijotage avant droit F. Commande de 1'616ment arriere gauche G. Commande de 1'616ment avant gauche (616ment double dimension) H. Commande de 1'616ment avant droit I J I.
UTILISATION DE LA TABLE DE CUISSON Utiliser des ustensiles de cuisson a peu pres de la m6me dimension que la zone de cuisson a la surface. Les ustensiles ne doivent pas depasser de plus de 1/2"(1,25 cm) a I'exterieur de la zone de cuisson. La zone de cuisson a la surface deviendra rouge Iorsqu'un element est allume. L'el6ment s'allumera et s'eteindra, a tous les reglages, pour maintenir le niveau de temperature choisi.
Sur certains antiadhesive modeles, les plaques a frire avec surface ne doivent pas _tre utilisees dans la r6tissoire. Utiliser le tableau suivant comme guide du materiau d'ustensile de cuisson. pour les caracteristiques USTENSILE CARACTERISTIQUES Aluminium • Chauffe rapidement • Convient &tous • Une _paisseur moyenne ou for_e convient le mieux pour la plupar_ des t&ches de cuisson. • Chauffe lentement • Convient pour le brunissage • Maintient la chaleur pour une cuisson lente.
y> N'OUBLIEZ PAS : Quand I'appareil est utlise ou (sur certains modeles) durant le programme d'autonettoyage, toute la surface de la table de cuisson peut devenir chaude. ....................... ............... ,1 ,,, ,=I I,II L I,II ,'_ Les _16ments en spirale devraient _tre a niveau pour une cuisson ideale, Les cuvettes de brQleurs, Iorsqu'elles sont propres, reflechissent la chaleur sur I'ustensile de cuisson. Elles aident egalement a contenir les renversements.
Utilisation : 1. Regler le commutateur appuyant a gauche). SIMMER (mijoter) a ON (marche) (en 2. Choisir le reglage de temperature desire entre LO et HI. 3. Regler le commutateur SIMMER (mijoter) a OFF (arr_t) (en appuyant a droite) apres avoir termine pour que I'el6ment fonctionne normalement. Sirnme[ Ge. La table de cuisson relevable permet d'acceder facilement endessous pour le nettoyage. Ne pas I'echapper ce qui risquerait d'endommager le fini et le ch&ssis de la table de cuisson.
P COMMANDE ELECTRONIQUE DU FOUR Commandes 41ectroniques du four Style I (convection - mod41es YKERA205 et YKERI204) B Bake Maxi Broil C ilooo© A Econo Broil D E G Bread Proof =i;o ....... \oooG Baked Meats __EASygE_//_ Goods Other Foods H K A. R6glages du four a convection B. R6glages du four C. R6glage pour la levee du pain D. Affichage du four E. Horloge/affichage de I'heure £ Touches num6riques L N M O P L. Minuterie G. Touche de s4lection des options H.
Commandes _lectroniques du four Style 3 (non-convection - module YKERI201) C D E / / Bread Bake Broil Proof ....10 O© 350 ° 400 ° 425 _ Self Clean G Cook Duration H Stop Time I A. R_glages du four F Touche de s_lection B. R#glage pour la levee du pain C. Affichage du four D. Horloge/Affichage de I'heure E. Touches num_riques G.Autonettoyage H. Dur#e de la cuisson I. Heure d'arr_t Lorsqu'on entre de multiples fonctions dans un r6glage, faire une breve pause entre chaque commande.
Si aucune fonction n'est entree apr_s 4 minutes, I'afficheur retourne au mode d'affichage de I'heure. Cette horloge de 12 heures n'indique pas a.m ou p.m. 1. Appuyer sur CLOCK SET/START (reglage de I'horloge/mise en marche). 2. Appuyer sur les touches numeriques 3. Appuyer sur CLOCK SET/START (reglage de I'horloge/mise en marche). 2, Appuyer sur les touches numeriques pour regler la duree. 3. Appuyer sur TIMER SET/START (reglage de la minuterie/mise en marche) pour mettre la minuterie en marche.
Volume des signaux sonores Le volume est prer6gl6 & fort, mais il peut @re baiss& Modification : Appuyer sur OPTIONS puis sur 3 pour baisser le volume. Appuyer sur OPTIONS puis sur 3 pour augmenter le volume des signaux sonores. ..... i AJUSTEMENT EN °F (CHANGEMENT AUTOMATIQU EN °C) CUlT LES ALIMENTS E 10°F (5°C) ...un peu plus 20°F (10°C) ...mod4r4ment 35°F (15°C) ...beaucoup -10°F (-5°C) ...un peu moins -20°F (-10°C) ...mod4r4ment -35°F (-15°C) ...beaucoup plus ............
_-*_4_ ¸'_b_ ....... _"_ d_ _ _ _m_:,_."_2__ _..... _ _'_• ......... {O1_,o_• IMPORTANT : Ne pas utiliser de thermometre pour mesurer la temp@ature du four car I'ouverture de la porte du four peut provoquer des lectures incorrectes. Le four fournit des temp@atures precises; toutefois, il peut cuire plus rapidement ou plus lentement que votre ancien four, de sorte que le calibrage de la temp@ature peut _tre ajust& II peut _tre change en degres Fahrenheit ou Celsius.
3, Appuyer sur START (mise en marche). La temperature du four choisie apparaft sur I'afficheur tout au long de la cuisson. L'afficheur indiquera "Lo °'' comme temperature de la sonde jusqu'a ce que la temperature interne de I'aliment atteigne 130°F (54°C). Ensuite, I'afficheur indique la temperature au m_me rythme que la temperature de I'aliment augmente. Lorsque la temperature de la sonde est atteinte, le four s'eteint automatiquement et "Cooking Complete" (cuisson terminee) apparaft sur I'afficheur.
Cuisson y* _X"v_:_ _ ___:___;:_ _w_"__:_____ i_:O_:_i_: A ............................ _ A. Event de la porte du four De Fair chaud et de I'humidite s'echappent de I'event de la porte Iors de I'utilisation de certains modes du fou£ Une certaine condensation peut se produire. Toutefois elle n'affectera pas la performance de cuisson. IMPORTANT : Ne pas placer les aliments ou les ustensiles de cuisson directement sur la porte ou le fond du four.
2. Appuyer sur START (mise en marche). Cuisson Style 1: "Lo °'' et "Preheating" apparaftront sur I'affichage du four si la temperature reelle du four est inferieure & 170°F (77°C). Lorsque la temperature a atteint 170°F (77°C), I'afficheur indiquera "Preheating" ainsi que la temperature jusqu'a ce que le niveau regle soit atteint. 1.
ALIMENTS POSITION DE LA GRILLE TEMP. DUREE TOTALE MIN. C6telettes d'agneau 1" (2,5 cm) d'_paisseur 4 400°F (204°C) 18-20 Poulet morceaux 3 500°F (260°C) 32 3 3 350°F (177°C) 20 20-22 avec os Poisson _/2"(1,25 cm) d'_paisseur 1" (2,5 cm) d'_paisseur *Placer jusqu'& 12 galettes, _galement lechefrite.
La commande du four ajuste automatiquement la temperature correcte de cuisson par convection Iorsque la cuisson commence en abaissant la temperature de 50°F (28°C). 2. 2. "Lo °'' apparaftra sur I'afficheur si la temperature du four est inferieure a 170°F (77°C). Une fois qu'une temperature de 170°F (77°C) est atteinte, I'affichage indique la temperature jusqu'a ce le niveau regle soit atteint. Appuyer sur START (mise en marche).
TABLEAU DE ROTISSAGE ALIMENT/ POSITION DE LA GRILLE PAR CONVECTION DUREE DE CUISSON (en minutes/Ib [454g]) TEMP. DU FOUR TEMP. INTERNE DE [.
Utilisation La caracteristique CONVECT FULL MEAL (repas complet par convection) vous permet de cuire des aliments differents pendant la m_me duree de cuisson s'ils necessitent des temperatures de cuisson similaires. Le programme Convect Full Meal (repas complet par convection) propose 10 programmes de cuisson preregles. Une seule touche programme le four, la temperature du four et la duree de cuisson ou la temperature de sonde.
D_sactivation : Style 1 : Appuyer sur OPTIONS, puis appuyer sur la touche numerique 7. "SABBATH ENABLED" apparaftra sur I'afficheur. 5, Le four peut _tre desactive de la capacite a regler le mode Sabbat en rep6tant les etapes precedentes. Voir la section "Activation". Lorsqu'il est desactiv6, le mode Sabbat ne peut _tre regle normalement avant d'6tre reactive. Pour un r_glage normal, non minut_ : 1. Appuyer sur BAKE (cuisson au four).
5. La levee du pain prepare la p&te pour la cuisson en faisant agir la levure. Suivre les instructions de la recette. Appuyer sur OFF (arr_t) ou ouvrir la porte du four pour arr_ter les signaux sonores de rappel. R_glage de la dur_e de cuisson et de rheure d'arr_t (mise en marche diff_r_e) : Avant le reglage, s'assurer que I'horloge est reglee a la bonne heure. Voir la section "Affichage horloge/minuterie".
ENTRETIEN DE LA CUISINIERE Essuyer toute salete restante afin de des dommages./_, des temperatures reagissent avec la porcelaine. Cette legeres taches blanches, des taches Ceci n'affectera pas la performance reduire la fumee et eviter elevees, les aliments reaction peut causer de intenses ou des piqQres. de cuisson. Preparation de la table de cuisson et du tiroir de remisage : • Enlever les articles de plastique de la table de cuisson car ils peuvent fondre.
Autonettoyage : Avant I'autonettoyage, s'assurer que la porte est completement fermee sinon erie ne se verrouillera pas et le programme ne commencera pas. 1. Appuyer sur SELF CLEAN (autonettoyage). Pour programmer une duree de nettoyage autre que 2 heures 30 minutes, appuyer sur SELF CLEAN jusqu'& ce que la duree desiree soit atteinte. La duree de nettoyage peut _tre programmee entre 2 heures 30 minutes et 4 heures 30 minutes. 2.
Souillure I_g_re a moder_e • EXTERIEUR DE LA PORTE DU FOUR Essuie-tout ou eponge humide propre : nettoyer pendant que la table de cuisson est encore tiede. Vous voudrez peut-_tre porter des mitaines de four pour ce nettoyage. Renversements sirop) • de matibres Nettoyant a vitres et essuie-tout ou tampon a recurer en plastique non abrasif : appliquer le nettoyant & vitre sur un chiffon doux ou une eponge, et non pas directement sur le tableau.
CAVITI_ DU FOUR Ne pas utiliser de nettoyants a four. Les renversements d'aliments devraient _tre nettoyes Iorsque le four est refroidi./_, des temperatures elevees, les aliments reagissent avec la porcelaine et cette reaction peut causer de legeres taches blanches, des taches intenses ou des piqQres. • Programme d'autonettoyage d'autonettoyage". Tourner I'ampoule dans le sens antihoraire et I'enlever de la douille. 4.
Pour enlever : 1. 3, Ouvrir la porte du four. Inserer les goupilles d'enlevement de la porte, livrees avec la cuisiniere, dans les deux supports de charniere. Ne pas retirer les goupilles pendant que la porte est enlevee de la cuisini_re. Incliner le dessus de la porte vers la cuisiniere. Glisser les supports de charniere sur les goupilles d'appui du ch&ssis I'avant. S'assurer que les supports de charnieres sont bien engages et reposent sur les goupilles d'appui. A. Supports de charniere B.
P DEPANNAGE Essayer les solutions sugger6es ici d'abord afin d'eviter le coot d'une visite de service non necessaire. Rien ne fonctionne La temp6rature • Est-ce que le cordon d'alimentation est d6branch6? Brancher sur une prise reliee & la terre. • Un fusible est-il grill6 ou le disjoncteur s'est-il ouvert? Remplacer le fusible ou remettre le disjoncteur en fonction.
Les grilles sont-elles en bonne position? Voir la section "Positionnement des grilles et ustensiles de cuisson" La porte a-t-elle _t6 ouverte pendant la cuisson? L'ouverture de la porte pour verifier la cuisson laisse la chaleur du four s'echapper et peut necessiter des durees de cuisson plus Iongues. Existe-t-il une circulation d'air appropri6e autour des ustensiles de cuisson? Voir la section "Positionnement des grilles et ustensiles de cuisson".
DE TABLE DE CUISSON, FOUR ENCASTRE ET CUISINIERE KITCHENAnY GARANTIE COMPLI_TE DE UN AN Pendant un an & partir de la date d'achat, Iorsque cet appareil m6nager est utilis6 et entretenu conform4ment aux instructions fournies avec le produit, KitchenAid paiera pour les pi_ces sp6cifi6es par le fabricant et les frais de main-d'oeuvre pour la correction des vices de mat6riaux ou de fabrication. Les r¶tions doivent _tre effectu6es par un 6tablissement de service d&sign& par KitchenAid.
9758876A © 2004. All rights reserved. Tous droits reserves. ® Registered Trademark/TM Trademark of KitchenAid_ U.S.A., KitchenAid Canada licensee in Canada @ Marque d6pos_e/TM Marque de commerce de KitchenAid. U.S.A., Emploi licencie par KitchenAid Canada au Canada 5/04 Printed in U.S.A. Imprime aux E.-U.