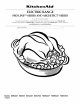
Ki|chen_kid ® ELECTRIC RANGE PRO LINE TMSERIES AND ARCHITECT For questions In Canada, about call for assistance features, operation/pe_ormanee, 1-800-461-5681, parts, accessories for installation www.kitchenaid.com and service, or service, DSERIES call: 1-800-422-1230 call: 1-800-807-6777 or visit our website or www.KitchenAid.ca Table of Contents ............................................................................................................
TABLE OF CONTENTS RANG E SAFETY ............................................................................. The Anti-Tip Bracket .................................................................... PARTS AND FEATURES ................................................................ 3 3 6 COOKTOP USE .............................................................................. 8 Ceramic Glass .............................................................................. 8 Cookware .......................
RANGE SAFETY Your safety and the safety of others are very important. We have provided many important safety messages in this manual and on your appliance. Always read and obey all safety messages. This symbol alerts you to potential hazards that can kill or hurt you and others. All follow the safety alert symbol and either the word "DANGER" or Thissafety is themessages safety alertwillsymbol. "WARNING.
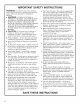
iMPORTANT SAFETY iNSTRUCTiONS WARNING: To reduce the risk of fire, electrical shock, injury to persons, or damage when using the range, follow basic precautions, including the following: ., WARNING: TO REDUCE THE RISK OF TIPPING OF THE RANGE, THE RANGE MUST BE SECURED BY PROPERLY INSTALLED ANTI-TIP DEVICES. TO CHECK IF THE DEVICES ARE INSTALLED PROPERLY, SLIDE RANGE FORWARD, LOOK FOR ANTI-TIP BRACKET SECURELY ATTACHED TO FLOOR, AND SLIDE RANGE BACK SO REAR RANGE FOOT IS UNDER ANTI-TIP BRACKET.
IMPORTANT SAFETY INSTRUCTIONS • Keep Oven Vent Ducts Unobstructed. For self-cleaning ranges - • Placement of Oven Racks - Always place oven racks in desired location while oven is cool. If rack must be moved while oven is hot, do not let potholder contact hot heating element in oven. • DO NOT TOUCH HEATING ELEMENTS OR INTERIOR SURFACES OF OVEN - Heating elements may be hot even though they are dark in color. Interior surfaces of an oven become hot enough to cause burns.
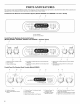
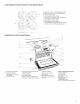
PARTS AND FEATURES This manual covers several different models. The range you have purchased may have some or all of the items listed. The locations and appearances of the features shown here may not match those of your model. Control Panel for Electronic Touch Activated System (Models KESV908 and YKESV908 - Pro Line TM Series) A B d J TM J J ,! A. Oven Display B.
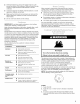
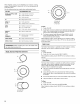
Cooktop Element Controls for Electronic Touch Activated System J A. Right Rear Touch Control (Dual-Size Element) B. Right Front Touch Control (Single Element) C. ALL OFF Control Lock D. Zone diameter indicator (Triple) E. Left Front Touch Control (Triple-Size Element) E Zone diameter indicator (Dual) G. Hot Surface Indicator Lights H. Zone diameter indicator (Single) I, Increase/Decrease Temperature Touch Control J.
Range (Standard and Electronic Knob Control System) H A J B K L M F A. Warming Zone Element (on some models) B. Dual-Size Element C. Temperature Probe Jack (not shown) D. Anti-Tip Bracket E. Model and Serial Number (behind left side of drawer) E Warming Drawer (Storage Drawer on some models) G. Ceramic Glass Surface Cooking Area H. Selectable Simmer Feature (available on left rear on some models) I. Hot Surface Indicator J. Control Panel Lights K. Automatic Oven Light L. Door Gasket M.
Determine flatness byplacing thestraight edgeofa ruler across thebottomofthecookware. Whileyourotatetheruler, nospace orlightshouldbevisiblebetween itandthe cookware. Cookware designed withslightlyindented bottoms orsmall expansion channels canbeused. Makesurethebottoms ofpotsandpansarecleananddry before usingthem.Residue andwatercanleavedeposits whenheated. • Donotcookfoodsdirectly onthecooktop. IMPORTANT: cooking area, Do not leave empty cookware element or surface burner.
When finished cooking, touch ON/OFF to turn surface cooking area(s) off individually, or touch ALL OFF to turn all elements off at the same time. Use the following chart as a guide when setting heat levels. A SETTING RECOMMENDED USE DUAL and TRIPLE-SIZE ELEMENTS • Large diameter cookware. • Large quantities • Home canning. HI • Bring liquid to a boil. MED- HI [8-10] • • Hold a rapid boil. Quickly brown or sear food. MED • Maintain a slosw boil. [6-7] • Fry or saut_ foods.
Simmer ,_, .... ¢ ,, ,, t, The Simmer function is available on all the surface cooking elements. It has an adjustable heat setting for more precise simmer control. Three levels of simmer are available. The recommended setting will vary depending on the quantity and density of the food being cooked as well as the size and shape of the cookware being used. To Use: 1. Touch ON/OFR 2. Touch the "up" arrow to select the desired simmer setting.
SETTING RECOMMENDED USE WARM • Keep cooked foods warm. MELT • Melt chocolate or butter. REMEMBER: When range is in use or (on some models) during the Self-Cleaning cycle, the entire cooktop area may become hot. Warm The Warm function is available on all the surface cooking elements, and is ideal for keeping cooked foods warm. Do not use it to heat cold foods. One hour is the recommended maximum time to maintain food quality. • Use only cookware and dishes recommended cooktop use.
Hot Surface Indicator Light The hot surface indicator light will glow as long as any surface cooking area is too hot to touch, even after the surface cooking area(s) is turned off. SETTING RECOMMENDED USE SIMMER Switch (on some models) • Precise simmer control. WARM ZONE Element Switch • Keep cooked foods warm. REMEMBER: When range is in use or (on some models) during the Self-Cleaning cycle, the entire cooktop area may become hot. Single and Dual-Size Elements AO A.
Simmer POWER ON Lights The Simmer feature is an adjustable heat setting for more precise simmering. It is the right front (and left rear on some models) surface cooking areas or elements. When the Simmer feature is not on, the right front surface cooking areas or elements will function as usual. Each control knob has a POWER ON light. The light will glow when its control knob is on. off @ ..................... A When this feature is on, the wattage to the burner is significantly reduced.
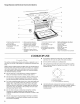
ELECTRONIC OVEN CONTROL Style I (Electronic Touch Activated and Electronic C Knob Control Systems) D E F G © ®®@ ©®® ....... \o o o oj Bake Irol R_t M_ X ,Q..o. Meats Goods Foods WARMING DRAWER on Off Self Clean Cook Duration Stop Time TIMER Set/Start Off EA_YgVlCT H Clock Oven Light .,..... ©® \,,/ A. EASYCONVECT B. Convection TM / J K G.Number Pads H. Options Selection Pad I. Warming Drawer J. Self-Clean Conversion Oven Settings C. Oven Settings D. Proof Bread Setting E.
The START pad begins any oven function except the Timer, Control Lock and Sabbath Mode. If not pressed within 5 seconds after pressing a pad, "START?" will appear on the oven display as a reminder. If not pressed within 5 minutes after pressing a pad, the oven display will return to inactive mode (blank) and the programmed function will be canceled. The Control Lock shuts down the control panel pads to prevent unintended use of the oven. The Control Lock is preset unlocked, but can be locked.
The Timer can be set in minutes and seconds or hours and minutes and counts down the set time. The bakeware manufacturer's material affects cooking results. Follow recommendations and use the bakeware NOTE: The Timer does not start or stop the oven. 1. Press TIMER SET/START. recommended in the recipe. Press again to switch from MIN/SEC and HR/MIN. If no action is taken after 4 minutes, the display will return to the time of day mode. 2. 3. Press the number pads to set length of time.
Press START. The set oven temperature will appear on the oven display throughout cooking. "Lo °'' will appear as the probe temperature until the internal temperature of the food reaches 130°F (54°C). Then the display will show the temperature increasing in 5°F increments. When the set probe temperature is reached, the oven will shut off automatically and "End" will appear on the oven display. If enabled, end-of-cycle tones will sound, then reminder tones will sound every minute.
BAKEWARE IMPORTANT: Do not place food or bakeware directly on the oven door or bottom. Permanent damage will occur to the porcelain finish. RACKS NOTES: • Position racks before turning the oven on. • Do not position racks with bakeware on them. • Make sure racks are level. To cook food evenly, hot air must be able to circulate. Allow 1" (2.5 cm) of space around bakeware and oven walls. Use the following chart as a guide. NUMBER OF PAN(S) POSITION ON RACK 1 Center of rack.
The BAKE function is ideal for baking, roasting or heating casseroles. During baking or roasting, the bake and broil elements will cycle on and off in intervals to maintain oven temperature. If the oven door is opened during baking or roasting, the broil element will turn off immediately and the bake element will turn off in 30 seconds to 2 minutes. They will come back on once the door is closed. To Bake or Roast: 2.
To Use: Before using convection temperature conversion for BAKED GOODS and OTHER FOODS, allow the oven to preheat before placing food in the oven. In a convection oven, the fan-circulated hot air continually distributes heat more evenly than the natural movement of air in a standard thermal oven. This movement of hot air maintains a consistent temperature throughout the oven, cooking foods more evenly, crisping surfaces while sealing in moisture and yielding crustier breads. 1.
CONVECTION Food/Rack Position Convection roasting can be used for roasting meats and poultry, or for baking yeast breads and loaf cakes using a single rack. During convection roasting, the bake and broil elements will cycle on and off in intervals to maintain oven temperature, while the fan constantly circulates the hot air. If the oven door is opened during convection roasting, the broil element and convection fan will turn off immediately and the bake element will turn off within 2 minutes.
PAD/OVEN SETTING OVEN TEMP. COOK TIME or PROBE TEMP. FOOD or MEAL During convection broiling, the broil elements will cycle on and off in intervals to maintain oven temperature, while the fan constantly circulates the hot air. 5 Convection Bake 425°F (218°C) 20 min. Baked Salmon Steaks, Roasted Vegetable Wedges, Biscuits The temperature is preset at 500°F (260°C), but can be changed to a different temperature.
5. Press OPTIONS, and then press number pad 7. "SABBATH MODE" will appear on the display. The Sabbath Mode sets the oven to remain on in a bake setting until turned off. A timed Sabbath Mode can also be set to keep the oven on for only part of the Sabbath. 6. When the stop time is reached, the oven will automatically turn off. The oven control will remain Sabbath Mode compliant until the OFF button is pressed.
2. Press START. Let the dough rise until nearly doubled in size, checking after 20-25 minutes. Proofing time may vary depending on dough type and quantity. 3. When the stop time is reached, the oven will shut off automatically, and end-of-cycle tones will sound, then reminder tones will sound every minute. 7. Press OFF to stop reminder tones or open the oven door. Press OFF when finished proofing. Before pan(s) spray.
Warming Drawer Temperature Chart Different foods require different settings in order to maintain the ideal serving temperature. Use the following chart as a guide.
Prepare Cooktop and Storage Drawer: • Remove plastic items from the cooktop because they may melt. • Remove all items from the storage drawer. How the Cycle Works IMPORTANT: The heating and cooling of porcelain on steel in the oven may result in discoloring, loss of gloss, hairline cracks and popping sounds. The Self-Cleaning cycle uses very high temperatures, to a powdery ash.
CONTROL CERAMIC GLASS (on some models) PAN EL Do not use steel wool, abrasive powder cleansers, chlorine bleach, rust remover or ammonia because damage may occur. Do not use abrasive cleaners, steel-wool pads, gritty washcloths or some paper towels. Damage may occur. Always wipe with a clean, wet cloth or sponge and dry thoroughly to prevent streaking and staining.
To Replace: 1. Insert both hanger arms into the door. The storage drawer can be removed. Before removing, make sure drawer is cool and empty. To Remove: 1. Pull drawer straight out to the first stop. 2. Lift up the back of the drawer and pull out. To Replace: 1. Fit the ends of the drawer rails into the guides in the cavity. 2. Slide the drawer closed. For normal range use, it is not suggested to remove the oven door. However, if removal is necessary, make sure the oven is off and cool.
TROUBLESHOOTING Try the solutions suggested here first in order to avoid the cost of an unnecessary service call. On some models, does the cooling fan run during BAKE, BROIL or CLEAN? It is normal for the fan to automatically run when the oven is in use, This helps cool the electronic control. Nothing will operate • Is the power supply cord unplugged? Plug into a grounded outlet. • Has a household fuse blown, or has a circuit tripped? Replace the fuse or reset the circuit.
ASSISTANCE OR SERVICE Before calling for assistance or service, please check "Troubleshooting." It may save you the cost of a service call. If you still need help, follow the instructions below. When calling, please know the purchase date and the complete model and serial number of your appliance. This information will help us to better respond to your request. If you need replacement parts If you need to order replacement parts, we recommend that you use only factory specified parts.
KITCHENAID ®ELECTRIC RANGE WARRANTY ONE YEAR LIMITED WARRANTY For one year from the date of purchase, when this major appliance is operated and maintained according to instructions attached to or furnished with the product, KitchenAid or KitchenAid Canada (hereafter "KitchenAid') will pay for factory specified parts and repair labor to correct defects in materials or workmanship. Service must be provided by a KitchenAid designated service company.