
Installation guide

IMPORTANT:Ifthereisasnappingorpoppingsoundwhenlifting
therange,therangemaynotbefullyengagedinthebracket.
Checktoseeifthereareobstructionskeepingtherangefrom
slidingtothewallorkeepingtherangefootfromslidingintothe
bracket.Verifythatthebracketisheldsecurelyinplacebythe
mountingscrews.
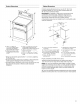
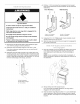
4. Slidetherangeforward,andverifythattheanti-tipbracketis
securelyattachedtothefloororwall.
5. Sliderangebacksotherearrangefootisinsertedintothe
slotoftheanti-tipbracket.
IMPORTANT:Ifthebackoftherangeismorethan2"(5.1cm)
fromthemountingwall,therearrangefootmaynotengagethe
bracket.Slidetherangeforwardanddetermineifthereisan
obstructionbetweentherangeandthemountingwall.Ifyou
needassistanceorservice,refertothe"AssistanceorService"
sectionoftheUseandCareGuide,orthecoveror"Warranty"
sectionoftheUserInstructions,forcontactinformation.
6. Repeatsteps1and2toensurethattherangefootis
engagedintheanti-tipbracket.
Iftherearoftherangeliftsmorethan1/2"(1.3cm)offthefloor
withoutresistance,theanti-tipbracketmaynotbeinstalled
correctly.Donotoperatetherangewithoutanti-tipbracket
installedandengaged.Pleasereferencethe"Assistanceor
Service"sectionoftheUseandCareGuide,orthecoveror
"Warranty"sectionoftheUserInstructions,tocontact
service.
1.
2.
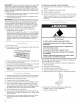
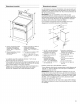
Place a rack in oven.
Place level on rack and check levelness of range, first side to
side; then front to back.
3. If range is not level, pull range forward until rear leveling leg is
removed from the anti-tip bracket.
4. Use a wrench or pliers to adjust leveling legs up or down until
the range is level. Push range back into position.
5. Check that rear leveling leg is engaged in the anti-tip bracket.
NOTE: Range must be level for satisfactory baking
performance.
1. Check that all parts are now installed. If there is an extra part,
go back through the steps to see which step was skipped.
2. Check that you have all of your tools.
3. Dispose of/recycle all packaging materials.
4. Check that the range is level. See the "Level Range" section.
5. Use a mild solution of liquid household cleaner and warm
water to remove waxy residue caused by shipping material.
Dry thoroughly with a soft cloth. For more information, read
the "Range Care" section of the Use and Care Guide.
6. Read the range Use and Care Guide.
7. Plug power cord into appropriate outlet. Slide range into its
final location. Check that the flexible conduit or power supply
cord is not bent.
8. Turn power on. Turn on surface elements and oven. See the
Use and Care Guide for specific instruction on range
operation.
If range does not operate, check the following:
• Household fuse is intact and tight; or circuit breaker has not
tripped.
• Range is plugged into a grounded outlet.
• Electrical supply is connected.
• See the "Troubleshooting" section in the Use and Care Guide.
When the range has been on for 5 minutes, check for heat. If
range is cold, turn off the range and contact a qualified
technician.
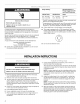
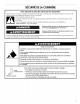
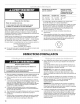
Tip Over Hazard
A child or adult can tip the range and be killed.
Install anti-tip bracket to floor or wall per installation
instructions.
Slide range back so rear range foot is engaged in the
slot of the anti-tip bracket.
Re-engage anti-tip bracket if range is moved.
Do not operate range without anti-tip bracket installed
and engaged.
Failure to follow these instructions can result in death
or serious burns to children and adults.
When moving range, slide range onto cardboard or hardboard to
avoid damaging the floor covering.
If removing the range is necessary for cleaning or maintenance:
1. Slide range forward.
2. Unplug the power supply cord.
3. Complete cleaning or maintenance.
4. Plug power supply cord into a grounded outlet.
5. Slide range back so rear range foot is under anti-tip bracket.
6. Refer to the "Verify Anti-Tip Bracket Is Installed and
Engaged" section to verify engagement.
7. Check that range is level.
6