
User Guide

Example Projects
Some example project setups are outlined in this guide to provide a starting point for using the Klip
Motor. Writing programs to control the Klip Motor is dealt with in the ‘How to code it’ section.
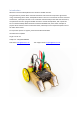
Example 1 – Driving two motors
Equipment required:
• 1 x Klip Motor board (https://kitronik.co.uk/5655)
• 1 x BBC micro:bit (https://www.kitronik.co.uk/5613)
• 2 x crocodile clip compatible motors (https://www.kitronik.co.uk/2594)
• 4 x crocodile clip leads (https://www.kitronik.co.uk/2407)
• 3 x AA batteries
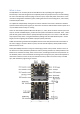
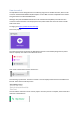
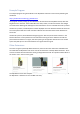
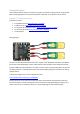
Wiring Diagram:
Connect crocodile clip leads between the motor outputs on the Klip Motor board (one pair labelled
M1 and the other labelled M2), and the exposed pads on the solderless motor attachment boards.
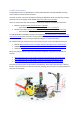
Program a BBC micro:bit (explained in the ‘How to code it’ section of this guide) and the slot this into
the edge connector on the Klip Motor board with the LED display facing up (as shown in the wiring
diagram above).
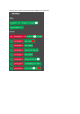
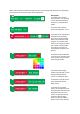
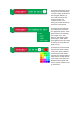
A short test program can be found using the link below:
https://makecode.microbit.org/_3t7c9d6gEJ6h
Pressing button A on the micro:bit will start the motors at half speed, pressing button b will stop
them This project is an ideal starting point as the connections and programming are simple; plus, it
leaves room for lots of creativity as there are now the beginnings of a two wheeled robot…