GARDEN SHED ASSEMBLY INSTRUCTION Model number: TK0804P Size(WxDxH):240x128x171cm Due to continuing improvements, actual product may differ slightly from the product described herein. PLEASE READ THE ASSEMBLY INSTRUCTION CAREFULLY BEFORE USE.
Page 1
Page 2
Page 3
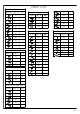
PARTS LIST FRONT FRAME PARTS LIST SKETCH PART NO. QTY F1 1 F2 ROOF PARTS LIST QTY M2 1 2 T1 1 M3 1 F3 1 T2 2 M3-1 1 F4 1 T3/T5/T6/T7 4 M4 1 F4-1 1 T4 2 M5 1 F5 1 F6 1 F7 1 F8 SKETCH DOOR PARTS LIST ACCESSORIES LIST PART NO. QTY 1 DL1 F9 1 F10 F11 PART NO. QTY 1 W1 4 DL2 1 W2-2 3 1 DL3 1 W3 270 1 DL4 1 W5 8 DL5 1 W6 8 DL6 2 DL7 1 W8 W4 W9 100 4 50 SKETCH PART NO.
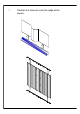
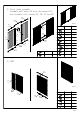
1. Position the channels over the edge of the panels.
2. Front frame assembly Assemble wall sheet F4 with the channel F2, then assemble with channel F1, F8, F3 and F9. F9 F10 QTY:1 F3 SKETCH F5 PART NO. QTY F1 1 F2 2 F3 1 F4 1 F5 1 F6 1 F8 1 F9 1 F4-1 F6 W3 F4 W3 F2 F8 F11 F1 F4-1 1 F10 1 F11 1 W3 28 3、LEFT L1 L4 QTY:1 W3 SKETCH L3 L2 PART NO.
4、RIGHT R1 R4 QTY:1 W3 R3 SKETCH R2 PART NO. QTY R1 1 R2 1 R3 1 R4 1 W3 14 PART NO. QTY B1 2 B2 1 B3 1 B4 1 B5 1 B6 1 W3 30 W3 5. Back frame assembly Connect wall sheet B1, B2 and B1 with screws; then assemble with channel B3, B4, B5 and B6; and tighten B3 and B4, B5 and B6 with screws.
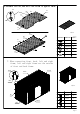
6. Assembl e t he roof , add W9 t o t he screws t o agai nst wat er W3 W3 T2 W9 T1 W9 T2 QTY:1 W3 T4 T5 SKETCH T3 T7 T6 T4 PART NO. QTY T1 1 T2 2 T3/T5/T6/T7 4 T4 2 W3 28 W9 28 7. When connecting front, back, left and right frame, left and right frame are the outside of front and back frame. BACK RIGHT BACK LEFT QTY:1 SKETCH W3 FRONT PART NO.
8、 W3 F7 PART NO. SKETCH QTY F7 1 W3 2 9.Add the Bracing M1,M2,M3,M3-1,M4 and M5 as per imge A-A to the wall. A-A W3 M3-1 M3 M1 M2 M4 M5 W3 M3 SKETCH M2 PART NO.
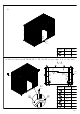
10. Put the TOP on the roof, and tighten it at pre-punched location with screws. TOP W3 SKETCH PART NO. QTY TOP 1 W3 42 11. Left door assembly Install DL3 and DL5, and then install DL1 and DL4, pay attention that the left of W2-1 is inserted into gap of DL3. W2-2 W2-2 W4 DL1 DL2 W3 SKETCH PART NO.
11. Right door assembly Install DL3 and DL5, and then install DL1 and DL4, pay attention that the left of W2-1 is inserted into gap of DL3. DR7 W3 DR1 DR2 W3 W2-2 SKETCH DR6 DR5 W3 DR3 W1 DR4 PART NO. QTY DR1 1 DR2 1 DR3 1 DR4 1 DR5 1 DR6 2 W1 2 DR7 1 W2-2 1 W3 42 PART NO.
14. Finally, fasten the four corners in shed with expansion screws Bolt & Nut Steel Angle W6 Wall Sheet Dyna Bolt Slab W5 SKETCH PART NO. QTY W5 8 W6 8 W3 W8 Note: please push 'screw cover' W8 onto the end of screws inside shed for covering screw sharp.