
Installation Instructions

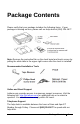
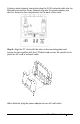
Table Of Contents
- THIS EQUIPMENT COMPLIES WITH FCC REQUIREMENTS
- Package Contents
- Install the CT Series Clock
- PayClock Online
- Using the CT Clock
- Employee Transactions
- Clocking IN/Out - Finger Sensor (CT72)
- Clocking IN/Out - Badge
- Clocking IN/Out - PIN
- Department Transfers - Finger Sensor (CT72)
- Department Transfers - Badge
- Department Transfers - PIN
- Amount Entries - Finger Sensor (CT72)
- Amount Entries - Badge
- Amount Entries - PIN
- Viewing Totals - Finger Sensor (CT72)
- Viewing Totals - Badge
- Viewing Totals - PIN
- Employee Transactions
- Supervisor Transactions
- Enrolling Fingers
- Administrator Functions
- Troubleshooting the CT Series
- Appendix A – Testing the Connection to PayClock Online
- Appendix B – Installing a Battery
- Appendix C – Adjusting Finger Sensitivity
- Appendix D – Bell Relay Connections
- Appendix E – Access Relay Connections
- Appendix F – Add/Edit/Delete Bell Events
- Blank Page

2 • Install the CT Series Clock
Install the CT Series
Clock
Step 1: Select a site to install your clock that will be convenient to
employees clocking in and out. When deciding where the clock will be
installed, keep in mind that an 115vAC power outlet should be within
reach of the mounting location as well as either a wired or wireless
internet connection.
Step 2: After selecting the appropriate installation site, use the mounting-
plate to determine the appropriate height. Hold the mounting-plate on the
wall and mark the screw hole locations on the wall.
Install the mounting-plate to the wall using the supplied screws. For
sheetrock walls, drill a 3/16” diameter hole through each of the four
screw locations; each approx. 1-1/2” deep. Install the plastic “anchors”
included in the mounting screw packet.
Note: The bottom of the clock should be about 45 inches from the floor.