
User Manual


5
but not necessarily against acoustic leakage. During Construction or remodeling of a screen
room, the transducers can be mounted on the frame members, and then acoustic insulation and a
decorative panel can be installed to the inside wall surface. This will help isolate the noise
generated from the room as well as decrease the acoustic leakage out of the room.
MOUNTING
Three basic mounting methods are suggested for transducers: Direct Screw for solid surfaces;
Hollow Wall Anchor for drywall (sheetrock), plaster, and other soft or brittle materials; and Plastic
Disk for flat, smooth surfaces like glass and plastic.
Attn: Always mount the transducer before connecting the wiring. The tabs supplied with each
transducer easily push on to the lugs. This eliminates twisting the wire.
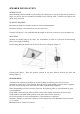
Direct Screw Mounting
A "Screw Adapter" is provided with a dual head. One end has 10-24 machine screw threads for the
transducer; the other has course tapered threads to be used in solid materials such as wood.
If the surface is a solid material such as ply wood, studs, or wood beams, the transducer can be
mounted directly.
1. Thread Screw Adapter into the transducer.
2. Drill a 1/8" pilot hole in the wall
3. Screw the transducer clockwise into the pilot hole until it is flush to the surface. DO NOT
TIGHTEN EXCESSIVELY. (Figure 3)
If the material is soft such as ceiling tile or drywall, use a piece of plywood and adhesive to attach
the transducer to the softer material.
1. Drill a l/8
th
pilot hole in the center of a 3-inch square (for drywall) to a 12-inch square (for ceiling
tile) piece of 3/8" or 1/2" plywood.
2. Attach plywood to the surface with adhesive or epoxy glue.
3. Thread the Screw Adapter in the transducer, (figure 3)
4. Screw the transducer clockwise into the pilot hole until it is flush to the plywood. DO NOT
TIGHTEN EXCESSIVELY.
Figure 3
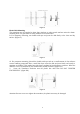
Hollow Wall Anchor Mounting
For walls with fragile surfaces such as drywall, plaster, or thin paneling, the transducer can be
attached with a hollow wall anchor.
1. Use the 10-24-thread size hollow wall anchor included with the transducer. Drill a 7/16" hole and
insert the anchor. Thread the screw until the wall anchor is tight. (figure 4A)
2. Remove the screw from the wall anchor, (figure 4B)
3. Screw the 10-24-threaded rod included with the TRN-2000 into the transducer.
4. Turning the transducer clockwise into the wall fastener, tighten the TRN-2000 until it is firm. DO
NOT TIGHTEN EXCESSIVELY. (figure 4C)