
User Manual


9
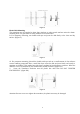
Figure 10
WIRING
Attn: Do not turn on the DNG-2300 until you have completed wiring the transducers as
recommended in this manual.
Route the wiring so that it cannot be pinched, cut, tripped over, or damaged in any way. Connect the
wires to the transducer using the female "quick connect" tabs furnished. Crimp or solder the wire to
the tab.
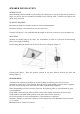
For lengths of less than 60 feet, use 18-gauge "zip cord" wire. Use 14-16 gauge heavy-duty speaker
cable (sold at audio stores) for longer runs that have impedance of less than 3 ohms. Use the
conductor that is silver o
|
r has markings on the insulator as the negative wire.
Attn: Each generator output is designed to be separate and isolated. Do not cross output
wiring or allow any wiring to be connected to the building's metal or earth ground.
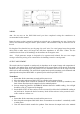
OUTPUT ADJUSTMENT
The actual noise level required to mask speech is dependent on the square footage and composition of
the surface, the ambient noise, and the general loudness of the conversation to be protected. Under most
situations, the required output level will produce a low to moderate noise level in the target area with
which one can talk comfortably. The actual level required under specific situations can be measured with
optional probe microphone DNG-MIC or optional probe stethoscope DNG-STET.
Transducers
1. Ensure that all the connections are made and the power is on.
2. Place the testing stethoscope DNG-STET on a surface in the protected room.
3. Tune the channel which controls the transducers. If both channels are used by transducers, tune
both of them. First decrease the output level to the minimal position.
4. Increase output level until the LOOPBACK indicator shows the middle reading – the red light
should be on the 10
th
segment of the bargraph.
5. Put the DNG-STET on other surfaces in the room and check that the LOOPBACK reading is
not less than 10. Increase the level if necessary. Probe all the surfaces in the protected room –
walls, windows, ceilings, etc.
Speakers
1. Ensure that all the connections are made and the power is on.
2. Place the probe microphone DNG-MIC where conversations are conducted – on/under/by a table
or other places.
3. Tune the channel which controls the speakers. First decrease the output level to the minimal