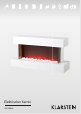
Elektrischer Kamin 10030846
Sehr geehrter Kunde, wir gratulieren Ihnen zum Erwerb Ihres Gerätes. Lesen Sie die folgenden Hinweise sorgfältig durch und befolgen Sie diese, um möglichen Schäden vorzubeugen. Für Schäden, die durch Missachtung der Hinweise und unsachgemäßen Gebrauch entstehen, übernehmen wir keine Haftung. Technische Daten Artikelnummer Stromversorgung Leistung 10030846 220-240 V ~ 50 Hz 2000 W Sicherheitshinweise Allgemeine Hinweise • Lesen Sie sich alle Hinweise sorgfältig durch und bewahren Sie die Anleitung auf.
• Stecken Sie den Stecker immer direkt in die Steckdose. Verwenden Sie keine Verlängerungskabel, externe Zeitschaltuhren oder ferngesteuerte Steckdosen. • Sobald die interne Gerätetemperatur 85 °C ± 2 °C übersteigt, schaltet sich das Gerät automatisch ab. Lassen Sie es mindestens 5 Minuten abkühlen, bevor Sie es wieder in Betrieb nehmen. Hinweise zur Installation • Schließen Sie das Gerät immer direkt an die Steckdose an. Verwenden Sie keiner Verlängerungskabel.
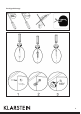
Installation Benutzen Sie das Gerät erst wenn es fest an die Wand angebracht wurde. Halten Sie sich bei der Suche nach einem geeigneten Platz und der Installation genau an die folgenden Anweisungen. Für eine höchstmögliche Effizienz empfehlen wir Ihnen das Gerät nicht direktem Sonnenlicht und staubiger Luft auszusetzen. Gerät auspacken • Die Installation sollte von zwei Erwachsenen durchgeführt werden, um Verletzungen oder Beschädigungen zu vermeiden.
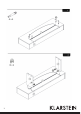
Übersicht über den Packungsinhalt 5
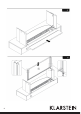
Benötigte Werkzeuge 6
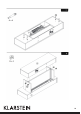
Inbetriebnahme und Bedienung Bedienfeld und Fernbedienung 1 2 3 4 5 6 Ein/Aus Heizung I Mehr Flammeneffekt Heizung aus Heizung II Weniger Flammeneffekt Tastenfunktionen Power Drücken Sie auf die Taste, um das Gerät einzuschalten. Drücken Sie erneut auf die Taste, um das Gerät auszuschalten. Heizen aus Drücken Sie auf die Taste, um die Heizung und das Gebläse auszuschalten. Wenn Sie auf eine der Tasten drücken werden Heizung und Gebläse eingeschaltet. Sie haben die Wahl zwischen Heizung I und II.
Fehlersuche und Fehlerbehebung Problem Das Gerät geht nicht an. Mögliche Ursache und Lösung Versichern Sie sich, dass es eingeschaltet ist. Lassen Sie die eingebaute Sicherung von einem Fachbetrieb ersetzen. Die Kohlen glühen aber kein Überprüfen Sie ob der Drehmotor in Betrieb ist. Falls nicht, wenden Sie sich Flammeneffekt. an einen Fachbetrieb. Das Gerät läuft nicht obwohl Setzen Sie alle Schalter auf OFF und ziehen Sie den Stecker aus der es eingeschaltet ist und alle Steckdose. Warten Sie 5 Minuten.
Dear Customer, Congratulations on purchasing this equipment. Please read this manual carefully and take care of the following hints to avoid damages. Any failure caused by ignoring the mentioned items and cautions mentioned in the instruction manual are not covered by our warranty and any liability. Technical Data Item number Power supply Power consumtion 10030846 220-240 V ~ 50 Hz 2000 W Safety Instructions General Hints • Read all instructions before using this appliance.
• Always plug heaters directly into a wall outlet/receptacle. Never use with an extension cord or relocatable power tap(outlet/power strip). • Once the inner temperature of this insert reach to 85± 2°C, this insert will off-work automatically.To reset temperaturing limiting control, disconnect power using plug or main switch for 5 minutes. Hints on Installation • Always plug heaters directly into a wall outlet/receptacle. Never use with an extension cord or relocatable power tap (outlet/power strip).
Installation The fireplace must not be used until it is securely fastened to the wall. When choosing a location for your electric fireplace, ensure that the general instructions are followed. For best results, install the electric fireplace away from direct sunlight and dust. Handling and Unpacking • The installation should be carried out by two adults to avoid injury or damage. If for any reason it is considered too heavy, please obtain assistance.
Packing Content 17
Necessary Tools 18
Use and Operation Control Panel and Remote Control 1 2 3 4 5 6 On/Off Heater I Flame+ Heater off Heater II Flame- Buttons and Functions Power Press this button to turn the unit on. To turn it back to standby mode, press it again. Heater off This button will tum off the heater and blower. Heater I/II Flame This button will tum on the power to the heater and blower. The HEATER switch has two options Heater I and Heater II. Hater I button will activate the heater on the low setting (750 W).
Troubleshooting Problem Fire is not switching on. Pebbles glow but flame effect does not work. Heater doesn‘t work, but Power and Heater switches/ buttons are in the „ON“ position. Fire seems noisy. Remote is not operating. Possible Cause and Solution Ensure mains switch is on. Replace the fuse in the plug. Check to see if the spinning motor is working. If not contact Focal Point Fires. Turn all switches / buttons to the „OFF“ position and unplug the unit from the wall outlet for 5 minutes.
Estimado cliente, Le felicitamos por la adquisición de este producto. Lea atentamente el siguiente manual y siga cuidadosamente las instrucciones de uso con el fin de evitar posibles daños. La empresa no se responsabiliza de los daños ocasionados por un uso indebido del producto o por haber desatendido las indicaciones de seguridad.
• Utilice el aparato solamente según se describe en estas instrucciones; de lo contrario, podrían producirse descargas eléctricas y lesiones. • Conecte el enchufe siempre directamente a la toma de corriente. No utilice un cable alargador, temporizadores externos ni tomas de corriente manejadas por control remoto. • Cuando la temperatura interna del aparato supere los 85 °C ± 2 °C, este se apagará automáticamente. Deje que el aparato se enfríe 5 minutos antes de utilizarlo de nuevo.
Instalación Utilice de nuevo el aparato cuando lo haya fijado a la pared. Siga estrictamente las siguientes instrucciones para determinar la ubicación adecuada para la instalación. Para el mayor nivel posible de eficiencia, le recomendamos no exponer el aparato directamente a la luz directa del sol ni a aire con partículas de polvo. Desembalar aparato • La instalación debe realizarse por parte de dos adultos para evitar lesiones o daños. Si el aparato es muy pesado para dos personas, pida ayuda adicional.
Descripción del contenido del paquete 29
Herramientas necesarias 30
Puesta en marcha y uso Panel de control y mando a distancia 1 On/off 2 Calefacción I 3 Más efecto llamarada 4 Calefacción off 5 Calefacción II 6 Menos efectos llamarada Funciones de los botones POWER Pulse una vez el botón para encender el aparato. Pulse otra vez el botón para apagar el aparato. Calefacción off Pulse el botón para desactivar la calefacción y el ventilador. Calefacción I/II Cuando pulse el botón, se activarán la calefacción y la ventilación.
Detección y resolución de problemas Problema El aparato no funciona. Posible causa y solución Asegúrese de que esté encendido. El fusible deberá ser sustituido por un servicio técnico. El carbón brilla pero no hay Compruebe que el motor giratorio esté encendido. De lo contrario, contacte efecto de llamarada. con un servicio técnico. El aparato no funciona Coloque todos los interruptores en la posición OFF y desconecte el enchufe aunque está encendido y de la toma de corriente. Espere 5 minutos.
Chère cliente, cher client, Toutes nos félicitations pour l’acquisition de ce nouvel appareil. Veuillez lire attentivement et respecter les instructions de ce mode d’emploi afin d’éviter d’éventuels dommages. Nous ne saurions être tenus pour responsables des dommages dus au non-respect des consignes et à la mauvaise utilisation de l’appareil.
• Toujours brancher directement la fiche sur une prise électrique. Ne pas utiliser de rallonge électrique, de minuterie externe ou de prise télécommandée. • L’appareil s’éteint automatiquement dès que la température interne de l’appareil dépasse 85 °C ± 2 °C. Laisser l’appareil refroidir pendant au moins 5 minutes avant de le remettre en marche. Conseils d’installation • Toujours brancher l’appareil directement sur une prise électrique. Ne pas utiliser de rallonge électrique.
Installation Utiliser l’appareil uniquement lorsque celui-ci a été monté au mur. Se reporter aux instructions du mode d’emploi pour la recherche d’un emplacement adapté et pour l’installation de l’appareil. Pour un résultat optimal, il est conseillé de ne pas exposer l’appareil à la lumière directe du soleil et à un air poussiéreux. Déballer l’appareil • L’installation doit être effectuée par deux adultes pour éviter toute blessure ou endommagement.
Aperçu du contenu de l’emballage 41
Outils requis 42
Mise en marche et utilisation Panneau de commande et télécommande 1 Marche/arrêt 2 Chauffage I 3 Plus d’effets de flammes 4 Chauffage éteint 5 Chauffage II 6 Moins d’effets de flammes Touches de commande Marche/arrêt Appuyer sur cette touche pour allumer l’appareil. Appuyer de nouveau sur cette touche pour éteindre l’appareil. Chauffage éteint Appuyer sur cette touche pour éteindre le chauffage et la soufflerie.
Identification et résolution des problèmes Problème L’appareil ne s’allume pas. Le charbon rougeoie mais il n’y a aucun effet de flammes. L’appareil ne fonctionne pas bien qu’il soit allumé et que tous les interrupteurs sont positionnés sur ON. L’appareil fait du bruit. La télécommande ne fonctionne pas Cause possible et solution S’assurer que l’appareil est allumé. Faire remplacer le fusible par une entreprise spécialisée. Vérifier si le moteur rotatif fonctionne bien.
Gentile Cliente, La ringraziamo per aver acquistato il dispositivo. La preghiamo di leggere attentamente le seguenti istruzioni per l’uso e di seguirle per evitare possibili danni tecnici. Non ci assumiamo alcuna responsabilità per danni scaturiti da una mancata osservazione delle avvertenze di sicurezza e da un uso improprio del dispositivo.
• Collegare il dispositivo sempre direttamente ad una presa di corrente. Non utilizzare prolunghe, timer esterni o prese di corrente con comando a distanza. • Non appena la temperatura interna del supera gli 85 °C ± 2 °C, il dispositivo si spegne automaticamente. Lasciare raffreddare per almeno 5 minuti prima di tornare a metterlo in funzione. Avvertenze sull‘installazione • Collegare il dispositivo sempre direttamente ad una presa di corrente. Non utilizzare prolunghe.
Installazione Utilizzare il dispositivo solo dopo averlo montato saldamente sulla parete. Seguire attentamente le indicazioni fornite per scegliere la parete adatta e per realizzare l’installazione. Per un funzionamento perfetto si suggerisce di non posizionare il dispositivo sotto a diretta luce solare in aree con aria molto polverosa. Togliere il dispositivo dall‘imballaggio • L’installazione dovrebbe essere eseguita da due adulti, per evitare danneggiamenti e infortuni.
Volume di consegna 53
Attrezzi necessari 54
Messa in funzione e utilizzo Pannello di controllo e telecomando 1 2 3 4 5 6 ON/OFF Riscaldamento I Maggiore effetto fiamma Riscaldamento OFF Riscaldamento II Minore effetto fiamma Tasti funzione Power Premere il tasto per attivare il dispositivo. Premere nuovamente per spegnerlo. Riscaldamento OFF Premere questo tasto per spegnere riscaldamento e ventola. Riscaldamento I/II Premendo questo tasto si attivano riscaldamento e ventola. Scelta possibile tra riscaldamento I e II.
Ricerca e correzione degli errori Problema Possibile causa e soluzione Il dispositivo non si accende. Assicurarsi che sia acceso. Far sostituire la sicura integrata da un tecnico specializzato. I carboni ardono, ma non c’è Controllare che il motore a rotazione sia in funzione. In caso contrario fiamma. rivolgersi ad un tecnico specializzato. Il dispositivo non funziona, Posizionare tutti gli interruttori su OFF e scollegare la spina. Attendere 5 sebbene sia acceso e tutti gli minuti.