INSTALLATION GUIDE Available at
BEFORE YOU BEGIN INSTALLATION VERIFYING YOUR ORDER Verify that all hardware, fillers, cabinet boxes, fronts, moulding and accessories you purchased are on site. A missing item could delay the project. ORGANIZING YOUR ORDER Your KLËARVŪE CABINETRY ® order is going to consist of cabinet boxes, hinges, drawer kits, hardware, shelves, door and drawer front, cover panels, and other finishing items.
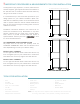
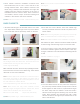
! IMPORTANT PROCEDURES & MEASUREMENTS FOR YOUR INSTALLATION To help prevent injury, explosion, or shock, make sure that all water supplies, gas supplies and electrical breakers to the area are shut off. Double check electrical outlets by using a circuit tester to confirm. INSTALL WALL CABINETS For 40" high wall cabinets draw a level line at 94-3/4" up from the highest point of your finished floor. Install each wall cabinet box so the top edge is level with the line.
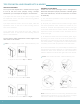
PREPARATION 1 Cabinets fit best on square walls. Walls that are out of square will require modification to ensure cabinet installation goes smoothly. For proper cabinet operation and overall appearance, it is essential for the cabinet to be mounted level, plumb, and square in relationship to the floor and walls. If there is any unevenness, your cabinets must be shimmed and adjusted for proper function.
4 Once cabinet connector installation locations have been determined, use a 3/16" or 5mm drill bit to drill through desired holes. Insert cabinet connector and fasten using a Phillips head screwdriver until tight. We suggest using two cabinet connectors at the front of the cabinet and one near the back. Once connectors are installed, remove clamps. Continue installing wall cabinets in this fashion until all are installed. Note: If cover panel is required between two wall cabinets, see page 9.
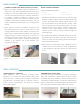
BASE CABINETS 4 CABINET CONNECTOR INSTALLATION (478-3872) Before you begin installing cabinet connectors, it is important to note the pre-drilled holes that are used in building your cabinet configurations. We have found it common to use the fourth hole from the top and bottom for cabinet connector installation, however, some configurations require use of these locations. Use the installation instructions included with drawer kits and hinges to determine hole locations your configurations will use.
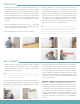
FILLER STRIP 1 If a filler strip is required, measure the distance between the cabinet and the wall and cut the filler strip to match. A minimum of 2" of filler is required between the wall and cabinet, to ensure full opening. Note: Follow the installation guide that is provided for filler strip with Small or Large L-Bracket (pending filler size) for filler installation. 2 Place filler strip to sit 3/16" past the front of the cabinet box and hold into place using clamps.
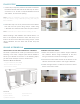
ISLAND & PENINSULA ATTACHING COVER PANELS TO ISLANDS AND PENINSULAS Attaching cover panels to the back of an island or peninsula will require some additional steps than standard cover panel installation. Additional Materials Needed - 1-1/4" Wood Screws COVER PANEL INSTALLATION 1 To attach cover panel to back of cabinet, clamp into place and secure using 1-1/4" screws (not provided) through the interior of the cabinet into the top & bottom fastening strips.
COVER PANELS & MOULDING COVER PANELS 1 Exposed ends of cabinets (typically end of cabinet runs) will require a cover panel. Place cover panel onto cabinet, lining up to be flush to the top of the cabinet box, and flush to the cabinet door or drawer front and secure with clamp. Fasten with included screws through the pre-drilled shelf holes of the cabinet into the cover panel. More instructions included with cover panel.
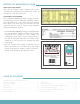
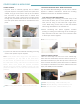
TIPS FOR INSTALLING DRAWER KITS & HINGES HINGE ADJUSTMENT You may find that adjustment is needed with the hinges to line up the door fronts properly. Using a Phillips screwdriver you can adjust the hinges in six directions. 1) To adjust the door fronts up and down in height, rotate the adjustment screw in the center of the mounting plate as shown in the illustration. 2) To adjust the door fronts in and out in depth, rotate the adjustment screw on the front of the mounting plate as show in the illustration.
QUALITY & CARE KLËARVŪE CABINETRY ® is hand-crafted from the finest materials. Our fine furniture grade finishes are very durable and moisture resistant, but they are not moisture-proof. Care must be taken to ensure durability for a lifetime. Use the following guidelines to assist you in maintaining the beauty of your KLËARVŪE CABINETRY ®. When the installation is complete, vacuum and wipe down all interiors and exteriors with a soft dampened cloth to remove all dust.
® Available Exclusively at 903-0261