® INSTALLATION GUIDE
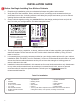
INSTALLATION GUIDE Before You Begin Installing Your Kitchen Cabinets 1. 2. 3. Read through installation guide to understand all steps and gather tools needed. Verify that all of the hardware, fillers, cabinets, fronts, mouldings, and accessories that you purchased are on site. A missing cabinet could delay the project and cause you to be without working kitchen until that cabinet arrives.
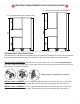
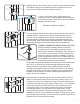
IMPORTANT MEASUREMENTS FOR YOUR INSTALLATION 40" Tall Cabinet Box & 90" Tall Cabinet Box 30" Tall Cabinet Box & 80" Tall Cabinet Box IMPORTANT MEASUREMENTS FOR YOUR INSTALLATION All Dimensions From Finish Floor • INSTALL BASE CABINETS: Draw a level line on your wall 34¾" We realize that not all floors are perfectly level. All KLËARVŪE CABINETRY® base and tall cabinets your base cabinet to bring the top of each box up to the level line (without countertop installed).
CABINET INSTALLATION 1) Verify that walls are square and level. Walls that are out of square or level will make installation of cabinets more difficult. Check the floor for level and make note of the highest points are before installing cabinets. Snap a chalk line or draw a level line at 34-3/4" from the highest 2) point of your floor. Your base cabinets will be adjusted up to that line (top of base cabinet without countertop).
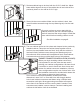
4) Starting with the corner wall cabinet, install 4 cabinet screws through the fastening strips on the cabinet into the wall studs. Be sure to check for level before fastening cabinet into place. If you do not have a corner, start with the end closest to a wall. Cabinets against wall will require a filler strip to begin. Install filler onto cabinet before installing cabinet to wall. See filler installation on page 8.
7) Set base cabinet legs to be level with the 34-3/4" chalk line. Adjust base cabinet legs so the top of the cabinet box is level with the line previously drawn on the wall at 34-3/4" high. 8) Start with the corner cabinet. Make sure the cabinet is level, then install 2 cabinet screws through the top-fastening strip into the wall studs. If you do not have a corner, start with the cabinet closest to the wall. Cabinets against wall will require a filler strip to begin.
10) Exposed ends of cabinets (typically end of cabinet runs) will require a cover panel. Place cover panel onto cabinet, lining up to be flush to the top of the cabinet box, and flush to the cabinet door or drawer front and secure with clamp. Fasten with 1-1/4" (included) screws through the pre-drilled shelf holes of the cabinet into the cover panel. Note: In some applications, you may need to trim panel down. Some cover panels are required in-between cabinets during the cabinet installation process.
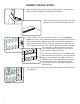
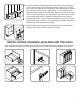
FILLER STRIP INSTALLATION 1) If a filler strip is required, measure the distance between the cabinet and the wall and cut the filler strip to match. A minimum of 2" of filler is required between the wall and cabinet, to ensure full opening. Follow the installation guide that is provided for filler strip with Small or Large L-Bracket (pending filler size) for filler installation. 2) Place filler strip to sit 3/16" past the front of the cabinet box and hold into place using clamps.
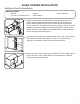
BLIND CORNER INSTALLATION Additional Item for Installation Materials Needed: • • • Silicone (2) 3”x30” Front Match Fillers • Clamps Rubber Mallet • Large L-Brackets 1) Determine orientation of cabinet (left or right opening) and use a rubber mallet to attached included feet into the pre-drilled holes. Adjust cabinet legs so the top of the cabinet box is level with the 34-3/4" chalk line.
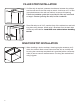
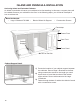
ISLAND AND PENINSULA INSTALLATION Anchoring Island and Peninsula Cabinets: An island or peninsula will cause your cabinets to be free standing. In this case, a support piece will be needed to secure your cabinets to the floor. In the following steps, you will see an example of how to achieve this.
Attaching Cover Panels to Islands and Peninsulas: Attaching cover panels to the back of an island or peninsula will require some additional steps than standard cover panel installation. Materials Needed: • 1-1/4" Wood Screws Countertop Finished End Cover Panel Cover Panel Finished End Cover Panel Seam * When island or peninsula length requires 2 cover panels, a seam will be required. Measure and cut so seam is in center of cabinet run.
® Available Exclusively at 903-0261