
Use and Care Manual


7
ENGLISH
OPERATING INSTRUCTIONS
CABLE IDENTIFICATION – DATA AND VOICE CABLES:
It is often necessary to identify cables that branch out from the wiring closet. The VDV Scout
TM
Pro 3 can assist
in two ways:
The first and most convenient way to identify installed cables is by using location ID remotes. Using location ID
remotes, you can trace up to 19 drop locations with one trip to the wiring closet or router. Identification with ID
remotes is done digitally, and does not rely on any manual tracing.
The second way to identify cables is using the VDV Scout
TM
Pro 3's built-in analog tone generator. The tester
will place a low-frequency voltage on the cable. By using an analog tone probe (Klein Tools VDV500-123, sold
separately), a cable can be identified by the tone it is carrying. This technique only allows one cable to be traced
per tone generator, but has additional benefits like the ability to trace unterminated cables of non-standard types.
• LanMap™ Location ID Remotes identify location only.
• CoaxMap™ Location ID Remotes identify location only.
• Test+Map™ ID Remotes identify location, and perform wire map and length tests.
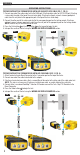
IDENTIFYING INSTALLED RJ45 CABLE (FIG. 5):
1. Insert a numbered LanMap™ Location ID Remote into the
RJ45 port of each room that needs to be identified. Write
down numbers and room names for later reference.
2. Take the VDV Scout
TM
Pro 3 to the wiring closet or router
(the source of the internet connection).
3. Connect an unknown cable to the RJ45 port on the top
of the tester.
4. Press the Data button
C
to begin the ID test. The LCD
will read "ID#", where "#" is the ID number of the LanMap™
Location ID Remote connected to the other side of the cable.
Compare this number to the number/room pair list you made
in step 1 and mark the cable with a piece of labeled tape.
5. Repeat steps 3 and 4 for each unknown cable until all have been labeled.
You can use these labels to determine which rooms should be connected
to the router, or to troubleshoot intermittent connections in the future.
IDENTIFYING INSTALLED VOICE CABLE (FIG. 5):
1. Insert a numbered LanMap™ Location ID Remote into the RJ45 port of each
room thatneeds to be identified. Write down numbers and room names for
later reference.
2. Take the VDV Scout
TM
Pro 3 to the wiring closet or router (the source of the
internet connection).
3. Connect an unknown cable to the RJ45 port on the top of the tester.
4. Press the Voice button
A
to begin the ID test. The LCD will read "ID#", where
"#" is the ID number of the LanMap™ Location ID Remote connected to the
other side of the cable. Compare this number to the number/room pair list you
made in step 1 and mark the cable with a piece of labeled tape.
5. Repeat steps 3 and 4 for each unknown cable until all have been labeled. You can
use these labels to determine which rooms should be connected to the router, or
to troubleshoot intermittent connections in the future.
FIG. 5
IDENTIFYING
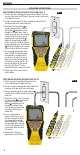
INSTALLED COAX CABLE (FIG. 6):
1. Insert a numbered CoaxMap™ Location ID
Remote into the F-connector port of each
room that needs to be identified. Write down
numbers and room names for later reference.
2. Take the VDV Scout
TM
Pro 3 to the wiring
closet or cable splitter (the source of the
cable connection).
3. Attach female-to-female Barrel Connector to
the F-connector port on the top of the tester,
then connect Connect an unknown cable to
the Barrel Connector.
4. Press the Video button
B
to begin the
IDtest. The LCD will read "ID#", where "#"
isthe ID number of the CoaxMap™ Location
IDRemote connected to the other side of the
cable. Compare this number to the number/
room pair list you made in step 1 and mark
the cable with a piece of labeled tape.
5. Repeat steps 3 and 4 for each unknown cable
until all have been labeled.
FIG. 6