Model 6350 150 PSI Compressor with 3-Gallon Air Tank 12VDC IMPORTANT: It is essential that you y and any other operator of this product read and understand the contents of this manual before installing and using this product.
Model 6350 Components: 1 1 1 1 3.0 Gallon, 7-port air tank Model 6350RC compressor Package air fittings Package mounting hardware (Please check to make sure that you have two packages in your kit. Each package contains the parts needed for specific areas of onboard air installation, and may contain smaller bags within each package labeled for specific use.
Qty 1 Replacement air filters Qty 1 Leader Hose Bracket Clip Qty 1 Air line for remote mounting air filter Qty 4 Nuts, bolts, and washers – (Air tank mounting hardware) 3.0 Gallon Air Tank Installation Your 3.0 Gallon air tank comes with seven 1/4” NPT port openings to allow a variety of installation configurations in your vehicle. To insure safe and trouble-free use of your air tank, we strongly recommend that you install the supplied drain cock and a safety pressure relief valve.
PLEASE NOTE: RUSTED TANKS CAN FAIL CAUSING EXPLOSIONS OR FATAL INJURIES. Discard tank immediately if tank is rusted. When using a safety pressure relief valve, point the safety pressure relief valve away from your body when releasing air. Use the pull ring on the safety relief valve; open the relief valve to vent any pressure inside the tank before servicing tank.
• • select compressor’s mounting location where air line can be routed from compressor air inlet to remote inlet air filter. Make sure that the remote inlet air filter is located in a dry location, away from water. You will also want to select a compressor mounting location where the leader hose bracket can be mounted to secure the 2 ft. leader hose.
16. Once air pressure reaches the preset cut out pressure of your pressure switch, the compressor will shut off. Inspect all air line connections for leaks with soap and water solution. If a leak is detected, the air line may not be cut squarely or pushed all the way in. Tighten connections if needed. 17. Always use a “switched” power source that only supplies power to your compressor when the vehicle is running.
CAUTION: Never touch the air compressor or fittings connected to the air compressor with bare hands during or immediately after use. Leader hose and fittings will become very HOT during and after use. Compressor Installation Tips 1. Always use the remote intake filter option when possible. This will extend the service life of your compressor. 2. If noise reduction from vibration is desired, using the remote mount option for the inlet filter can reduce operation noise by up to 25%. 3.
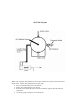
Air Tank Layout Note: Your setup may look different if your tank is mounted in a position other than what is shown above. Follow these guidelines for proper setup: • Drain cock should always be on the bottom • Safety valve should always be on the top • Pressure switch should be on the side, but not directly opposite the inlet from the compressor • Use the hex plugs to plug the two unused ports.
Kleinn Model 6350 LIMITED WARRANTY Kleinn Automotive Air Horns warrants this product, when properly installed and under normal conditions of use, to be free from defects in workmanship and materials for a period of one year from provided date of purchase. To receive a replacement or for repairs, return the complete unit to retailer from whom it was purchased along with proof of purchase. Returns should be made within the time period and conditions of the retailer’s policy for exchanges.
Kleinn Automotive Accessories P.O. Box 91278 Tucson, AZ 85752 Phone: (520) 579-1531 Fax: (520) 579-1528 info@kleinn.