
Owners Manual


CONNECTION
Connect RCA connector from sub output on your amp/reciever to
LINE input on subwoofer.
CROSSOVER
If you are using the Bass Managagement crossover menu settings in your
A/V receiver or processor, select the 150Hz setting on the subwoofer, if
you are not using this function, set to 80Hz.
VOLUME CONTROL
This control affects the output of your subwoofer, and should be set at
lowest level before turning the power on. Volume can be increased until
desired level is achieved. For 2-channel applications, you should adjust
the volume to match the output of your speakers.
AC INPUT
Your subwoofer is supplied set to either 115 volts or 230 volts depend-
ing on the country it is shipped. This voltage can be changed by having
a technician change the fuse (T3.15AL for 115 V and T1.5AL for 230V) and
move the switch on your subwoofer amplifier to the desired voltage.
Residents of some other countries will need to purchase an adapter or
new proper power cord that fits your specific socket.
TRIGGER
Use of the trigger is an optional hook-up. If your A/V receiver or A/V
preamp/processor has a 12-volt trigger output, you can run a 3.5mm
connector cable to the subwoofer trigger input and your subwoofer will
power on and off with your A/V receiver or A/V preamp-processor.
When the trigger is in the “off” mode the LED will turn off and the ampli-
fier will be switched to a low power consumption standby mode.
LEFT
OPTIONAL
SUB
OPTIONAL
SUB
OPTIONAL
SUB
SUB
RIGHT
CENTER
SURROUND
LEFT
SURROUND
RIGHT
0-180 PHASE CONTROL
This synchronizes the in/out movement of the subwoofer driver with the
other speakers in your system. Once you have chosen the best location
for your subwoofer, try flipping the phase swith between 0-180 to see
which setting produces deeper and smoother bass output. Leave the
switch at the setting that results in the smoothest and deepest bass
at several listening locations in the room. If you hear no difference,
leave the switch at the 0 position. Quite often this switch makes little
difference, but it is dependent on your particular room dimensions and
subwoofer location.
POWER SWITCH
The POWER ON switch near the bottom of the panel
supplies power to the sub amplifier. When this switch is in
the ON position, the subwoofer will remain on, and the LED
indicator will be illuminated.
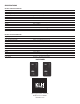
ROOM POSITION
The placement of your subwoofer can add a significant difference to the
performance of your home theater system. Low frequencies are omnidi-
rectional, but best performance results if you place the subwoofer in the
corner, as this will increase the level of bass output. You can experiment
with different configurations, or even add multiple subwoofers to your
system (see diagram).
NOTE: When cleaning your subwoofer, avoid the use of abrasives,
solvents, or harsh detergents. Windsor subwoofers have a long-lasting
vinyl finish that should only require dusting or cleaning with a dry cloth.
Gently use the brush attachment of your vacuum cleaner to remove any
dust or particles from the surfaces of your subwoofer.
WARRANTY
Our 5 year warranty begins from purchase date of the item. (Receipt
Date) Warranty registration must be completed at KLHAUDIO.com/
warranty. Registration of the product must be completed within 120 days
of purchase for warranty validation. Original receipt of purchase must
be retained for proof of purchase. For warranty or service issues, please
contact authorized KLH dealer. The warranty covers any production and/
or material defects of the product. This warranty is non-transferable.
The following is NOT COVERED by the warranty:
1. Accidents, misuse, poor maintenance, electrical overloads such as
lightning or voltage.
2. Incorrect use of product.
3. Altered serial number.
4. Transportation costs for service call.
5. Purchase of KLH products from unauthorized reseller.
Replacement item cannot exceed the cost of the item under warranty.
The supplier is responsible for only repair or replacement. KLH toll free
number is 1-833-554-8326
1
3
2
RCA SUB OUT
SUBWOOFER
RECEIVER
LINE IN
UNPACKING
Place the package on the floor or table top with the box flaps up. Cut the
tape with a utility knife to open the package. Fold the carton flaps back
and carefully slide the subwoofer and packaging from the box, or turn the
box over with flaps open and remove the box. Stand the subwoofer and
packing upright, making sure the subwoofer is right side up, and remove
the packing material.
MAX
MIN
VOLUME
CROSSOVER 80 150
PHASE 0 180
TRIGGER
AC-220-240V~
AC-100-120V~
AC-220-240V~
AC-100-120V~