
Installation Manual
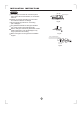

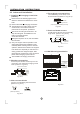
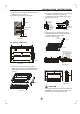
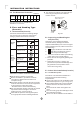
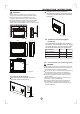
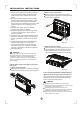
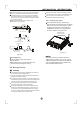
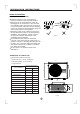
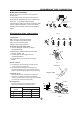
Table Of Contents

25
INSTALLATION INSTRUCTIONS
CAUTION
CAUTION
Keep indoor unit, outdoor unit, power supply
wiring and transmission wiring at least 1 meter
away from televisions and radios. This is to
prevent image interference and noise in those
electrical appliances. (Noise may be generated
depending on the conditions under which the
electric wave is generated, even if 1 meter is kept.)
≥100mm
≥100mm
≥100mm
≥1000mm
Fig.50-2
Fig.50-5
Fig.50-3
Fig.50-4
195mm
Hook
700mm
210mm
600mm
5.3.2 Install the main body
Fix the hook with tapping screw onto
the wall. (Refer to Fig.50-4)
Hang the indoor unit on the hook.
(The bottom of body can touch with floor
or suspended, but the body must install
vertically. )
195mm
Hook
Tapping
screw
Washer
<6mm
5.4 Install the connecting pipe
(Console)
5.4.1 The procedure of connecting pipes:
Check whether the height drop between
the indoor unit and outdoor unit, the length
of refrigerant pipe, and the number of the
bends meet the following requirements:
Capacity(KBtu/h)
The max height drop
The length of refrigerant pipe
The number of bends
7/9/12
Less than 10m
Less than 5m
18/20/26/32/53
10m
Less than 20m
Less than 5
5m
All field piping must be provided by a licensed
refrigeration technician and must comply with
the relevant local and national codes.
Do not let air, dust, or other impurities fall in the
pipe system during the time of installation.
The connecting pipe should not be installed
until the indoor and outdoor units have been
fixed already.
Keep the connecting pipe dry, and do not let
moisture in during installation.
Execute heat insulation work completely on
both sides of the gas piping and the liquid
piping. Otherwise, this can sometimes result
in water leakage.