
Installation Manual


6
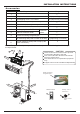
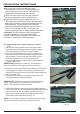
2. Drill a hole in the wall
1. Determine hole positions according to
the diagram detailed in Fig.5. Drill
one (1) hole (φ90mm/3.54in) slanting
slightly to outdoor side.
2. Always use wall hole conduit when
drilling metal grid, metal plate or the like.
Wall
Indoor
Outdoor
5-7mm
/0.2-0.28in
INSTALLATION INSTRUCTIONS
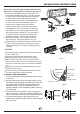
3. Drainage Installation
1. Run the drain hose sloping downward. Do not
install the drain hose as illustrated in Fig.7.
2. When connecting extension drain hose, insulate
the connecting part of extension drain hose with
a shield pipe, do not let the drain hose slack.
Drainage
Fig.7
Fig.6
Do not form a rise
Do not put the hose
end into water or any
container
4. Connecting the refrigerant pipes
4.1 Tools needed
-You will require the following tools to carry out this
installation work correctly:
1x open-ended spanner, 19 mm/0.75in
1x open-ended spanner, 22 mm/0.87in
1x open-ended spanner, 24 mm/0.95in
1x Allen key, 5 mm/0.2in
1x Philips screwdriver
1x leak detection spray or alternatively soap suds
(water/detergent mix)
Follow the detailed instructions for connecting
the refrigerant pipes to the indoor unit and
outdoor unit. We can only provide a warranty if
the lines are installed correctly as described in
the instructions.
Do not remove the sealing caps and stoppers
until immediately before you install the lines.
To prevent leaks, ensure that the quick-release
screw connections are absolutely free of dirt.
Moisture or foreign bodies will adversely affect
the function of the quick-release connectors,
leading to a risk of refrigerant loss (not covered
by the warranty).
Only install refrigerant lines outdoors in dry
weather.
The refrigerant lines must not be installed and
then plastered over.
Please make sure that refrigerant is never
allowed to enter the environment.
Improper handling of refrigerant may be harmful
to health. Always wear work gloves and goggles
when handling refrigerant.
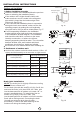
4.2 Important information
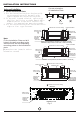
Refrigerant pipe
Connectors(both ends):
Fig.8
NOTE: To distinguish the connectors
to be connected to the indoor unit and
outdoor unit, the connectors of the
refrigerant pipe has been labelled “A”,
“B”,“C”and “D”. Ensure the
marks on the connectors are the same
to the indoor s and outdoor s respectively
during connection.
,
,