
Owner's Manual


IMPORTANT
SAFETY
INSTRUCTIONS!
1.
REA
D
the
se
in
struct
ions.
2
KE
EP
t
hes
e
ins
t
ruc
tio
ns
3
HEED
a
ll
warn
in
gs
4.
FOLLOW
a
ll
instructi
ons
5.
DO
NOT
us
e
t
his
app
aratu
s
nea
r
wa
te
r.
6.
C
LE
AN
O
NLY
wi
th
dr
y
clo
th
or
light
ly
damped
cl
oth.
7
DO
N
OT
bl
ock
any
ven
t
ilatio
n
openings.
I
ns
tall
in
acco
rd
ance
wi
th
the
manufactu
re
r'
s
in
st
r
uc
tion
s.
DO
NO
T i
ns
t
all
near
any
h
eat
so
urc
es
such
as
r
ad
i
ato
r
s,
heat
regi
sters
. s
toves
, or
othe
r
a
ppa
ra
tus
(
in
c
luding
amp
lif
i
ers
)
th
at
produ
ce
heal.
9.
ON
LY
US
E
attachm
en
ts/accessories
specif
ied
by
the
man
uf
acturer.
~
10
USE
on
ly
wi
th
a
cart,
st
and,
tr
ip
od,
b
rack
et,
or
table
spec
i
fied
by
the
ma
n
ufac
-
\Q?
tu
re
r,
or
sold
wi
th
the
app
arat
us.
When
a cart
is
u
sed,
u
se
cau
ti
on
w
hen
moving
the
c
ar
t/app
ar
atus
combination
to
avo
id
i
nju
ry
fro
m
tip
-
ov
er
11.
DO
NOT
ex
pose
th
is
apparatus
to
dr
i
pp
in
g or
sp
l
ash
ing
and
e
ns
ure
t
hat
no
objects
fi
lled
with
liquid
s,
su
ch
as
vases,
are
placed
on
t
he
apparat
us.
A
The
exc
l
amat
i
on
poi
nt
, w
ithin
an
eq
uil
ate
ral
tr
i
an
gle, is
inten
ded
to
al
er
t
th
e u
ser
to
the
pr
ese
nce
of
imp
ortant
operating
a
nd
maintenance
(serv
i
cmg)
ins
t
ruc
ti
ons
in
t
he
literat
ur
e
ac
companyin
g t
he
produc
t.
A
The l
igh
t
ni
ng
flash
with
arrowhead
symbo
l within an
equ
il
ateral
triangl
e, is
int
ended
to alert
th
e u
ser
to
the
presence
of
uni
ns
ulat
ed
"
da
n
gerous
voltage'
w
it
hin
th
e
pro
duct's
enclo
su
re
that
may
be
of
su
ffic
ient
ma
gnitud
e
to
constitute
a
ris
k
of
el
ect
ri
ca
l
shock
to
persons.
WAR
N
IN
G: To r
educ
e
th
e ri
sk
of
fire
or
elec
tric
al
shock
,
do
not
expose
t
his
a
ppara
tus
to
ra
in
or
moi
stu
re
WARNING
: No
naked
flame
s
our
ces
-
suc
h
as
can
dl
es-
sh
ou
ld
be
placed
on
the
pr
oduct.
A
RI
SK
OF
ELE
CTR
I
~
SHOCK
A
~
DO
NO
T O
PEN.
WARN
I
NG
:
Do
Not
Open
I
Risk
of El
ec
tri
ca
l
Shock
.
Voltages
in
this
equ
ip
me
nt
a
re
hazard
ous
to life. No
use
r
-serv
i
ce
able
pa
rt
s i
nside
.
Re
fer
all
servic
i
ng
to
qu
alifie
d
se
rvice
pe
r
son
ne
l.
UNPACKING
All Models
•
Open
one
e
nd
of
th
e
carton,
inv
e
rt
the
sp
eake
r
and
pull
the
carton
off
of
the
lou
dspeake
r.
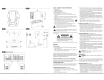
(See
Figur
e
1.)
•
Remo
ve
all
i
nner
packing,
including
plas
tic
bags,
and
re-
install
the
gri
ll
e
on
the
front
of the
ca
binet.
Inspect
the
loudspeaker
for
shipping
damage
.
If
dam
age
has
occurred,
notify your
Klipsch
dealer
or
the
responsible
transit
company.
Re
t
ain
a
ll
packaging
fo
r
future
use.
Bookshelf, Center
and Surround
Models
Th
ese
models
are
s
upplied
with
se
lf-
st
ick
ru
bber
f
eet
to
pr
even
t s
urf
ace
damage.
(See
Figure
2
for
proper
application.)
ROOM
PLACEMENT
Your
Refere
nce
lo
udspeakers
w
ill
perform
well
in a
variety
of
location
s,
b
ut
best
resul
ts w
ill
be
ac
hieved
us
in
g
th
e
follow
i
ng
g
uid
elin
es:
Front Left and Right Speakers
(See
Fi
gure
3.)
•
Place
on a
common
wall
6
to
15
lee
t
ap
art
.
•
If
u
sed
in
a
home
theater
sys
tem,
pos
ition
t
he
sp
ea
kers
fla
nking
you
r
video
di
sp
l
ay.
•
Pos
ition
them
e
quidistant
from
the
back
wall.
•
Position
t
he
m
at
the
same
height
abov
e
th
e
fl
oo
r
(
for
non-flo
or
stand
in
g
mod
el
s)
wi
lh
th
e
high
frequency
driv
ers
at
seat
ed
ear
he
ig
ht.
•
Angle
spea
ker
s to
wa
rd
the
lis
te
n
er
a
nd
even
wi
th
or
f
orwa
rd
of
any ad
ja
cen
t
obs
t
ruct
ions.
• P
lac
i
ng
the
m
nea
r a
comer
or
wa
ll
prov
i
des
th
e
grea
t
est
amount
of
bass
w
hil
e
moving
the
speake
rs
awa
y
from
room
bounda
ri
es
reduce
s
bass
ene
rg
y.
•
Asymme
tri
cal
pla
cement
of
a
pa
ir
of
spea
k
ers
f
rom
ad
jace
nt
side
wal
ls
can
smoo
th
roo
m-
induced
bass
uneve
nness.
•
Books
helf
mode
ls
ma
y
be
pl
aced
on
s
helve
s
or
optiona
l fl
oor
st
ands
.
•
Exper
i
me
nt
wi
th
the
above
gu
idel
in
es
to
su
it
your
t
aste
and
to
compen
sate
fo
r
your
room'
s
acousti
c
cha
r
ac
ter
isti
cs.
Center Channel
Speakers (
See
Figures
3 and
4.
)
• Pl
ace
immed
iate
ly
above
or
be
low
center
of
yo
ur v
id
eo
display.
•
These
models
are
su
pp
l
ied
wi
th
a
ti
lt
ro
d
to
compensate
fo
r
placemen
ts
above
or
be
l
ow
sea
t
ed
ear
he
igh
t.
The
ti
lt
rod
sc
r
ews
in
to
ei
th
er
1/4
",
20
th
readed
in
se
rt
on
lhe
speaker
bo
ttom.
•
Use
the
s
uppli
ed
self-st
i
ck
ru
bber
pa
ds
to
cove
r
th
e
threaded
bush
i
ng
h
oles
(2)
if
the
tilt
rod
is
not
used
.
(See
Fi
gure
6.)
Surround Channel
Speakers
(Se
e
Figures
3
and
4
.)
•
Pla
ce
approximate
ly
2
feet
above
th
e
li
ste
ni
ng
pos
i
tion
{Typica
ll
y
t
hi
s
wi
ll
be
about
5-7
feet
abo
ve
the
floor.)
•
The
surrounds
shou
ld
be
pl
aced
on
the
walls
di
r
ecl
ly
adja
ce
nt
to
t
he
list
en
ing
pos
i
tion.
Ano
th
er
o
ption
would
be
on
the
w
all
b
ehind
the
li
stening
pos
ition.
•
T
he
fina
l
surro
u
nd
speake
r
placeme
nt
depends
on
your
room
's c
harac
t
erist
i
cs
.
•
Use
the
attac
he
d k
eyho
le
moun
t to
hook
to
an
a
ppr
opriately
si
zed
s
cr
ew
h
ead
screwed
i
nto
a
wall
st
ud
or
wall
ancho
r
wi
th
a
suitab
le
we
i
ght
bear
in
g
ca
pac
ity.
(See
Fi
gure
4
.)
•
See
your
Klipsc
h
deale
r
for
thi
rd
-p
arty
,
adj
usta
ble
wall
mounts
if r
eq
u
ir
ed
.
The
se
mounts
ut
ilize
the
t/4",
20-
th
re
ad
ed
bushings
on
lhe
r
ea
r
of
t
he
cab
i
ne
t.
A
CAUTION!
N
ever
use
the
attached
ke
y
ho
le
mo
unt
f
or
m
oun
ti
ng
the
speake
r to t
he
ce
il
i
ng'
CONNECTING
,
A
CAUTION!
Tu
rn
you
r
amp
lifier
off
befor
e maki
ng
a
ny
co
nn
ec
ti
ons
.
Your
loudspeake
rs
a
re
equ
i
pped
w1
th
posi
tive
(Red)
and
negati
ve
(Bl
ack
)
con
ne
ct
i
on
te
rminals
on
the
rear
of
th
e
cab
i
net.
T
he
se
co
rre
spond
to
t
he
posi
ti
ve
and
ne
gative
t
erm
inals
on
the
appropri
ate
channe
l (
le
ft
,
rig
ht
,
cent
er
,
rea
r e
tc
.)
of
yo
ur
am
plifie
r.
Standard
Connections
(
See
Fi
gu
re
5.)
•
Some
Ref
e
rence
speakers
come
wi
th
dua
l
bi
ndi
ng
p
osts
tha
t are co
nnected
by
a
metal
st
rip.
Do
not
remove
thi
s
str
ip
or
your
speake
rs
wi
ll
no
t
function
correctly
.
Keep
th
is
str
ip in pl
ace
and
co
n
nec
t
your
speake
r w
ir
e to
th
e
top
se
t
of
the
bindin
g p
os
ts.
It
is
possible
to
"
Bi
-
wire
"
or
"B
i-
amp
"
a
speaker
t
ha
t
has
tw
o
se
ts of
bi
nding
posts.
Pl
ease
see
you
r
aud
io v
id
eo
rece
i
ver's
m
anua
l
f
or
further
instructions.
•
All
speakers
in
you
r
system
must
be
con
nected
in
phase
with t
he
posi
ti
ve
sp
eaker
term
inal
connected
to
th
e p
osi
ti
ve
ampl
ifi
er
term
i
nal.
R
epea
t
this
for
the
nega
ti
ve
speaker
term
in
al
and
amp
li
fier
ter
m
in
als
.
Most
sp
ea
ker
wire
has
di
stinguish
i
ng
mar
k
ings
on
the
in
s
ulation
of
one of
the
con
ductor
s
to
ass
ist in c
orrect
h
ookup.
•
U
se
16
ga
u
ge
(AWG
),
two
conducto
r.
copper
wi
re
at
a mini
mu
m
and
la
rger
gauge
wire
for
lo
ng
er
runs
.
The
co
nnection
term
in
als
on
yo
ur
lou
ds
p
ea
ker
w
ill
acco
mmod
ate
bare
wire
,
spa
de
te
rm
inals
or
ba
nan
a
type
plu
g
s.
•
Use
either
pa
ir of
pos
iti
ve
and
nega
tive
term
i
na
ls
keeping
the m
eta
l
co
upling
s
tr
aps
in
p
lace.
A
CAUTION!
With
a
ll
con
n
ec
ti
on
t
ypes
, t
ake
care
t
hat
th
ere
is
no
contact
bet
wee
n
the
pos
iti
ve
and
n
eg
at
ive
te
rm
ina
ls
at
the
speake
r
a
nd
amplifier
D
amage
to
you
r
eq
uipm
en
t
may
result
!
Bass
Management
When
us
i
ng
your
speake
rs
in
a
home
t
heate
r
syste
m,
co
n
sult
the
owner's
m
anua
l
of
you
r
audio
vide
o
receiver
or
process
or
for
proper
app
li
cat
i
on
of
bass
ma
n
age
-
ment
sett
i
ngs
.
•
As
a
general
rule,
compact
speakers
(Bookshe
lf,
Cente
r Ch
annel
and
Su
r-
rounds
)
are
set
to t
he
"S
ma
ll
,"
or
ba
ss-
li
m
it
ed
se
tting
.
• Fl
oo
rstan
ding
speake
rs
are
typ
i
ca
ll
y
se
t to the
"
La
rge
,"
or
fu
ll-ra
n
ge
se
tt
ing.
• Also
refe
r to
t
re
audio
vi
deo
r
ece
i
ver
or pr
ocesso
r i
nstruc
ti
ons
for
adj
usti
ng
the
r
ela
t
ive
vo
lume
leve
ls
of
the
speakers
so
the
y
ar
e at
the
same
leve
l
when
in the
lis
t
en
i
ng
pos
i
tion.
CARE
AND
CLEANING
•
Occas
i
onal
dusti
ng
or
wiping
of
the
cab
i
net
with a
damp
cl
oth
is
all
tha
t is
r
equ
ir
ed.
Ne
ver
use
a
bra
sive
or
so
l
ve
nt
type
cl
eaners
or
harsh
de
ter
gents.
•
A
vacu
um
cl
ea
ner
with
a
soft
b
ru
sh
attac
hmen
t may
be
u
sed
to
cl
ea
n
the
gr
ill
e f
abr
ic.
•
Neve
r sp
ray
pol
ishe
s
or
cl
eaners
on
the
dri
ve
un
its
(woo
fer
s, mi
dranges
or
tweeters
).
EU
COMPLIANCE
INFORMATION
:
E
li
gib
le
to
b
ear
the
CE
mark
,
Co
n
fo
rms
to
Eu
r
opean
U
nion
EMC
Direct
i
ve
2004
/1
08
/
EC;
Eu
ropea
n
Uni
on
Res
tri
ction
of
Haza
r
do
us
Subst
ances
(
RoHS
)
D
ir
ect
i
ve
2002/95/EC;
Eu
ropean
Un
ion
WEEE
Di
r
ect
i
ve
2002/96/E
C;
Confor
ms
to
European
Un
i
on
L
ow
Voltage
Dire
ct
i
ve
2006/95
/
EC
.
WEEE
NOTICE
Note
:
Th
is
mark
a
pplies
only
to
co
u
ntr
i
es
wit
hin
th
e
Eu
rope
an
Union
(EU)
and
N
orway
.
X!
-
Th
is
app
lia
nce
is
labe
l
ed
in
ac
co
rda
n
ce
wit
h
Eur
opea
n
Di
r
ect
i
ve
2002/96/EC
concern
i
ng
waste
of
el
ec
tri
ca
l
and
el
ectron
ic
equ
ip
me
nt
(WE
EE)
.
Th
is l
abel
indi
cates
that
this
pr
oduct
shoul
d
not
be
disposed
of
w
it
h
house
h
old
waste
.
It
sho
uld
be
depos~
ed
at
an
approp
ri
ate
f
ac
i
lity
to
e
na
ble
r
ecovery
and
recyc
li
ng
.
PRODUCT
REGISTRATION
Register
your
p
ro
duc
t
on
li
ne
at
www.klipsch.
com
/register
•
Kl
i
psch
wi
ll
ke
ep
you
up
-
to
-
date
on
new
pr
od
uc
ts
and p
romo
ti
ons
.
•
Yo
ur
perso
nal
inform
a
ti
on
wi
ll
ne
ver
be
r
eso
ld.
•
This
regis
t
rat
i
on
i
nforma
ti
on is
no
t used f
or
wa
rr
an
ty
purposes
.
P
lease
r
eta
in
yo
ur
receip
t
fo
r
wa
rran
ty
cl
ai
ms.