REFERENCE EN Gti SH en): 1) the stand ard, the bench mark , the point used for comp ariso n 2) the embo dime nt of the legen dary Klipsch soun d lOUD AND PROUD SINCE 1946 In 1946, Paul W. Klipsch revolutionized the audio industry by creating our proprietary horn technology and the acoustic principles that are the driving force behind our highly acclaimed signature sound. Today, we remain true to PWK's vision and pack the better part of a century's worth of sweat and genius into every product we make.
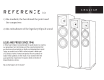
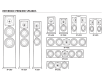
REFERENCE PREMIERE SPEAKERS -- ~ ~ .____.. _____..,.----,-______ ~ ~O~G0~ ~ ~ , RP-160M , RP-150M ...._ RP-2505 - ~ ~ 0~~~0 RP-450C @~~0® RP-440C RP-280F RP-260F RP-250F 0~~ RP-250C ..
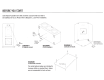
BEFORE YOU START Some Klipsch® speakers have feet and other accessories that may need to be installed prior to use. Please refer to Diagrams 1, 2, 3 and 4 for installation. co· : - ~) -- , \ \ \ \ , ' ,k=:====:::=:::::::::::. Felt Bumpers ,/~ DIAGRAM 3 DIAGRAM 1 SURROUND SPEAKERS R-150M WALL MOUNT ~ //-1' DIAGRAM 4 FLOORSTANDING SPEAKERS The included optional spikes are intended to increase stability on carpeted floors. Spikes are not recommended for hard surfaces.
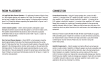
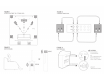
ROOM PLACEMENT Left and Right Main Channel Speakers - For optimum performance, Klipsch Group, · Inc. (KG I) suggests placing your speakers 6 to 15 feet (1.8 to 4.6m) apart. They may also be toed-in slightly for better stereo imaging. The listening position should be about 1to 1.5 times the distance separating the speakers. Refer to Figures 1and 3 for connection and placement.
FIGURE 1 FIGURE 3 SPEAKER PLACEMENT IN LI STENING AREA 0 0 6' 15' Sub c • '' ~ 1f I , y X \ I I ' 'II Q ( • Sub TV ~tt ~ STANDARD CONNECTIONS / I z - + X=Y=Z I ~ • • +@ @ . r -@ @ front RIQht I ~ • ~• ( Front Left ; .
CARE AND CLEANING PRODUCT REGISTRATION The only thing you should ever need to do to your speakers is dust them occasionally. Never apply any abrasive or solvent-based cleaner or any harsh detergent. You can clean the grilles with the brush attachment of a vacuum cleaner. Register your product online at www.klipsch.com/register • Keep up-to-date on new products and promotions. • Your personal information will never be resold. • This registration information is not used for warranty purposes.
CONSUMER KLIPSCH AUDIO TECHNOLOGIES Reference Premiere RP-280F/RP-260F/RP-250F Floorstanding Speaker Service Manual Product Type: RP-280F/RP-260F/RP-250F Manual Part #: 1061797 Model Line: Reference Product Launch Year: 2015 The information contained in this document is solely intended for service and repair of Klipsch Group, Inc product; use of this information to mimic or copy KGI designs is strictly prohibited and subject to prosecution. Table of Contents SPECIFICATIONS................................
Service Manual – Consumer Specifications Cut Sheet Data Model: RP-280F 2
Service Manual – Consumer Specifications Cut Sheet Data Model: RP-260F 3
Service Manual – Consumer Specifications Cut Sheet Data Model: RP-250F 4
Service Manual – Consumer Exploded View 5
Service Manual – Consumer Warranty Parts List Reference Premiere Floorstanding Speaker Warranty Replacement Parts Part Number Parts Description RP-280F Warranty Replacement Parts 1060814 Reference Premiere Tweeter 1061147 RP-280F Woofer 1061107 RP-280F Grill 1061087 RP-280F Network Assy 1062493 Premiere Binding Post Shorting Straps (Pair) 1016198 Rubber Foot RP-260F Warranty Replacment Parts 1060814 Reference Premiere Tweeter 1061254 RP-260F Woofer 1061108 RP-260F Grill 1061086 RP-260F Network Assy 1062493
Service Manual – Consumer Tweeter Removal for RP-280F, RP-260F, and RP-250F Tools needed: 3mm hex (Allen) key Small Flat Blade Screwdriver First, gently pry back the silicone tweeter horn lens with your finger-tips as illustrated below 7
Service Manual – Consumer 8
Service Manual – Consumer Next, begin removing the screws from the perimeter of the tweeter, highlighted in red below. There will be eight (8) total screws to remove, each using a 3mm hex key head.
Service Manual – Consumer 10
Service Manual – Consumer Once all the screws have been removed, the tweeter and tweeter horn should come free as shown below. Once the tweeter is removed from the cabinet, slide back the silicone covers on the terminals, and use a small flat blade screw driver to release the wire clips holding to the positive and negative terminals of the tweeter.
Service Manual – Consumer After the tweeter is removed completely from the cabinet, turn the tweeter over with the magnet facing up.
Service Manual – Consumer 13
Service Manual – Consumer Once the screws have been removed, the tweeter driver will come free as shown below. Next, place the new tweeter on the horn lens and replace the four (4) screws. Reattach the wire clips to the positive and negative terminals on the tweeter, and seat the tweeter back into position. Replace the eight (8) screws holding the tweeter in place inside the cabinet.
Service Manual – Consumer Troubleshooting Guides Woofer Removal for RP-280F, RP-260F and RP-250F Tools needed: 3mm hex (Allen) key Small Flat Blade Screwdriver First, gently pry back the silicone trim ring with your finger-tips as illustrated on the next page 15
Service Manual – Consumer 16
Service Manual – Consumer Once the trim ring is removed, begin removing the screws from the perimeter of the woofer. There are six (6) screws in total, each using a 3mm hex key head, highlighted in red below.
Service Manual – Consumer 18
Service Manual – Consumer Once the screws are removed, the woofer should come free as shown below.
Service Manual – Consumer Next, slide back the silicone covers on the terminals, and use a small flat blade screw driver to release the wire clips holding to the positive and negative terminals of the woofer 20
Service Manual – Consumer Once the woofer is removed, the cabinet will look as shown below. Next, plug the wires on to the new woofer, and slide the silicone covers back over the terminals. Place the woofer back into position, and replace the screws. Replace the trim ring by setting into position and gently pressing the trim ring around the edge.
CONS IGNES DE StCURITt IMPORTANTES I IMPORTANT SAFETY INSTRUCTIONS I READ these instructions. KEEP these instructions. 1. 2. 3. 4. 5. 6. 7. 8. 9. DO NOT block any ventilation openings. Install in accordance with the manufacturer's instructions. DO NOT install near any heat sources such as radiators. heat registers, stoves, or other apparatus (including amplifiers) that produce heat. ONLY USE attachments/accessories specified by the manufacturer. 10. USE ONLY with the cart.
Klipsch .Jamo RUSSIAN - rAPAHTMJ-CWA KOMIIdll~~ Hp~ti!Group, lo< (1::61) npe,!IOti~SMe1Hepg~~II(W1 poJtM~~O'-Iy POliSM · GWARANCJA-ltSA FirmaKiipschGroop. 11c,(KGI}gwarantU)tplf!WOIIli'ITIUnabywcydetalic:lnenliJ,itW)'I6b:l'Jl ~ OX ~naTtHO lilpaHIM ll ~a~tC IM MJ1fpHAIIM ~ ~ l i()IOQH~ M~ ,!I~HHOI ~ MJJifiiMH b\(lzic wol'l)'odllad mateMcwycitl wadw~twaprrezokres p~(S)~tod~ty Cp!XOM HQ 5 (Mlb) nn, lta~MH.I~ CJiaT!II HOKjflKH, r,pM )'COOBHH H(OM030Ril~~~ zakUPIJpodwJrl.llkienl.