
User's Manual


CONNECTION
1. Connecting the soundbar to your TV: The soundbar part of your Klipsch HD
Theater SB 3 system is what needs to be connected to your TV, Cable Box or
Satellite Receiver. If you have other devices connected to your TV, such as a DVD /
BluRay player, gaming system, etc., connect the soundbar to the TV so that you can
listen to all those and your TV through the soundbar. If there are no other devices
connected to your TV other than a cable or satellite box and you receive all of your
television programs from that box, you can connect the soundbar to either that box or
your TV. There are three different ways to connect the soundbar to your TV, Satellite or
Cable box.
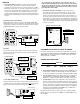
A. Digital Optical Cable (Preferred Method)
Most High Definition TV’s, Satellite and Cable boxes have an DIGITAL OPTICAL AUDIO
OUTPUT. Simply connect one end of a digital optical cable (included) into the correspond-
ing output of your TV, Satellite or Cable box and connect the other end of the cable into
the DIGITAL OPTICAL INPUT on the back panel of the soundbar.
B. RCA Cable
If you do not have an optical digital output, you can use analog left and right audio
outputs on your device and connect them to the analog left and right inputs on the
soundbar (cable supplied).
C. 3.5mm Output (Headphone Jack)
Other choices would be to connect from a headphone output on your device to the ana-
log left and right inputs on the soundbar (cable NOT supplied) OR from a headphone
output on your device to the 3.5mm input on the right side of the soundbar.
Once you have made any of the above audio cable connections, connect the
supplied soundbar power supply into the “DC Input” on the back of the soundbar,
plug the other end into an active electrical socket and turn the Main Power Switch
on the back of the soundbar on. Select the input you connected the TV to by push-
ing the input button on the soundbar.
2. Connecting the subwoofer to the soundbar: Once you have placed the sub-
woofer in the room, take the supplied subwoofer power cord, plug one end into
the subwoofer where it is labeled “AC In” and plug the other end into an active
electrical socket. Turn the Main Power Switch on the back of the subwoofer on. On
the soundbar, make sure the left status light is either solid green or orange (press
SOURCE button once if light is steady red). The red light will turn on until it finds the
wireless signal coming from the soundbar. Once it finds that signal (approximately 15
seconds), the solid red light will change to solid blue, indicating the subwoofer is now
connected to the soundbar.
PROGRAMMING YOUR TV REMOTE TO OPERATE THE SOUNDBAR
The following 3 steps should be used to program each function of your TV or cable box
remote control buttons (MUTE, VOLUME UP, & VOLUME DOWN). IF THE SOUNDBAR IS IN
STANDBY MODE (solid red status light), push the <SOURCE> button on the soundbar
until the status light is solid GREEN.
1. Place the unit in learning mode: With the status light showing solid GREEN, press and
hold down both the <SOURCE> and <MUTE> buttons on the front of the soundbar at
the same time (approximately 3 seconds) until the status light flashes RED and GREEN
2. Select the function to learn: Press the <MUTE> button once on the soundbar (the
status light changes to solid ORANGE). (Substitute the VOLUME UP & VOLUME
DOWN in place of <MUTE> when programming the other buttons during this step)
3. Learn the function: Hold your remote control within one foot and pointed at the
front of the soundbar. Slowly press the <MUTE> button on your remote control four
times. On the first three presses, the status indicator light will flicker ORANGE with
each press. If the unit has successfully learned the function, on the fourth press of
the button, the light will flash GREEN several times and then turn to solid GREEN.
(Remember to use the VOLUME UP & VOLUME DOWN in place of <MUTE> when
programming the other buttons during this step)
To program the remaining functions, simply repeat all steps, substituting <MUTE>
with the new function and button presses (VOLUME UP, and VOLUME DOWN) on steps
TWO and THREE.
POWER
OFFON
SUBWOOFER
VOLUME
MAXMIN
AC~100-240V
50/60Hz
90W
24V – 2.5A
60W
L
R
DC IN
POWER
ONOFF
1 2SOURCE
Subwoofer Rear Connection Panel
Status Light
AC Power Cord
24V – 2.5A
60W
L
R
DC IN
POWER
ONOFF
1 2SOURCE
Male RCA to Male
RCA Cable
(Supplied)
Soundbar Connection Panel
Soundbar Right Side
TV Connection Panel
3.5mm to Male RCA
Cable
(Not Supplied)
3.5mm to 3.5mm
Cable
(Not Supplied)
24V – 2.5A
60W
L
R
DC IN
POWER
ONOFF
1 2SOURCE
24V – 2.7A
65W
R
L
DC IN
POWER
ONOFF
1 2SOURCE
OFF ON
24V – 2.7A
65W
R
L
DC IN
POWER
ONOFF
1 2SOURCE
Digital Optical Cable
(Supplied)
TV Connection Panel
Soundbar Connection Panel
POWER
OFFON
SUBWOOFER
VOLUME
MAXMIN
AC~100-240V
50/60Hz
90W
24V – 2.5A
60W
L
R
DC IN
POWER
ONOFF
1 2SOURCE
Power Supply
and AC Cord
Soundbar Connection Panel
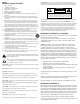
SOUNDBAR FRONT CONTROL PANEL
STATUS LIGHTS
SOURCE MUTE VOLUME DOWN VOLUME UP