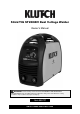
Stick/TIG ST200iDV Dual Voltage Welder Owner’s Manual WARNING: Read carefully and understand all ASSEMBLY AND OPERATION INSTRUCTIONS before operating. Failure to follow the safety rules and other basic safety precautions may result in serious personal injury.
® Thank you very much for choosing a Klutch product! For future reference, please complete the owner’s record below: Serial Number/Lot Date Code: ________________________________ Purchase Date: ____________________________________________ Save the receipt, warranty, and this manual. It is important that you read the entire manual to become familiar with this product before you begin using it. This welder is designed for certain applications only.
Table of Contents Intended Use .......................................................................................................................................... 4 Important Safety Information ............................................................................................................... 5 General Safety Rules ............................................................................................................................ 6 Specifications of Welder ........................
Intended Use The Klutch ST200iDV is a dual-input voltage, DC only, inverter stick welder with an exceptionally smooth stick welding performance. It’s intended for welding steel, stainless steel, cast iron, and hard surfacing, using electrodes from 1/16 inch to 5/32 inch. This unit can also perform lift start DC TIG welding on steel and stainless steel materials with the optional TIG Torch #44455*. Argon shielding gas along with a regulator, gas hose, and TIG filler rod is also required for TIG welding.
Important Safety Information ⚠WARNING Read and understand all instructions. Failure to follow all instructions may result in serious injury or property damage. The warnings, cautions, and instructions in this manual cannot cover all possible conditions or situations that could occur. Exercise common sense and caution when using this tool. Always be aware of the environment and ensure that the tool is used in a safe and responsible manner.
parts. Air vents on the tool often cover moving parts and should be avoided. Wear the proper personal protective equipment when necessary. Use ANSI Z87.1 compliant safety goggles (not safety glasses) with side shields, or when needed, a face shield. Use a dust mask in dusty work conditions. Also use non-skid safety shoes, hardhat, gloves, dust collection systems, and hearing protection when appropriate. This applies to all persons in the work area. Do not overreach.
⚠WARNING Your Welding Environment Keep the environment you will be welding in free from flammable materials. Always keep a fire extinguisher accessible to your welding environment. Always have a qualified person install and operate this equipment. Make sure the area is clean, dry, and ventilated. Do not operate the welder in humid, wet, or poorly ventilated areas. Always have your welder maintained by a qualified technician in accordance with local, state, and national codes.
⚠WARNING Electrical Shock Electric arc welders can produce a shock that can cause injury or death. Touching electrically live parts can cause fatal shocks and severe burns. While welding, all metal components connected to the wire are electrically hot. Poor ground connections are a hazard, so secure the ground lead before welding. Wear dry protective apparel: coat, shirt, gloves, and insulated footwear. Insulate yourself from the work piece. Avoid contacting the work piece or ground.
Warn people in your welding area when you are going to strike an arc so they can protect themselves. ⚠WARNING Fire Hazards Do not weld on containers or pipes that contain or have had flammable, gaseous or liquid combustibles in them. Welding creates sparks and heat that can ignite flammable and explosive materials. Do not operate any electric arc welder in areas where flammable or explosive materials are present. Remove all flammable materials within 35 feet of the welding arc.
Do not weld on the cylinder Always secure the cylinder upright to a cart or stationary object. Keep cylinders away from the welding or electrical circuits. Use the proper regulators, gas hose, and fittings for the specific application. Do not look into the valve when opening it. Use the protective cylinder cap whenever possible ⚠CAUTION Proper Care, Maintenance, and Repair Always have power disconnected when working on internal components.
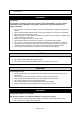
Main Parts of Welder 1 9 8 5 2 6 4 7 3 10 5 Figure 1.
Reference 1 2 3 4 5 6 7 8 9 10 Subassembly Indicator Lights Output Amperage Control Input Power Adapter 120V Negative (-) Weld Output Terminal Ground Cable And Clamp Positive (+) Weld Output Terminal Electrode Holder And Cable Weld Process Selector Switch Digital Output Amperage Display Shoulder Strap Setting Up Equipment ⚠WARNING ELECTRIC SHOCK CAN KILL! High voltage danger from power source! Consult a qualified electrician for proper installation of receptacle.
⚠CAUTION Make Tight Connections Improper connections, including loose connections, in the weld circuit leads to resistance causing excessive heat and may result in damage to your equipment. Insure all connections are snug and tight. DC STICK WELDING ASSEMBLY ⚠CAUTION Be aware that the ELECTRODE HOLDER will be electrically HOT when the Input Power Switch on the welder is turned on. 1. 2. 3. 4. 5. 6. Install the ground cable quick connector to the Negative (-) Weld Output Connector (Figure 1).
grounded 230 VAC (220V - 240V), 60 HZ, single phase, 50 amp power source. If operating on 120V, attach the 120V Adapter cord to the unit power cord and then connect the assembly to a properly grounded 120 VAC (110V-130V), 60 Hz, single phase, 20 amp power source. DC STICK OPERATION 1. SETTING UP THE WORK PIECE a. Welding Positions - There are two basic positions, for welding: Flat and Horizontal. Flat welding is generally easier, faster, and allows for better penetration.
2. GROUND CLAMP CONNECTION Clear any dirt, rust, scale, oil, or paint on the ground clamp. Make certain you have a good solid ground connection. A poor connection at the ground clamp will waste power and heat. Make sure the ground clamp touches the metal. 3. ELECTRODE The welding electrode is a rod coated with a layer of flux. When welding, electrical current flows between the electrode (rod) and the grounded metal work piece.
ii. The bead will undercut the work. iii. The bead will be flat and porous. iv. The rod may be freeze or stick to work piece. Note: The rate of travel over the work also affects the weld. To ensure proper penetration and enough deposit of the rod, the arc must be moved slowly and evenly along the weld seam. 5. SETTING THE AMPERAGE CONTROL The welder has an infinite current control. It is capable of welding with electrodes up to 3/32” diameter.
It is important that the gap be maintained during the welding process without being too wide or too narrow. If it’s too narrow, the rod will stick to the work piece. If it’s too wide, the arc will be extinguished. Practice will be needed to maintain the gap. A beginner will usually have sticker or arc extinguishing. When the rod is stuck to the work piece, gently rock it back and forth to separate them. If not, a short circuit will occur and it will break the welder.
beads. Too long of an arc will be held or the travel speed will vary from slow to fast (illustrated below). A. Weld speed is too fast. B. Weld speed is too slow. C. Arc is too long. D. Ideal weld. A solid weld bead requires that the electrode be moved slowly and steadily along the weld seam. Moving the electrode rapidly or erratically will prevent proper fusion or create a lumpy, uneven bead.
Consult a qualified electrician for proper installation of receptacle at the power source. This welder must be grounded while in use to protect the operator from electrical shock. If you are not sure if your outlet is properly grounded, have it checked by a qualified electrician. Do not cut off the grounding prong or alter the plug in any way and do not use any adapter, other than the supplied adapter, between the welder's power cord and the power source receptacle.
8.5 Move the joint down to be welded by pushing the torch. 8.6 Insert filler metal in the leading edge of the weld puddle as needed. Maintenance ⚠WARNING ELECTRIC SHOCK CAN KILL! Touching live electrical parts can cause fatal shocks or severe burns. Do not touch live electrical parts Wear dry, hole-free insulating gloves and body protection. Disconnect input power before installing, maintaining or servicing this equipment. Lockout/tagout input power according to OSHA 29 CFR 1910.147.
Failure Possible Cause Corrective Action Unit is not plugged in Plug in unit Input power circuit breaker is not on Reset Input power circuit breaker The Main Power Switch is not working Replace main power switch The internal temperature is too high Leave power on and let the fan cool the unit. Output will continue when the unit has cooled Input power voltage is high or too low Meter input power voltage.
Parts Diagram Page 22 of 25
Parts List Reference 1 2 3 4 5 6 7 8 9 10 11 12 13 14 15 16 17 18 19 20 21 22 23 24 25 26 27 28 Part Number 105300038 125300006 105300039 125400006 105300040 105300041 105300042 105300043 105300044 105300045 105300046 105300047 105300048 105300049 125300007 105300050 105200058 105300051 105300052 105300053 105300035 105300054 105300055 105300056 105300057 105300058 105300059 105300060 105300061 105300062 105300063 105200046 105200211 105200212 Item Description HANDLE ENCLOSURE WARNING LABEL NEED HELP LAB
Limited Warranty Northern Tool and Equipment Company, Inc. ("We'' or "Us'') warrants to the original purchaser only ("You'' or ''Your'') that the Klutch product purchased will be free from material defects in both materials and workmanship, normal wear and tear excepted, for a period of three years from date of purchase. The foregoing warranty is valid only if the installation and use of the product is strictly in accordance with product instructions.
Distributed by: Northern Tool & Equipment Company, Inc. Burnsville, Minnesota 55306 www.northerntool.