
Product Manual


Page 19 of 25
Consult a qualified electrician for proper installation of receptacle at the power source. This
welder must be grounded while in use to protect the operator from electrical shock. If you are
not sure if your outlet is properly grounded, have it checked by a qualified electrician. Do not
cut off the grounding prong or alter the plug in any way and do not use any adapter, other than
the supplied adapter, between the welder's power cord and the power source receptacle.
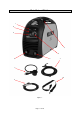
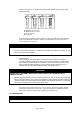
Make sure the POWER switch is OFF then connect your welder's power cord to a properly
grounded 230 VAC (220V - 240V), 60 HZ, single phase, 50 amp power source. If operating on
120V, attach the 120V Adapter cord to the unit power cord and then connect the assembly to a
properly grounded 120 VAC (110V-130V), 60 Hz, single phase, 20 amp power source.
⚠WARNING
EXPOSURE TO A WELDING ARC IS EXTREMELY HARMFUL TO THE EYES AND SKIN!
Prolonged exposure to the welding arc can cause blindness and burns. Never strike an arc or
begin welding until you are adequately protected. Wear flame-proof welding gloves, a heavy
long sleeved shirt, trousers without cuffs, high topped shoes, and an ANSI approved welding
helmet.
⚠CAUTION
Be aware that the TIG torch will be electrically HOT when the Input Power Switch on the welder is
turned ON.
1. Remove the ground cable and the electrode holder from the weld output connections. Install
the ground cable to the Positive (+) weld output connection.
2. Secure the ground clamp to the work piece
3. Connect a regulator to a bottle of ARGON gas. Then connect the gas connection from the TIG
torch to the regulator.
4. Connect the TIG torch weld cable to the Negative (-) weld output connection.
5. Set desired amperage on the amperage control knob on the front panel of the welder.
6. Turn ON the input power switch on the welder.
7. Turn ON the regulator on the bottle of shielding gas and adjust the regulator to approximately
20 CFH. Then open the shielding gas valve on the torch to start the flow of shielding gas.
8. Follow these steps for striking an arc while TIG welding.
8.1 Open the shielding gas valve on the torch handle to begin gas flow.
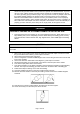
8.2 Rest the TIG torch nozzle on the work piece taking care to not touch the installed tungsten
electrode.
8.3 Twist the torch to make contact between the work piece and the tungsten.
8.4 Lift the torch away from the work piece about 1/8 inch.