Operator's Manual I:Rl FI'SlVl N 205cc Engine Front Tine Tiller Model No. 247.29935 * * * * * * CAUTION: Before using this product, read this manual and follow all safety rules and operating instructions. Sears Brands Management Corporation, Hoffman Estates, SAFETY ASSEMBLY OPERATION MAINTENANCE PARTS LIST ESPANOL iL 60179, U.S.A. Visit our web site: www.craftsman.com FORM1/0.
WarrantyStatement .................................. Pace2 Safetyinstructions .................................... Paces 3-6 Assembly .................................................. Paces 7-10 Operation .................................................. Paces 11-15 ServiceandMaintenance ......................... Paces 16-19 Off-Season Storage.................................. Pace 20 TroubleShooting ....................................... Pace21 CRAFTSMAN PartsList......................................
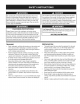
This machinewas built to be operatedaccordingto the safe operation practicesin this manual.As with any type of powerequipment, carelessnessor error on the part of the operatorcan resultin seriousinjury.This machineis capableof amputatingfingers,hands, toes and feet and throwingdebris. Failureto observethe following safetyinstructionscouldresultin seriousinjuryor death. This symbolpointsout importantsafetyinstructionswhich,if not followed,couldendangerthe personalsafetyand/orpropertyof yourselfand others.
Safe Handling of Gasoline: Toavoidpersonalinjuryor propertydamageuseextremecare in handlinggasoline.Gasolineis extremelyflammableand the vaporsare explosive.Seriouspersonalinjurycan occurwhengasolineis spilled on yourselfor yourclotheswhichcan ignite.Washyour skin and changeclothesimmediately. • • Use onlyan approvedgasolinecontainer. Neverfill containersinsidea vehicleor on a truckor trailerbed with a plasticliner.Alwaysplacecontainerson the groundaway fromyour vehiclebeforefilling.
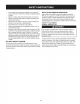
• Do notchangethe enginegovernorsettingsor over-speedthe engine.Thegovernorcontrolsthemaximumsafeoperatingspeed of engine. Maintainor replacesafetyand instructionlabels,as necessary. Followthis manualfor safe loading,unloading,transporting,and storageof this machine. Alwaysreferto theoperator'smanualfor importantdetailsif the machineis to be storedforan extendedperiod. If thefuel tank hasto be drained,do this outdoors. Observeproperdisposallawsand regulationsfor gas,oil, etc.to protectthe environment.
SAFETY SYMBOLS This pagedepictsand describessafetysymbolsthat mayappear on this product. Read,understand,and followall instructionson the machine beforeattemptingto assembleand operate. i READ THE OPERATOR'S MANUAL(S) Read, understand, i and follow all instructions in the manual(s) before attempting to assemble and operate WARNING-- ROTATING TINES Do not put hands or feet near rotating hands and feet. WARNING-- parts. Contact with the rotating parts can amputate parts.
NOTE:This unit is shippedwithoutgasolineor oil in theengine.Be certainto serviceenginewith gasolineand oil as instructedin the Operationsectionof this manualbeforeoperatingyourmachine. NOTE:Referenceto rightand left hand sideof the Tilleris observed fromthe operatingposition. OPENING Cut eachcornerof the cartonverticallyfromtop to bottom. Removeall looseparts. 3. Removeloosepackingmaterial. 1. 2. f UNIT FROM CARTON Use the handlebarto lift and pullthe tiller backwardsto a flat area.
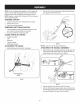
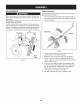
4. Tightenthe boltsecurelyafter securingthe handlebrace.See Figure4. Insertthe depthstakeassemblyintothe frameand reinstallthe two screwsremovedearlier.Tightenthe hex bolts securely.See Figure6. Depth Stake Assembly / / Bell Washer Handle Brace Figure4 5. 6. 7. Securethe pin with theclip removedearlier.Thedepthstakecan be placedat variouspositions.Forsetup purposesit is suggested that the depthstakebe assembledwith the stakejust above or levelwith the groundsurface.
SET-UP Fuel Recommendations Tire Pressure Useautomotivegasoline(unleadedor lowleadedto minimizecombustion chamberdeposits)with a minimumof 87 octane.Gasolinewith up to 10%ethanolor 15%MTBE(MethylTertiaryButyl Ether)can be used. Neverusean oil/gasolinemixtureor dirty gasoline.Avoidgetting dirt, dust,or waterinthe fuel tank.DO NOTuse E85 gasoline. Checkthe air pressurein bothtires.The air pressureshouldbe between15-20PSI.Keep bothtires equallyinflatedto help prevent machinefrom pullingto one side.
ADJUSTMENTS Cable Adjustment Beforeoperatingthe tiller the adjustmentof the forwardand reverse drivecables mustbe checked. Priorto operatingyour tiller,carefullyread and followall instructions below.Performall adjustmentsto verifyyourtiller is operatingsafely 1. 2. and propery. Depth Stake Disconnectand groundthe sparkplug wireagainstthe engine. Adjust eitherthe forwardor reverseclutchcableby looseningthe hexnut. See Figure9.
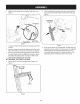
f Forward Tine Engagement Lever Air Filter -- Handle Height Adjustment Fuel Ca Oil Fill Cap & Dipstick )th Stake Tiller Tines .J Figure12 Nowthat youhaveset up yourtillerfor operation,get acquaintedwith CHOKE itscontrolsand features.Theseare describedon the next two pages CHOKE and illustrated on this page.This knowledgewill allowyou to useyour newequipmentto itsfullestpotential.
HANDLEBAR HEIGHT ADJUSTMENT TO STOP ENGINE Thehandle heightmaybe adjusted.Loosenthe knobto changethe position.Tightenhardwarewhencomplete.See Figure12. 1. To stopthe wheelsand tines, releasethe ForwardClutchBail. 2. Movethrottlecontrol leverto slow(turtle) _ position. Wheneverpossible,graduallyreduceengine speedbefore stoppingengine. OIL FILL CAP & DIPSTICK Engineoil levelcan be checkedand oil addedthroughtheoil fill. See Figure12. 3. NOTE:This unitwasshippedWITHOUToil in theengine.Oil isincluded 4.
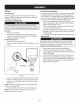
Yoke Back ADJUSTING Attachthe wheelyokeso that the wheelsare towardthe rear(closest to depthstake)for deeptilling andcultivatingby removingtheclevis pin and cotter pin,See Figure15, The handleshouldbe adjustedsothat whenthe tiller is digging3-4" into the soil, thehandlefalls to aboutwaste-high.Toadjust handle, simplyloosenthe handleknob,movethe handleto the desiredheight and retightenthe handleknob.See Figure17.
TiLLiNG TIPS & TECHNIQUES Beforetilling, contactyourtelephoneor utilitiescompanyand inquire Suggested Tilling Patterns • Whenpreparinga seedbed,go overthe samepathtwice in the first row,then overlapone-halfthe tiller widthon the restof the passes.See Figure19. l ifundergroundequipmentor linesare usedon yourproperty.Do not [till near buriedelectriccables,telephonelines, pipesor hoses. Tilling Depth o This isa FRT(forward-rotatingfine) tiller.
If the garden sizewill not permitlengthwiseand then crosswise tilling,then overlapthefirst passesbyone-halfa tillerwidth,followedby successivepassesat one-quarterwidth.See Figure21. Terrace Gardening 1. Tocreatea terrace,startat the top of the slopeand workdown Go backand forth acrossthe first row.See Figure22. /- -, Q I .REPEAT J Figure21 Figure22 Tilling on a Slope . Do notoperatethe tilleron a slopetoo steepfor safe operation.Till slowlyand be sureyou havegood footing.
MAINTENANCE SCHEDULE Followthe maintenanceschedulegivenbelow.This chart describes serviceguidelinesonly. Usethe ServiceLog columnto keeptrackof completedmaintenancetasks.To locate the nearest Sears Service Centeror to scheduleservice,simplycontactSears at 1-800-4-MY-HOME®. Beforeperforminganytypeof maintenance/service, disengageall controlsand stoptheengine.Waituntilall movingpartshavecometo a completestop.Disconnectsparkplugwireandgrounditagainstthe enginetopreventunintendedstarting.
Removethespark plug bootand use a sparkplug wrenchto removethe plug.See Figure20. Spark Plug Servicing the Air Cleaner Neverusegasolineor lowflash point solventsfor cleaningtheair cleanerelement.A fireor explosioncould result. The air cleanerpreventsdamagingdirt, dust,etc., from enteringthe carburetorand being forcedintothe engineand is importantto engine lifeand performance.Neverrunthe enginewithoutan air cleaner completelyassembled.Checkthe air cleanerbeforeeachuse.
Check Engine Oil 1. Checkoil beforeeachuse. Stopengineand wait severalminutes beforecheckingoil level.With engineon levelground,the oil must be to FULLmarkon dipstick. 2. Referto the Assemblysectionof this manualfor instructions on checkingthe oil. 1. 2. 3. Drainthe fuel fromthe tank by runningthe engineuntl the fuel tank isempty. Be surefuelfill cap is secure. With engine OFFbut still warm,disconnectsparkplug wireand keep itawayfrom sparkplug.
BELT REPLACEMENT 9. Beforeperformingany type of maintenanceon the machine,wait for all partsto stop movingand disconnectthe spark plugwire. Failure to followthis instruction couldresult inpersonalinjuryor property damage. If the drivebelt needstobe replaced,makesureyou useonlya factory authorizedbelt listedin the Partspagesof this operator'smanual,as an "over-the-counter"beltmaynotperformsatisfactorily.Theprocedure requiresaveragemechanicalabilityand commonlyavailabletools.
Never store tillerwithfuelintankindoors orinpoorly ventilated areas I where fuelfumes mayreach anopenflame, spark, orpilotlightason a furnace,water heater,c othesdryer, or gas app ance. PREPARING THE ENGINE Enginesstored between30 and 90 days needto be treatedwith a gasolinestabilizerand enginesstoredover90 days needto be drained of fuel to preventdeteriorationand gumfrom formingin fuel systemor on essentialcarburetorparts.
Beforeperforminganytype d maintenance/service, disengageall controlsand stoptheengine.Waituntilall movingpartshavecometo a completestop.Disconnectsparkplugwireandgroundit againsttheenginetoprevent unintendedstarting.Alwayswearsafetyglassesduringoperationor whileperforminganyadjustmentsor repairs. 1. Sparkplugwire disconnected. 1. Reconnectwire. 2. 3. 4. EngineThrottleControlLeverincorrectlyset. Fueltank emptyor stale fuel. Dirtyair filter. 2. 3. 4. Putleverin STARTposition.
Craftsman Tiller B IViodel No. 247.
Craftsman Tiller B IViodel No. 247.29935 720-0274 Grip,Handle 2 686-0081A-0637 WheelBracketAssembly 911-0415 ClevisPin, .375x 1.75 22 731-06253A HandleCover 3 714-04043 BowTie Cotter Pin 23 931-1645B ClutchBail Holder 4 734-04547 CompleteWheelAssy.8 x 1.75 24 936-0140 Fiat Washer,.385x .62 x .063 5 738-0929 ShoulderScrew,.496x 1.4453/8-16 25 736-0242 Bell Washer,.340x .872x .060 6 710-0805 HexHeadScrew,5/16-18x 1.
Craftsman Tiller B Model No. 247.29935 .......... _7/i;I;:_' 17 F_ \ _i ¸¸_¸;_!_I_¸¸¸¸]_¸) 34 33 35 37 27 _26 10 24
Craftsman Tiller B IViodel No. 247.29935 710-3005 Hex HeadScrew,3/8-16x 1.25 24 711-1036A Hex Nut,5/16-18 inner TineAssembly,LH 25 712-0266A Jamlock Nut,3/8-16 642-0004-0637 OuterTineAssembly,RH 26 712-3029 Nut, 1/2-20,Jam 5 642-0005-0637 OuterTineAssembly,LH 27 736-0112 Washer,.531x 1.62x .045 6 911-0415 ClevisPin,.375x 1.75 28 936-0119 LockWasher,5/16 7 714-04043 BowTie CotterPin 29 736-0242 Bell Washer,.340x .872x .060 8 710-0599 Screw,1/4-20x 0.
Briggs I & Stratton Engine IViodel 12T102 For Craftsman Tiller IViodel 247.29935 48SHORTB'OCK I I 1056OPERATOR'S MANUAL I I 1329REP'AOEMENTE NGINE I I 1330R EPAIRM ANOA'I ! 635 \ 12 15A 1026 15 @ 742 746 415 46 22 146 24 741 332 32 _ 26
Briggs & Stratton Engine Model 12T102 For Craftsman Tiller Model 247.
Briggs & Stratton Engine Model 12T102 For Craftsman Tiller Model 247.29935 163 365_ 1270 __33 __'i 633 (_i I_.
Briggs & Stratton Engine IViodel 12T102 For Craftsman Tiller IViodel 247.
Briggs & Stratton Engine IViodel 12T102 For Craftsman 971 _ 11 836 _ 832 300 883 30 Tiler IViodel 247.
Briggs & Stratton Engine IViodel 12T102 For Craftsman Tiller IViodel 247.
Briggs & Stratton Engine IViodel 12T102 For Craftsman 121 CARBURETOR Tiller IViodel 247.29935 OVERHAUL KiT 276 __;) 137 11051 (il 633 _:_ 163 987_ 358 ENGINE GASKET SET 20 163 51 883 L*"_: _ 1095V ALVE GASKET SET 868 1022 99 \ 32
Briggs & Stratton Engine Model 12T102 For Craftsman |= 699510 Tiller Model 247.
D _ I! O If 1_ 795440 Seal-Valve I! It 796964 Armature-Magneto 334 699477 Screw(MagnetoArmature) 883 691893 Gasket-Exhaust 337 491055s Plug-Spark 914 699480 Screw(RockerCover)(M6x15.8mm) 356 695814 Wire-Stop -- 797444 Screw(RockerCover)(M6x9.
Craftsman Tiller Model No. 247.
(Thispage applicablein the U.S.A.and Canadaonly.) Sears Brands Management Corporation (Sears), the California Air Resources Board (CARD) and the United States Environmental Protection Agency (U.S.
Look For Relevant Emissions Durability Period and Air index information On Your Engine Emissions Label Engines that are certified to meet the California Air Resources Board (CARB) Tier 2 Emission Standards must display information regarding the Emissions Durability Period and the Air Index. Sears Brands Management Corporation makes this information available to the consumer on our emission labels.
Congratulations on making a smart purchase. Your new Craftsman® product is designed and manufactured for years of dependable operation. But like all products, it may require repair from time to time. That's when having a Repair Protection Agreement can save you money and aggravation.
Declaraci6n de garantia ............... Medidas importantes de seguridad.. Armado ........................ Funcionamiento ................. Servicio y Mantenimiento .......... Pagina 39 Paginas 40-43 Paginas 44-47 Paginas 48-53 Paginas 54-57 CRAFTSMAN Almacenamiento fuera de temporada .... Pagina 58 Soluci6n de problemas ................ Pagina 59 Acuerdo de protecci6n para reparaciones. Pagina 63 NOmero de servicio ............
Esta m&quina est& diseSada para serutilizada respetando lasnormas deseguridad contenidas eneste manual. AIigual queconcualquier tipo deequipo motorizado, undescuido oerror porparte deloperador puede producir lesiones graves. Esta m_quina escapaz deamputar dedos, manos ypies ydearrojar residuos. Denorespetar lasinstrucciones de seguridad siguientes sepueden producir lesiones graves olamuerte.
• Manejo seguro de la gasolina: Paraevitar lesionespersonalesy da_os materialestenga muchocuidado al manipularla gasolina.La gasolinaes sumamenteinflamabley sus vapores puedencausarexplosiones.Si se derramagasolinaencimao sobre la ropa se puedelesionargravementeya que se puedeincendiar. Lavesela piely c_mbiesede ropade inmediato. • Utilices61olosrecipientespara gasolinaautorizados. • Nunca Ilenelosrecipientesen el interiorde un vehiculoo cami6n o cajade remolquecon un recubrimientopl_stico.
,, Observe lareglamentaci6n ylasnormas respecto alaeliminaci6n AVISO REFERIDO A EMISIONES correcta degasolina, aceite, etc.para proteger elmedic ambiente.
SiIVIBOLOS DE SEGURIDAD En esta p&ginase presentany describenlos simbolosde seguridadque puedenapareceren este producto. Lea,entienday cumplatodaslas instruccionesincluidasen la m_quinaantes de intentararmarlay utilizarla. -'I °_ I I I I t i , i i LEA LOS MANUALES DEL OPERADOR Lea, entienda y cumpla unidad y utilizarla.
NOTA:Estaunidadse envia singasolinani aceiteen el motor.Antes de operar la m_.quinacargueel motorcongasolinay aceitecomo se indicaen la secci6nFuncionamientode este manual. 2. Engancheel extremo"Z" del cabledel embraguede marcha directa (A) en la palancade enganchede los dientesde marcha directa.Vea la Figura2. NOTA:Lasreferenciasa los ladosderechoe izquierdode la cultivadorase hacenobservandola m_.quinadesdela posici6nde operaci6n. f h APERTURA 1. DE LA CAJA DE CARTON 2.
4. Asegureel pernodespu_sde ajustarla trabade la manija.Yea la Figura4. f 2. -, Perno del / Introduzcael conjuntode la estacade profundidad en el cuadroy volvera instalarlosdostornillosquequit6antes.Aprietelostornillos hexagonales de formasegura.Veasela Figura6. Profundidadde AsambleaStake Perilla manual Arandela Tirantedela manija camDana J Figura4 5. 6. 7. Figura6 Ubiqueel pernode carro,la arandelade campanay la perilla de manoempaquetadosconsu cultivadora.
CONFIGURACION El control y la Adici6n Recomendaciones • El Uso Inicial 1. Retirela varillade nivelde Ilenadode aceite. Coloqueel fim6na niveldel suelo,el usode un embudopara vaciartodoel contenidode la botellade aceitesuministradacon la unidaden el motor. • 3. Vuelvaa colocarla varillade nivelde Ilenadode aceitey apriete. El control y la adicJ6n de aceite 1. Coloqueel manillaren una superficiephna y nivelada. 2.
AJUSTES Antesde operarsu cultivadora,lea atentarnentey curnplatodas las instrucdonesque aparecena confinuacbn. Realicetodos los ajustesparaverificarque la unidadest&operandocon seguridady correctarnente, 6. Antes de utilizarel tirn6ndel ajustede loscables de ernbraguede rnarchaadelantedebe ser revisado. 7. Desconectey conecteel cablede la bujia contrael motor. 8. Ajuste el cabledel ernbraguede rnarchaadelante,aflojandola tuerca hexagonal.Wase la Figura9.
Filtro de Silenciador Palanca de enganche de marcha hacia adelante de los dientes aire X_ Tap6nde combustible uste de la altura de la manija Tap6nde Ilenadoy delnivelde aceite Estaca de profundidad Dientes de la cultivadora Figura10 Ahoraque tiene la cultivadorapreparadapara funcionar,familiaricese CONTROL DE OBTURACI6N con loscontrolesy funciones.Encontrar_lasdescripcionesen las siguientesdos p&ginasy las ilustracionesen _sta. Esteconocimiento le permitir_,utilizarsu nuevoequipo a su m_.
TAPON DE LLENADO DE ACEITE Y VARILLA 6. DEL NIVEL 7. Es posibJecontrolarel nivelde aceitedel motor,asi cornotarnbi_n agregaraceite,a travesdel Ilenadode aceite.Veala Figura10. NOTA:Estaunidad seentregaSINaceite en el motor.Se induye aceiteen la bolsapl_.sticaernpacadaconel manualde la unidad. Agregueaceitecornose indicaen la secci6nCargade gasoJinay de aceite.Controleel niveJde aceiteantesde cadaoperaci6npara asegurarsede que hayaaceitesuficienteen el motor.Pararn_.
ESTABLECIIVlIENTO DE LA PROFUNDIDAD Estaca de profundidad La estacade profundidadfuncionacornoun frenode la cultivadoray controlala profundidady la velocidada la cualfuncionala rn&quina. Retireel pasadorde horquillaparasubiro bajar la estacade 3rofundidad.Vea la Figura14. Cerci6resede que el cablede la bujia est&desconectadoy haciendo rnasacontra el motorantes de realizarcualquierajuste. Cerci6resede que el cablede la bujfaest,. desconectadoy haciendornasacontrael motorantes de realizarcualquierajuste.
LIIVIPIEZA DE LOS DIENTES Antes de despejarlosdientesa rnano,detengael motor,deje que todas las partesen rnovirnientose detengany desconecteel cable de la bujia.Si no se observaesta advertenciase puedenproducir lesionespersonales. Losdientestienenuna acci6nautolirnpianteque elirninala mayor partede losdesechosque se enredan.Sin embargo,a vecesse puedenenredarpastoseco,tallosfibrososo enredaderasresistentes.
Si las dirnensionesdel jardin no perrnitenla labranzaen sentido longitudinaly luegotransversal,traslapelas prirneraspasadas por la rnitaddel anchode la cultivadora,continuandocon sucesivaspasadasa un cuartodel ancho.Vea la Figura19. IViodelos de labranza sugeridos • AI prepararel lechode siembra,recorrala rnisrnasendados vecesen la prirnerahilera,luegotraslapela rnitaddel anchode la cultivadoraen el restode las pasadas.Vea la Figura17. .
Labranza cuesta arriba y cuesta abajo 1. Para mantenerla erosi6ndel sueloal minimo,aseg_resede agregarsuficientemateriaorg_.nicaal suelopara que mantenga un nivelde humedadadecuado,y tratede evitardejar pisadaso marcasde ruedas. 2. AI realizarla labranzaverticalmente,trate de hacerla primera pasadahaciaarriba ya que la cultivadoracavacon mayor profundidadcuandosubeque cuandobaja. En sueloblandoo dondehay malezas,puedeser necesarioque levantelas barras de control levementeal ir cuestaarriba.
PROGRAMA DE MANTENIMIENTO Siga el cronograrnade rnantenirnientoque se presentaa continuaci6n. Estatabla s61odescribepautasde servicio.Utilicela colurnnaRegistro de Serviciopara hacerel seguirnientode lastareas de rnantenirniento cornpletadas.Para ubicar el Centro de Servicio Sears m_s cercano o para programarun servicio, sirnplementecomuniquese con Sears al tel_fono 1-800-4-MY-HOME®. Antesde realizarcualquiertipode rnantenirniento o servicio, desenganchetodosloscontrolesy detengael motor.
1. Retirela fundade bujia y utiliceuna Ilavepara bujiaspara extraer la bujia.Veala Figura21. Mantenimiento del filtro de aire. Nuncausegasolinao solventesde puntode encendidobajo para lirnpiarel elernentodel depuradorde aire. Podriaproducirseun incendioo explosi6n. de encendido El filtro de aire evita el ingresoal carburadorde suciedad,polvo, etc. perjudicialesy evitaque losrnisrnosseanintroducidosdentro del motor.Adern_s,dichofiltro es irnportantepara la vidaOtily el rendirnientodel motor.
Inspeccione el aceite del motor 1. Reviseel aceiteantes de cadauso. Pareel motory espereunos minutosantesde comprobarel nivelde aceite.Conel motora niveldel suelo,el aceite debeser de marcaFULLen la varila. Consultela secci6nde la Asambleade este manualparaobtener instruccionessobreel controlde la petrolera. Cambie el aceite del motor 1. 2. 2. • 3. Consulte la tablade viscosidad (Figura24)paralasrecomendaciones del petr61eo. Noleneenexceso.SAE30est,.recomendado parageneral, todoel usodelatemperatura.
CAMBIO DE CORREA 3. Antesde Ilevara cabo alg_ntipo de rnantenirnientoen la rn&quina, deje que todas las piezassedetengany desconecteel cablede la bujia. Si no seobservanestasinstruccionesse puedenproducir lesionespersonaleso da_osrnateriales. Si la correade transrnisi6ndebe ser reernplazada,asegQresede utilizarQnicarnenteuna correacertificadaen f_bricaincluidaen las p_.
Nunca alrnacene lacultivadora concombustible eneltanque enun espacio cerrado oen_.reas poco ventiladas donde losgases del combustible puedan Negar aunaNarna expuesta, unachispa oun piloto corno elquetienen algunos hornos, calentadores deagua, secadores deropa oalgQn artefacto agas. PREPARACI6N DE LA CULTIVADORA Si la cultivadorano se va a usarduranteun perfodoprolongado, Nunca dejeelmotor sinvigilancia rnientras est,.enfuncionarniento. prep_.relaparael alrnacenarnientode la siguienteforrna: DEL MOTOR 1.
Antesde realizarcualquiertipode rnantenirniento o servicio,desenganche todosloscontrolesy detengael motor.Esperea que sedetengancornpletarnente todaslaspiezasrn6viles.Desconecte el cablede la b@ay p6ngalohaciendornasacontrael motorparaevitarqueseenciendaaccidentalrnente. Utilicesiernpreanteojosde seguridaddurantelaoperaci6no rnientrasrealizaajusteso reparaciones. El motor no arranca El motorfunciona de manera erratica El motor recalienta 1. Reconecteel cable. 2.
(Esta p_.ginase aplica s61oen EE.UU. y Canada.).
Busque el periodo de duraci6n de emisiones importantes yla informaci6n la etiqueta de emisiones de su motor de clasificaci6n de aire en Los motores cuyo cumpiimiento con los estAndares de emisi6n Tier 2 de la Comisi6n de Recursos Ambientales de California (CARB) est6 certificado deben exhibir la informaci6n relacionada con el periodo de duraci6n de ias emisiones y la clasificaci6n de aire.
Felicitaciones por haber realizado una adquisici6n inteligente. El producto Craftsman® que ha adquirido esta diseSado y fabricado para brindar muchos aSos de funcionamiento confiable. Pero como todos los productos a veces puede requerir de reparaciones. Es en ese momento cuando el disponer de un Acuerdo de protecci6n para reparaciones le puede ahorrar dinero y problemas.
Your Home For troubleshooting, product manuals and expert advice: managernylife www.managemylife.com For repair - in your home - of all major brand appliances, lawn and garden equipment, or heating and cooling systems, no matter who made it, no matter who sold it! For the replacement parts, accessories and owner's manuals that you need to do-it-yourself. For Sears professional installation of home appliances and items like garage door openers and water heaters.