
User Guide
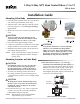

VEZ-4x Series, 2-Way/3-Way, NPT Zone Control Valves (1/2 to 1") 1 Installation Guide
Installation Guide
2-Way/3-Way, NPT, Zone Control Valves (
1
⁄2 to 1")
VEZ-4x Series
Mounting Valve Body
1. Clean the lines upstream from the valve. Remove
any debris larger than 0.06" (0.015 mm).
2. Alignthevalve’sowindicatorwiththesystem
ow(seepage4for3-waymixing or diverting
applications).
3. Mountthevalvesotheactuatorispositionedover
valve.
CAUTION
To prevent condensation from dripping onto the
actuator housing, mount the valve with the actuator
in the upright position or, at most, at a 45° angle.
4. Sealvalveswithapprovedpipesealant.
5. Usingtwowrenches,securethevalvetothepipe.
Torqueshouldnotexceed75ft-lbs.(102N
•m).
6. Eliminate air from the system to keep the valves
fullofuidduringoperation.
NOTE: Ifthesystemexperienceslargeamountsof
debris,stepsshouldbetakentokeepthe
systemclean.
Mounting Valve Body 1
Mounting Actuator on Valve Body 1
Wiring 2
Two-Position Spring Return 2
Proportional and Tri-State 2
Manual Override 3
Proportional and Tri-State 3
Two-Position Spring Return 3
Operation 4
Maintenance 4
Select Specifications 4
More Information 4
Important Notices 4
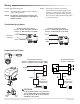
UP
CAUTION
Using mineral oil lubricants or other incompatible
substances in system fluids may damage EPDM
rubber seals in valves. Before using any lubricant or
additive in a water or ethylene glycol base, consult
the substance manufacturer for compatibility with
EPDM (Ethylene Propylene Diene Monomer).
2-Way with Tri-State or
Proportional Actuator
3-Way with 2-Position
Fail-Safe Actuator
1
2
Mounting Actuator on Valve Body
Ring Nut to
Valve Body
Black Plastic
Attachment
Support Ring
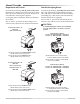
CAUTION
If mounting the actuator to a valve already in-line,
close the shut-off valves in the piping (upstream
first, then downstream) or switch off the pump to
allow the differential pressure in the valve to drop.
1. Toremoveanexistingactuator,disconnect
thewiring,turntheringnut(couplingpiece)
counterclockwiseuntilitisloose,andpullothe
actuator.
CAUTION
The black plastic actuator attachment support ring
must be in place on top of the valve bonnet before
mounting the actuator or damage to the actuator
connection may result.
2a.ForNOactuators(“A,”“M,”and“P”),placethe
actuatorontopofthevalvebodyandrmly
hand-tighten(only)theringnut.
NOTE: Thelastdigitofvalvemodelnumber
representsthetypeofactuator.
Mounting Actuator on Valve Body
2b. For NC actuators (“B,”“F,” “N,” and “Q”),
manually rotate and latch open the actuator (or
propervalveclose-omaybeaected).Seethe
ManualOverridesectiononpage3.Thenplace
theactuatorontopofthevalvebody,rmly
hand-tighten(only)theringnut,andreturnthe
actuatortoitsnormalposition.