
Installation Guide


If you have any ques
tions, please give us a call. Call
Toll Free 1-800-456-7865
KNAACK® products are protected by one or more of the following patents or trademarks : U.S. - 945736, 1182980, 5076078, 1266140, 1266140,
1266140, 1182982, 1182983, 1517767, 1560477, 1897535, 2290111, 5076078; Canada - 283281; U.K. - 2233036, 1390299, 2172510;
N.Z. - 296048, 296050; AUS - 754069, 754070 other patents or trademarks pending.
- NOTICE -
Any modification or unintended use of this product shall immediately void all manufacturers warranties.
Manufacturer disclaims all liability for injuries to persons or property resulting from any modification to, or
unintended use of this product.
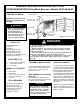
Figure 2. Caster Mounting Holes
5/16-18
Whiz Nut
1/4"
Pushnut
5/16-18 x 3/4"
Carriage Bolt
Figure 3. Caster Mounting
Drawer Removal
and Installation
4. To remove a drawer (Figure 4.), pull
the drawer out till it stops. Notice the
locking levers located inside the track
that is attached to the drawer. Lift the left
lever (A) while pressing down on the right
lever (B). Pull drawer clear of the slides.
5. To replace a drawer, simply insert the
drawer slide into the cabinet slide and
close the drawer completely. The
mechanism will automatically latch.
Figure 4. Drawer Removal
Figure 5. Support Panel
#6 x 1/2"
Screw
Figure 6. Drawer Slide Installation
CAUTION
Pull out only one drawer at a
time to avoid sudden tipping
of product which could cause
serious personal injury or
property damage. For optimal
weight distribution of unit,
install larger drawers in lower
positions.
Drawer Slide Installation
6. The Drawer Support Panel (Figure 5.
Item A) has four wing nuts (B) that are
used to adjust the spring loaded panel.
Adjust these wing nuts as necessary to
obtain an approximate measurement of
17-13/16" between the left and right
support panels. It is important to mea-
sure across all four corners.
7. Figure your drawer arrangement
first. There are 15 possible "notches" for
drawer mounting in the following manner:
1" deep drawer requires 1 notch.
2" deep drawer requires 2 notches.
4-1/2" drawer requires 3 notches.
6" deep drawer requires 4 notches.
You can assemble any combination,
as long as you do not use more than
the 15 notches.
8.
Take one slide (Figure 6.) and insert
the clips (Inset) into the front and rear
notches of the drawer support panel.
Push the slide to the rear and down.
Secure the slide through the end access
hole in the slide.
9. With all slides installed, install the top
and bottom drawers and operate them a
few times. If they seem sluggish, further
adjustment to the wing nuts may be
required. Once the drawer action is
satisfactory, install the remaining
drawers.
Knaack LLC
ATTN: Warranty Claims
420 E. Terra Cotta
Avenue Crystal Lake, IL 60014
www.knaack.com
If you have any questions, please call toll free at 1-800-456-7865.
©201
3 Knaack LLC
Part No. 14-4710 REV. L ECN 5285 03/13