
Installation Guide


E
A
B
C
D
F
H
G
I
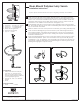
Parts Included
A. (2) Shelves G. (8) #8 x 1/2˝ Screws
B. Lower post H. (2) Bearing Hubs
C. Upper post I. (2) Bearing pins
D. Bottom Mounting Bracket
E. Clutch Mount Assembly
F. (4) #10 x 1˝ Screws
Door Mount Polymer Lazy Susan
Installation Instructions
Inspect all parts and read all instructions prior to beginning assembly and installation.
©2008 Knape & Vogt. All rights reserved. Knape & Vogt
®
reserves the right to change specifi cations without notice. Made in USA.
2700 Oak Industrial Drive NE
Grand Rapids, MI 49505 USA
800.253.1561 • www.kv.com
2
1
RN-245EFS-0808
Tools Required
• Phillips screwdriver with sharp #2
point and 1/4˝ diameter shank.
Note: a rounded or broken point
will make height adjustment difficult
or damage adjusting screw.
• Drill with 1/8˝ and 1/16˝ diameter
drill bits
• Pencil
Product Assemblies
• PPN24 • PPN28
2
3
1
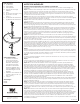
Hold Lower post (B) and locate height adjusting screw in post raising assembly.
To check that jack base is properly located for future vertical adjustment, loosen
screw 1 turn. Leave the screwdriver in the screw to use as a handle. Rotate the
jack base within the post to the right and to the left. Stop the screw so that the
jack base is in the middle of the travel area and tighten 1 turn.
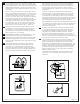
Insert Bearing Hubs (H) into center area on the underside of each of the Shelves
(A). Note that the key way on the side of the Bearing Hub must be aligned with the
key on the inside of the Shelf.
Slide the Shelves onto the Lower post from the bottom (post raising assembly end).
Push one of the Bearing pins (I) into bottom slot in pole and through the hole in
post raising assembly, then slide bottom shelf down over pin so that the groove
in the hub engages or captures the pin, making sure the jack assembly remains
inserted in the lower post.
Insert second Bearing pin (I) into one of the upper holes in the Lower post to give
desired shelf separation. (Note: The second from the top pin hole will give ap-
proximately 11 1/2˝ of clearance. This should allow for enough room for items on
Lower Shelf). Slide Top Shelf down over the Bearing pin so that the groove in the
Bearing Hub engages or captures the pin.
4&5
3
4
5