
Installation Guide
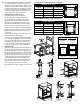
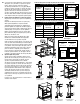

BRACKETS FACE INWARD
Product
Assembly
Outside to Outside
Edge of Brackets (Z)
Door Center
to Bracket (B)
USC12-1-35 11-3/4"(30cm) 5-1/2"(14cm)
USC12-1-50 11-3/4"(30cm) 5-1/2"(14cm)
USC15-2-35 14-3/4"(37.5cm) 7" (17.8 cm)
USC18-2-50 N/A N/A
Door-Mount Bracket Installation for Standard Configuration
BRACKETS FACE OUTWARD
Product
Assembly
Outside to Outside
Edge of Brackets (Z)
Door Center
to Bracket (B)
USC12-1-35 14-3/4"(37.5cm) 6-7/8"(17.5cm)
USC12-1-50 14-3/4"(37.5cm) 6-7/8"(17.5cm)
USC15-2-35 17-3/4"(45cm) 8-3/8" (21.3 cm)
USC18-2-50 17-3/4"(45cm) 8-3/8" (21.3 cm)
Door-Mount Bracket Installation for 3" Wider Configuration
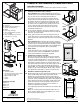
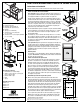
4B. Ifyourdoorbracketmustfaceoutward,youmustremove,
rotateandreinstallthedoorbrackets.First,slideall4
decorativecoversbackapproximately2"(figure4B).This
willrevealthedoorbrackettochassisscrews.Pickaside
tostartwith.Removetheupperandlowerdoorbracketto
chassisscrews.Rotatedoorbracket180degreessothe
bracketfacesoutward.Reinstallthedoorbrackettothe
chassis.Repeatfortheoppositedoorbracket.
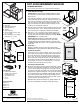
5. Install Cabinet Door to Door Bracket
Ensure that chassis is in fully closed position.
Peelprotectivecoverfromtapeonbrackets(5A).
Line-up the cabinet door in desired position ensuring
thatitislevelwithanycabinetdoorsoneitherside.
Also ensure that spacing between the door and any
draweraboveisevenwithspacingonyourothercabinets.
Pressthecabinetdooragainstthedoorbracketsfirmly
(5B)toensurethedooradherestothedouble-sidedtape.
Graspthebottomofthecabinetdoor(5C)andslowlyopen
theslidingassemblyuntilyouhaveeasyaccesstothe
doorbrackets.
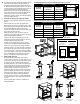
Install 1 – #8x1/2" mounting screw in the center of each
ofthe4horizontalslotsshown(5D-1).
Ensure your door is centered by closing unit into cabinet.
If your door requires adjustment pull unit out from cabinet,
loosen all 4 screws, adjust door left to right and tighten.
Repeatthisprocessuntilyoudooriscentered.Install
1 – #8x1/2" mounting screw through each round hole
locatedintheoutsidecornersofeachbracket(5D-2).
6. Adjust Door Angle
Usingthedoor,pushtrashunitbackintothecabinetuntil
it stops. If there is a gap between the top of the door and
thecabinet,adjustthedoorbracketbyslidingthetop2
decorativecoversbackapproximately2".Thiswillreveal
thedoorbrackettochassisscrews.Loosenalltwoofthe
leftandrightupperdoorbrackettochassisscrews.Push
in and/or pullout the top of the door slightly until the gap
iseliminated.Tightendoorbrackettochassisscrews.
Slidedecorativecoversbackintoposition.Pushthetrash
unitbackintothecabinetuntilitstops.Repeatthis
process until your door is flush with the cabinet.
Placewastebin(s)inchassis.Installationisnowcomplete.
Z
Z
Top View
BIN
USC12-1-35
USC12-1-50
Single Bin
BIN
USC15-2-35
USC18-2-50
Overall
CabinetWidth:
12"–15"
Overall
CabinetWidth:
15"–18"
BIN
Double Bin
5B
5C
5D
BracketsFace
Inward
BracketsFace
Outward
4B
BracketsFace
Inward
BracketsFace
Outward
5A