® Education TEACHER’S GUIDE WHEEL & AXLES AND INCLINED PLANES UNDERSTANDING MECHANISMS 78620
Wheels�and�Axles�and�Inclined�Planes�Teacher’s�Guide 96265-V3-10/14 © 2014 K’NEX Limited Partnership Group and its licensors. Text: Dr. Alex Wright, AW Education, Wrexham, LL12 7LR, U.K. K’NEX Limited Partnership Group P.O. Box 700 Hatfield, PA 19440-0700 Visit our website at www.knexeducation.co.uk or www.knexeducation.com K’NEX Eduction is a Registered Trademark of K’NEX Limited Partnership Group. Conforms to the Requirements of ASTM Standard Consumer Safety Specification on Toy Safety, F963-03.
2
Your K’NEX Wheels and Axles and Inclined Planes kit is part of a series called “Understanding Mechanisms”. The series has been produced to enable Key Stage 2 pupils to investigate and evaluate some familiar products, to think about how they work and to explore the mechanisms that make them work.
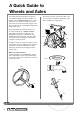
A�Quick�Guide�to�� Wheels�and�Axles The wheel and axle mechanism has been in use for about 5000 years. Many children are familiar with the wheel and axle as it is used in bicycles, cars and the vehicles they make themselves in Design and Technology lessons. They recognize it as something that helps other things move easily. They are perhaps less familiar with the use of a wheel and axle as a simple machine that helps make other mechanisms work.
Wheel and axle basics: How a wheel and axle mechanism works depends on whether the wheel is turning the axle or the axle is turning the wheel. In some cases the wheel turns the axle, as with a water wheel, doorknob and screwdriver, while in other cases the axle turns the wheel, as in a car or bicycle. A Quick Guide to Wheels and Axles A wheel, however, does not have to be a circular disk; it can be the circular path outlined by a handle that turns.
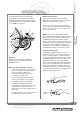
A�Quick�Guide�to�� Wheels�and�Axles In the same way, it is virtually impossible to turn a lock mechanism by trying to turn the lock spindle itself – you cannot generate enough turning forces - but with the doorknob attached, it becomes an easier task. AXLE: Small turning distance. Large output force. Wheel Turning an Axle Large output force produced at the axle moving a short distance. Fulcrum Small input force turning the rim of the wheel through a long distance.
To demonstrate this concept, try opening a door. A door is another example of a wheel and axle in action. The centre of the door hinge is the fulcrum, the door hinge is the axle and the door is the wheel. To open the door by pushing close to the hinge requires a lot of effort. Your hand moves slowly but the outer part of the door moves quite quickly. A small resistance against the door is enough to prevent you pushing it open.
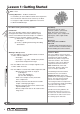
Lesson�1:�Getting�Started Time: 1 hour Learning Objectives - Children should learn: • to assemble, join and combine materials and components • that construction material can be used to try out ideas • to recognise shapes and their application in structures • to draw and label designs Possible Teaching and Learning Activities Introduction This lesson provides children with the opportunity to investigate how K’NEX construction materials may be used to create different 2D and 3D shapes.
• Ask the children to make drawings of their models and to label them showing: • How and where they made the structure stable. • How their model works and the movements the model makes.
Lesson�2:�The�Well Time: 2.5 hours The lesson could be divided into two separate activities: Part 1: Investigating how a lifting mechanism works (1 hour). Part 2: Investigating the forces used in lifting – more suitable for Year 5 and 6 pupils (1.5 hours).
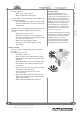
• Ask the children to think of examples of machines they know that use wheels and axles. Provide pictures and examples. • Ask the children to imagine that they are turning a large handle in the air in front of them. Ask them what is the shape they have traced. Let’s Investigate! Working in Groups of 2-3 • Distribute a K’NEX Wheels & Axles and Inclined Planes building kit to each group.
Lesson�2:�The�Well * How many turns of the handle are needed to raise the bucket from the floor? • Ask each group to record their observations, to draw and label the different parts of their K’NEX Well mechanism and to explain how it works. Write the children’s results on the board and discuss their findings. Whole Class • Ask the children to look at the drawing of the ‘big axle’ and ‘small axle’ on Page 3 of the K’NEX Building Instructions booklet.
Lesson 2: The Well Teacher’s Notes In both cases the job done is the same - the ‘bucket’ has been raised to the same height. With the larger axle, the ‘bucket’ will be raised faster, needs fewer turns of the handle and requires more effort. With the small axle, the ‘bucket’ will be raised slowly, needs many more turns of the handle but requires much less effort. Optional Activity • Ask the children to count the number of turns of the handle that are needed to raise the ‘bucket’ 10 cm.
Lesson�2:�The�Well Whole Class • Discuss how the handle of the well is an example of a wheel. The handle turns in a circle, just like the rim of a bicycle or any other wheel with which they may be familiar. It is like a bicycle wheel with only one spoke. • Talk about other example of ‘wheels and axles’ that the children may not immediately recognise. Turning these wheels and axles usually makes something else move.
• Lesson 2: The Well Resources: 60cm length of 30mm dowelling or a broom handle. Ask one member of the pair (A) to extend one arm and firmly grasp the centre of the dowelling or ruler. The other member (B) places his/her hands on either side of A’s hand and tries to turn the length of dowelling while A tries to stop the turning movement.
Lesson�2:�The�Well Teacher’s Notes When making a powered vehicle, as in Design and Technology Units 6C: Fairground and 6D: Controllable Vehicles or in any model they may make that is driven by an electric motor, children often try to connect a motor with a small axle to a large wheel and are surprised when their model does not run when placed on a surface. The small amount of friction between the wheels and the surface is enough to prevent the vehicle moving.
Lesson 3: The Paddle-boat Lesson�3:�The�Paddle-boat Time: 1 hour Learning Objectives - Children should learn: • to investigate and disassemble products in order to learn how they work • how to convert rotary motion into linear motion • to communicate information about products and mechanisms through labelled drawings Possible Teaching and Learning Activities Whole class • Review the outcomes of the previous lesson in which it was found that a wheel and axle mechanism can be used in two ways.
Lesson�3:�The�Paddle-boat Working in Groups of 2-3 • Ask each group to build their K’NEX Paddle-boat model and allow them some time to investigate how it works. • Explain that they should wind the elastic band around the axle using the grey end Connector and then release it to observe how the paddle mechanism works.
Try • this! Ask two children to hold on to either end of a long pole or broom handle. Both should face in the same direction. One child is the axle and the other is the outer edge of the paddle wheel. Ask them to turn in a circle. As they turn, the child who is the axle must turn slowly while their partner at the outer edge must move quickly to keep up.
Lesson�3:�The�Paddle-boat Key Fact • To turn a large wheel, very large turning forces must be applied to the axle. Plenary Ask the children to discuss and explain their observations and their recommendations for the fastest paddle design. Teacher’s Notes Some children may suggest that the larger paddles will work best because they will move the fastest or simply because they are the biggest.
Time: 1.
Lesson�4:�The�Steering�Wheel Let’s Investigate! Working in Groups of 2-3 • Ask each group to build their K’NEX car model (Pages 6-8 of the Building Instructions booklet). Remind the children that there are 3 pages of building instructions for this model. Limit their building time to 15 – 20 minutes but ensure that all the groups have time to observe and investigate the steering mechanism as they push their vehicles along a desktop or the floor.
Calliper brakes on bicycles, treadle sewing machines and toolbox drawers that stay level when opened are examples of linkages. Lesson 4: The Steering Wheel Teacher’s Notes The steering mechanism is an example of a linkage mechanism. Linkage mechanisms allow (i) forces and movements to be transferred, (ii) the direction of a force to be changed, or (iii) things to be moved in a particular way. The K’NEX car steering linkage is based on a parallelogram.
Lesson�4:�The�Steering�Wheel Teacher’s Notes Formula 1 racing cars travel at high speeds and their steering needs to respond very quickly. At these high speeds, a smaller steering wheel gives the driver much greater control over the car’s direction of movement through the use of rapid, small hand movements. More effort is needed, however, to turn a small steering wheel compared to a larger one. Steering wheels for family cars will fall between these two sizes.
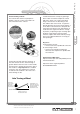
A Quick Guide to Inclined Planes A�Quick�Guide�� to�Inclined�Planes We know from our experience of walking up hills that it needs less effort to walk up a gentle slope than a steep one. In the end, however, both routes will take us to the top and we will have climbed the same vertical distance. The difference lies in the fact that one route will cover a longer distance than the other, but it will appear to be easier to accomplish.
A�Quick�Guide�� to�Inclined�Planes What does an inclined plane do? Inclined planes are used to lift a load through a vertical distance. A load can be lifted vertically upwards but this will need an effort at least equal to the weight of the load. An inclined plane makes the job easier. Other simple machines such as levers and pulleys could possibly be used to do this task. Inclined planes simply give engineers another tool to use, but the choice of tool to be used depends on the job to be done.
When you push an object along a level surface (A) all your effort can be used to move the load through a horizontal distance. (Note: In reality, friction will come into play.) When lifting an object vertically (B), gravity is working entirely against you. All your effort is put into lifting the object vertically, all the time working against gravity. In (A), however, the level surface balances the force of gravity for you; you contribute nothing to this effort.
A�Quick�Guide�� to�Inclined�Planes Key Facts • An inclined plane can be used to lift loads through vertical distances. • The longer the slope, the less effort is needed to complete the task, but the distance over which the effort must be applied is increased. When a wedge is pushed down into an object, the object it is pushing against is forced apart sideways in a direction that is at right angles to the movement of the wedge. • An inclined plane is an example of a simple machine.
Key facts: • Wedges are moving inclined planes. • The wedge concept is used in many cutting tools. • The greater the distance moved by the wedge into the object being cut, the greater are the separating forces produced. • Inclined planes can also be spirals or screws. A Quick Guide to Inclined Planes Not all inclined planes have straight edges. How is a spiral staircase an inclined plane? Make a right angle triangle by folding and cutting an A5 sheet of paper across the long diagonal.
Lesson�5:�Ramps Time: 1 hour Learning Objectives - Children should learn: • to investigate and disassemble products in order to learn how they work • about simple machines that make it easier to do things • to relate science to the ways familiar machines work • to communicate information about products and mechanisms through labelled drawings Possible Teaching and Learning Activities Introduction The activities in this lesson may be used to support the QCA/DfES Exemplar Materials for: Science Units
Lesson 5: Ramps Whole Class • Ask the children to talk about how they might move themselves or heavy objects from a low level to a higher level. They may discuss, for example: * How people reach something much taller than themselves in a building. * Stairs and ladders. * How people in wheel chairs enter and exit buildings with high steps. * Ramps. * How the ancient Egyptians moved heavy blocks to build the pyramids. * They probably used ramps.
Lesson�5:�Ramps • • Ask the children to talk about and compare their experiences of walking up steep hills, over gentle slopes, and along flat surfaces. Explain how ramps, stairs and ladders are all examples of a simple machine called an ‘inclined plane’. Let’s Investigate - Ramps! Working in Groups of 2-3 • Explain to the children that they will investigate how ramps (inclined planes) make it easier for people to move heavy loads from one height to another.
Building Tips 1: To complete Step 7 for the Long Ramp, slide the first section of the ramp over the yellow Connectors. Then slip the white joining plate (technical term = biscuit) into the end of the first section of the ramp. Finally, slide the second section of ramp over the yellow Connectors and the joining plate until the gap between the plates is closed. 2: Make sure the children construct both versions of the model so that the bottom end of the black plastic ramp touches the desktop.
Lesson�5:�Ramps Extension Activity 1 - The effects of friction Whole class * Ask the children to describe the surface of the K’NEX Ramp and explain how this surface affects the movement of an object over it. * The ramp has a smooth plastic slope. This makes it easier to pull an object up the slope. • Discuss how friction might affect the ability of workers to pull the heavy stones up the ramp.
Lesson 6: The Splitting Wedge Lesson�6:�The�Splitting�Wedge Time: 1.
Lesson�6:�The�Splitting�Wedge • Demonstrate how using scissors not only makes cutting paper very simple – the edges of the scissors are sharp - but also allows them to cut paper accurately in lines or curves. Teacher’s Notes They will find it very difficult to pull apart the sheet of paper because paper is strong when under tension, or stretching forces, but it is easy to tear. Tearing, however, produces very ragged edges.
• Draw the profiles of the different tools on the board and compare their shapes to the inclined plane investigated previously. For example: Knife blade. Teacher’s Notes A wedge used in a cutting tool acts like a moving inclined plane. Instead of the object being moved up the inclined plane, the plane itself makes the object move. The same principle applies: the wedge moves a greater distance into the object than the sideways movement of the cut side.
Lesson�6:�The�Splitting�Wedge • Ask the children to observe and record what happens when the wedge is pushed into the K’NEX ‘log’.
Lesson 7: The Hand Drill Lesson�7:�The�Hand�Drill Time: 1 hour Learning Objectives - Children should learn: • to investigate and disassemble products in order to learn how they work • about simple machines that make it easier to do things • to relate science to the ways familiar machines work • to communicate information about products and mechanisms through labelled drawings Vocabulary inclined plane, spiral, vertical, linear motion, rotate, groove, slope, diagonal, right angled triangle, screw Res
Lesson�7:�The�Hand�Drill • Ask why they think firemen slide down a pole to reach their fire engines in emergencies and not a spiral staircase or spiral slide? Teacher’s Notes Going vertically down the pole is the fastest route. A spiral staircase would take too long because it is a longer distance than the vertical slide down the pole. Explain to the class that using a spiral allows a gentler descent and an easier way to go up when compared to going straight up or down.
* Ask what the shape of the right angle triangle resembles. * An inclined plane. 4. Place the paper on the desktop so that the marked edge is face down. 5. Place the pencil or dowelling along the short vertical edge and roll the paper around it. 6. Measure the length of the pencil/dowelling covered by paper. 7. Compare the length of the pencil/dowelling covered by paper with the length of the marked edge of the paper. * Ask the children to describe the shape made by the marked edge.
Lesson�7:�The�Hand�Drill Teacher’s Note’s: If resources permit, allow the children to investigate, first hand, the structure of a real drill bit, especially noting the spiral grooves that run along its length. Please refer to the Safety Guidelines in this guide to ensure adequate safety measures are taken. A hand drill usually has a small gear wheel turning a larger gear wheel that turns the drill bit.
The path of the spiral is upwards, just like any inclined plane. The only difference is that this inclined plane spirals around the shaft of the drill. The same inclined plane rules apply. While the drill bit only moves a short distance into the wood, the drill bit, itself, has rotated through a much greater distance. This requires less effort than trying to push the drill bit directly into the wood. Lesson 7: The Hand Drill Ask the children to record their observations and results.
Key�Technical�Terms�� and�Scientific�Definitions This list of key terms is intended as background information. While we recognize that some of these terms are not fundamental to National Curriculum requirements for Key Stage 2 Design and Technology and Science, we have nevertheless included them here to help you better understand some of the concepts investigated in the K’NEX Understanding Mechanisms kits. SIMPLE MACHINE A simple tool used to make jobs easier to do.
If the force is measured in newtons (symbol N) and the distance is in metres (m) then the work done (W) is measured in newton metres (Nm). The SI unit of work is the joule (J) and 1 joule = 1 newton metre. Key Terms and Scientific Definitions Work = Force x Distance moved by the object in the direction of the force or W=Fxd FORCE A force is a push or a pull which, when applied to an object, can make it change shape, move faster or slower, or change direction.
Key�Technical�Terms�� and�Scientific�Definitions MECHANICAL ADVANTAGE Most machines are designed to make jobs easier to do. For example, a wheelbarrow that allows you to move a heavy load of soil or a winch used to lift a heavy object. When a machine enables you to use a small effort to move a large load, that machine has given you a “mechanical advantage” you would not otherwise have had.
• Rotary: This can be seen in the movement of car, bicycle and gear wheels and in Ferris wheels or carousels as they go round and round on an axis. It is the most commonly occurring type of motion in a mechanism. Key Terms and Scientific Definitions TYPES OF MOTION 4 basic forms of motion are used in mechanisms: • Oscillating: This is an alternating, or swinging to and fro, type of motion.
Key�Technical�Terms�� and�Scientific�Definitions • Pulley: A wheel with a groove in its outer rim that spins freely on an axle. A rope, cable, or chain runs in the wheel’s groove and may be attached to a load. As the wheel turns, the rope moves in either direction so that a pull down on one side will raise an object on the opposite side of the wheel. • Fixed Pulley: A pulley attached to a solid surface; it does not move when the rope is pulled, other than to turn in place.