® Education TEACHER’S GUIDE BRIDGES INTRODUCTION TO STRUCTURES 78640
Bridges�Teacher’s�Guide 96568-V3-10/14 © 2014 K’NEX Limited Partnership Group and its licensors. Text: Dr. Alex Wright, AW Education, Wrexham, LL12 7LR, U.K. K’NEX Limited Partnership Group P.O. Box 700 Hatfield, PA 19440-0700 Visit our website at www.knexeducation.co.uk or www.knexeducation.com K’NEX Education is a Registered Trademark of K’NEX Limited Partnership Group. Conforms to the Requirements of ASTM Standard Consumer Safety Specification on Toy Safety, F963-03. Manufactured under U.S.
Contents TABLE OF CONTENTS Introduction 3 A Quick Start Guide to Structures: Bridges 4-21 Lessons 1- 10 2 Lesson 1: An Introduction to Bridges 22-24 Lesson 2: What Do Bridges Do? 25-28 Lesson 3: Beam Bridges 29-33 Lesson 4: Truss Bridges 34-39 Lesson 5: Cantilever Bridges 40-44 Lesson 6: Bascule or Movable Bridges 45-48 Lesson 7: Arch Bridges 49-54 Lesson 8: Suspension Bridges 55-61 Lesson 9: Cable-stayed Bridges 62-65 Lesson 10: Design and Make Assignment 66-67 Glossary 68-70
This K’NEX Bridges kit is the first in a series called Understanding Structures. An investigation of how bridges work will help children develop a good understanding of the forces affecting structures in general. A successful bridge is the result of balanced forces in action. While bridge building makes use of simple scientific concepts, their application often requires complex engineering solutions.
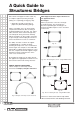
A�Quick�Guide�to�� Structures:�Bridges What is a bridge? A bridge is a structure that is used to cross some form of barrier, making it easier get to one place from another. Other barriers, such as rivers, have always confronted travellers and traders who wanted to take the shortest, quickest and safest route to complete their journeys.
river and tidal currents and earthquakes on the bridge. The Tacoma Narrows Bridge collapsed, for example, because engineers did not fully take into account the effect of wind, (Page 58), while cable-stayed and suspension bridges, (Pages 17-20), are not designed to carry trains because of their susceptibility to shock load. When the total load capacity of the bridge is taken into consideration, the longest single span for a beam bridge is approximately 80 – 100 metres. Fig.
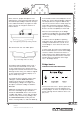
A�Quick�Guide�to�� Structures:�Bridges Fig. 4 Compression (squeezing) • Compression: a force that acts to squeeze a material. Example – squeezing a sponge. The effects of compression and tension on a bridge structure can be modelled by taking a rectangular strip of solid foam rubber and drawing parallel lines with a felt tipped pen along one side, as shown in the diagram below. Place the strip of foam across two blocks (or two books) and push down on the centre.
• Can we change the physical properties of materials? MATERIALS USED IN STRUCTURES As noted above, structural engineers must take into account the properties of the building materials they plan to use for their structures. Some materials are strong under compression - wood, reinforced concrete, steel, and some plastics, for example. Other materials are strong under tension - rope, string, paper, and wood - when it is cut along the grain. Many bridges are constructed from reinforced concrete.
A�Quick�Guide�to�� Structures:�Bridges Roll a sheet of A4 paper to make a tube. Try to compress (squeeze) it along its length (axially). It is surprisingly strong (Fig. 12b). • What types of load can the tube of paper carry before buckling (failing)? Tubes, even paper ones, are strong under compression and tension, but not strong in resisting bending forces (See Fig. 12c). Paper tubes, however, when used in the right way, can make quite strong structures.
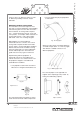
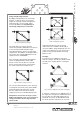
A Quick Guide to Structures: Bridges Using strengthening triangles By adding a diagonal brace to a rectangle, however, so that the forces act along its length, the rectangle can be strengthened and reinforced. It is now a rigid, stable structure. A brace is a strengthening or reinforcing component of a structure. Fig.
A�Quick�Guide�to�� Structures:�Bridges When a load is applied to the top of an arch, the top moves down, while the sides will tend to move outwards. Fig. 22 Force applied at the angle of a triangle Used in the right way, triangles are the most stable and rigid shapes that can be incorporated into a structure. Arches Arches have been used in structures for thousands of years. Many arched bridges and aqueducts built by the Romans are still in use today – a testimony to their strength. Fig.
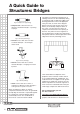
Arches, however, do have their limitations. If the arch span is too large, it is weakened. The largest single span arches today are approximately 250 metres wide. Different types of bridges BEAM BRIDGES • Construction and materials: The beam bridge supports its own weight and its load on upright, or vertical, piers. This type of bridge is typically used to span narrow distances over streams or small rivers, or over highways.
A�Quick�Guide�to�� Structures:�Bridges TRUSS BRIDGES The pillars or piers supporting the weight of the bridge are under compression. Long beams are much weaker than short beams of the same thickness. Fig. 26 Long beams are weaker than short ones Increasing the thickness of the beam can make this type of bridge stronger and more rigid. This, however, will not only increase the cost, but will also make the bridge much heavier.
Fig. 29b: Solution 1: Push up from below A Quick Guide to Structures: Bridges As better materials and designs were developed, trusses became more complex, using larger and larger numbers of triangles in their designs. Today, trusses are usually made from steel. In some cases the beam is “arch shaped”. These are thicker in the middle, to provide greater strength where a simple beam would bend the most, and thinner at either end, where it bends least. Fig.
A�Quick�Guide�to�� Structures:�Bridges 2. Using arches ARCH BRIDGES The arch was used in structures built by ancient Egyptian and Chinese engineers, as well as in the buildings, bridges and aqueducts constructed by the Romans. central block, is reached. These forces hold the stones together between the abutments of the bridge. When the arch bridge is made from masonry blocks, their shape is critical.
A Quick Guide to Structures: Bridges Many older arched stone bridges were constructed from multiple arches. For example, the original London Bridge, the Ponte Veccio in Florence, Italy and the English Bridge over the River Severn at Shrewsbury. With time, bridge materials improved and arch bridges were made with cast iron, steel and, more recently, with concrete. 3. Using Cantilevers CANTILEVER BRIDGES A cantilever bridge is another variation of a beam bridge.
A�Quick�Guide�to�� Structures:�Bridges Fig. 32 The cantilever concept can be easily demonstrated using 5 books of an equal size (or wood blocks). Stand two books vertically - these represent the supporting piers. Lay a book, horizontally, on each of the piers – these represent the cantilevers. Each pier and cantilever should look like a letter T. Connect the two cantilevers by balaning another book across the gap or by moving the two cantilevers together so that they meet.
The massive tubes take the weight of the bridge and are under compression. They are also held up by the narrow top members. A Quick Guide to Structures: Bridges Note the additional bracing and struts to keep the forces from buckling the main structures. Fig. 34 The Forth Railway Bridge, crossing the wide estuary of the Firth of Forth near Edinburgh, Scotland is one of the world’s largest cantilever bridges. It was constructed of steel in 1890 and has a length of approximately 2500 metres.
A�Quick�Guide�to�� Structures:�Bridges • Constructions and Materials Modern suspension bridges use cables strung between two towers, (the cables pass over the tops of the towers), which support the weight of the bridge. The ends of the cables are anchored in the bedrock. The decking is suspended from vertical cables, called suspenders, which hang down from the main cables.
A Quick Guide to Structures: Bridges The Humber Bridge: Total length - 2220 metres The very longest bridges built today are suspension bridges, capable of spanning lengths of 4000metres. The Akashi Bridge, linking the Japanese Islands of Shikoku and Honshu, for example, has a length of 3,911 metres. 4B.
A�Quick�Guide�to�� Structures:�Bridges NOTE: We encourage you visit www.brantacan.co.uk/cable_stayed.htm where you will find a helpful summary comparing the features of cable-stayed bridges with those of suspension bridges. This site also provides information on the new Severn Bridge (cablestayed) carrying the M4 motorway over the River Severn and compares it with the older suspension bridge carrying the M48 motorway across the river further upstream.
http://www.icomos.org/studies/bridges.htm This site is an excellent library of bridge designs from all over the world. Heavy on text and very detailed, but a good reference source. A Quick Guide to Structures: Bridges Useful web sites: http://www.brantacan.co.uk/ A valuable resource site with detailed information on all aspects of bridge design and construction. Offers an excellent selection of photos and diagrams that can be used in the classroom. http://eduspace.free.fr/bridging_europe/ index.
Lesson�1:�An�Introduction�to�Bridges OPTIONAL�Preparatory�Activities Time: 2 hours Objectives - Children should learn: • to identify the forces that act on structures • to demonstrate the ways in which selected materials respond to forces acting on them • to explore the ways in which selected shapes respond to forces acting on them Materials Each group of 2-3 children will need: • Sheets of A4 paper • Elastic bands • Long K’NEX rods • Selection of K’NEX corner Connectors You will need: • A piece of s
Ask the children the following question: “If you were an engineer designing a large building, bridge, etc., what would you need to take into consideration as you planned the structure?” Teachers Notes Possible answers: Strength, beauty, safety, etc. • Use probing, questioning strategies to help the class with this brainstorming activity. • List their responses on the board and use a mapping or webbing diagram to help the children realize how many of their ideas are related.
Lesson�1:�An�Introduction�to�Bridges OPTIONAL�Preparatory�Activities 2. To introduce your pupils to these concepts please refer to the activities described in the Quick Guide section on Page 5-11 of this Guide. Resource materials for these activities are listed above on Page 22. The activities you may want the children to undertake might include: • Demonstrating the effects of forces using a piece of foam rubber or visiting the Forces Lab at www.pbs.
Time: 2 hours Learning Objectives - Children should learn: • to form an operational definition of a bridge • to use a range of sources to find information about bridges and how they support loads • to relate the way bridges are designed and constructed to their intended function and to the materials used in their construction Vocabulary bridge, barrier, obstacle, valleys, estuaries, ravines, stepping-stones, span Lesson 2: What do bridges do? Lesson�2:�What�do�bridges�do? Resources Each group of
Lesson�2:�What�do�bridges�do? Teachers Notes As noted in Lesson 1, the web site at www.pbs.org/wgbh/buildingbig/ bridge/ provides much of the basic information you will need to help children understand how bridges work. This site covers some of the main bridge types, the forces acting on them, explains compression/ squeezing, stretching/tension, twisting and sliding forces using simple clear graphics. It also explores the effect of forces on different shapes.
• You may want to refer the children to the photographs of bridges shown in the Building Instructions booklet, and the barriers they have been designed to cross. • Encourage them to look carefully at the shape of the bridges and ask them to notice differences. At this stage it may be helpful to focus on just 3 types of bridge: beam (Pages 2-3), arch (Page 10) suspension (Page 12).
Lesson�2:�What�do�bridges�do? Alternative Activity • Each group could choose a bridge from the local area to investigate and include some of the following information in a short, written report: • What type of bridge is it? • Where is the bridge located? Teachers Notes The children may not have this knowledge at this stage – a simple description will be sufficient.
Lesson 3: Beam Bridges Lesson�3:�Beam�Bridges Time: 2 hours Learning Objectives - Children should learn: • the basic characteristics of a simple beam bridge structure • that structures can fail when loaded • to identify the need for a fair test and how to devise and carry one out Vocabulary stable, unstable, beam, pier, support, ramp, road deck, guard rail, beam, span, force, weight, load, splay, tension, girder Resources Each group of 2-3 children will need: • 1 K’NEX Introduction to Structures: Br
Lesson�3:�Beam�Bridges • Talk about how a beam bridge is one of the oldest and simplest types of bridge. The earliest example of a beam bridge was probably a tree trunk that had fallen across a stream. Modern beam bridges, often called girder bridges, are made from steel beams and can be quite complex structures, but all beam bridges are alike in the way they support their own weight and their loads on upright or vertical supports.
Explain that a beam bridge is simply a horizontal beam resting on piers at either end. The weight of the bridge, and any load it carries, pushes down onto the piers. The piers must support the total weight. Teachers Notes For information on the forces acting on beam bridges refer to A Quick Guide to Structures: Bridges section of this Guide.
Lesson�3:�Beam�Bridges Whole Class • Discuss the children’s findings. As its span increases, the weaker the beam bridge becomes. The beam will begin to bend under its own weight and may even break without any load being placed on it. • These findings will provide an opportunity for you to review the effects of compression and tension on a structure.
When loaded, the two K’NEX piers will start to splay out as the beam bends. In the photographs of real beam bridges, both ends of the bridges are firmly anchored. By preventing the base of the K’NEX piers from moving, the rigidity and strength of the K’NEX beam bridge can be greatly increased. Lesson 3: Beam Bridges Teachers Notes The decking gives additional strength to the structure by adding another layer that helps to resist the bending forces acting on it.
Lesson�4:�Truss�Bridges Time: 2 hours or 2 x one-hour lessons Learning Objectives - Children should learn: • how structures can fail and explore methods used for strengthening and reinforcing them • to understand the need for an experimental design that includes a fair test • to apply what they have learnt by carrying out a simple design and make task • to work as part of a team Vocabulary reinforce, strengthen, diagonal, stable, unstable, stability, framework, lattice, truss, arch, section, square
Teachers Notes The children may suggest adding more piers to support the beam, using more rigid materials or making the beam thicker. The optional activity below suggests one way to investigate their suggestions. The Forces Lab at www.pbs.org/ wgbh/buildingbig/bridge/ provides some very useful background information on this topic.
Lesson�4:�Truss�Bridges Optional Activity 2 Working in Groups of 2-3 • Children could be allowed the opportunity of investigating this point for themselves by constructing a square from 4 K’NEX Rods (blue) and 4 dark grey 90-degree Connectors. • Encourage them to gently twist and bend the square, then ask them to add one Rod to their square and notice what happens. (They can use a dark grey Rod as a diagonal.) • Ask what shape was formed when they added a Rod to the square.
Ask the entire class what they think would be a fair test for measuring the strength of the bridges they build. Help them to understand that a fair comparison of the different versions can only be made if testing methods are the same throughout the series of experiments. Teachers Notes It is likely that the children will suggest adding weights to measure the strength of the bridges. Ask them to consider how and where they will place the weights. You may want to introduce the term “variable” at this point.
Lesson�4:�Truss�Bridges • Ask the children to: • Predict the weight their bridge might support. • Record and explain their findings using labelled drawings and notes. • Explain the effect of using triangles in their bridge structures. Other Truss Bridges • To investigate the other examples of truss bridges, shown on Page 5, teams of 4-6 children could build 2 variations of the Warren Truss bridge: the Howe Truss and the Baltimore Truss bridges.
Remind the children about some of the effects they observed in the previous lesson. Lesson 3: Beam Bridges Limitations of the design: As the span increases the weight of the bridge will also increase until its own weight will be so large it will not be able to support itself. Extension Activity 1 Working in Groups 2-3 Ask the children to design and make plans for their own truss bridge pattern. Each group may either make their own truss bridge or ask another group to build to their plans.
Lesson�5:�Cantilever�Bridges Time: 2 hours Learning Objectives - Children should learn: • to relate the way things work to their intended purpose and to how materials have been used • how to find information on bridges and the ways in which they support their loads • to record their research findings using drawings and labels • to work as part of a team Possible Teaching and Learning Activities Whole Class Introduction • Discuss how engineers have been called upon to design and build bridges th
Lesson 3: Beam Bridges • Ask the children to imagine two diving boards, built on either side of a river. The ‘boards’ extend out over the river and either meet in the middle, or have an additional beam suspended on the two boards to close the span. • You may want to draw a sketch on the board to demonstrate the principle. Additional Beam Cantilever Cantilever Pier Pier • Demonstrate the concept by making a cantilever from books or blocks of wood.
Lesson�5:�Cantilever�Bridges • Talk about how cantilevers are not only used in bridges but can also be found at home or in school e.g. bookshelves. The shelf is the cantilever and the books the load. The weight of the shelf is supported by a triangular bracket, which transfers some of the weight of the books to the wall. What might happen if a rectangular bracket was used instead of a triangular one? Teachers Notes It would probably collapse because rectangles are not strong shapes.
Lesson 3: Beam Bridges Whole Class • Bring the whole class together to discuss their findings and possible solutions to support the cantilever structure. • Suggest the children place the decking on an upright book so that most of the decking is unsupported (as it was when they held one end of it.) Ask them to add weight to the end of the decking that rests on the book.
Lesson�5:�Cantilever�Bridges • Do they think their cantilever bridge is a stable or unstable structure? Why or why not? Teachers Notes See A Quick Guide to Structures: Bridges for additional information. The children should recognize that the bridge extends back from the piers in order to balance the cantilever structure. The base of the piers in the model bridge will splay outwards when weight is added to the deck. There is a network of trusses to keep the bridge rigid and strong.
Time: 1- 2 hours Learning Objectives - Children should learn: • to relate the way things work to their intended purpose and to how materials have been used • how to find information on bridges and the ways in which they support loads • to record their research findings using drawings and labels Possible Teaching and Learning Activities Whole Class Introduction • Review the functions and locations of the bridges the children have investigated so far.
Lesson�6:�Bascule�or�Movable�Bridges • Ask the children to consider ways to make a bridge move so that it can accommodate ships using a river. • Ask the children if they have ever seen movable bridges operating. Ask where they are found and how they think they might work. For example, the children may have noticed that the road deck can be raised or it may rotate. Explain how castle drawbridges and even car park barriers use the same principle.
Arrange for the children to see photographs of movable bridges or encourage them to use the Internet to find out about the locations of bascule bridges, what they are used for and how their lengths compare to other bridges they have investigated. Teachers Notes The following Internet sites are useful sources of free photographs of bridges www.freefoto.com www.FreeImages.co.uk www.brantacan.co.
Lesson�6:�Bascule�or�Movable�Bridges (ii) if the span is too long it will be harder to lift, or take too long to move. Design Task 1: To reduce the force needed to open the bascule bridge • 2 groups combine as a bridge design team. • They have 10 minutes planning time and a further 20 minutes to complete the building activity. • Before constructing their bridge, ask the children to suggest two alternative solutions and give their reasons for selecting the one they will use.
Lesson 7: Arch Bridges Lesson�7:�Arch�Bridges Time: 1 hour Learning Objectives - Children should learn: • to relate the way things work to their intended purpose and to the way materials have been used • how to find information on bridges and the ways in which they support their loads • to record their research findings, making use of labelled drawings Vocabulary arch, abutment, span, reinforcing, strengthening, diagonal, stable, unstable, stability, framework, splay, keystone, horizontal, vertica
Lesson�7:�Arch�Bridges How strong is an arch? • Demonstrate an arch shape using a green K’NEX flexi-rod and show how it can be used to make stable structures. Demonstration or Working in Groups of 4 • Organize the class into teams of 4 children - similar heights and weights work best. • Explain that they are going to make a human body arch. Teachers Notes Teacher’s notes: For more information on arches please refer to A Quick Guide to Structures: Bridges or visit the “Forces Lab’ at www.pbs.
Lesson 3: Beam Bridges just made. Point out that the top centre stone in the arch, called the KEYSTONE, has a similar location to the place where their upper backs pressed together. All the other stones in the bridge push, or squeeze, against this stone, in the same way that all the weight of the children’s bodies pressed against their upper backs.
Lesson�7:�Arch�Bridges Working in Groups 2-3 • Before beginning construction of the K’NEX Arch Bridge model, you may want to draw the children’s attention to the 3 versions (Pages 10-11 of the Building Instruction booklet) and explain that an arch can be a very versatile structure. Ask the children to identify the differences between the 3 versions of the bridge. • Ask each group to construct Steps 1-4 of the K’NEX Arch Bridge shown on Page 10 of their Building Instructions booklet.
Teachers Notes The completed bridge is more stable but a force will still need to be applied against the sides to give the bridge its overall stability. • You may want the teams to investigate and discuss the following: • How is the road decking supported so that it remains rigid and strong enough to support the load? The road decking is made rigid and strong enough to support a load by using a reinforcing framework.
Lesson�7:�Arch�Bridges Plenary Discuss the children’s findings about arch bridges and how this arch bridge model uses similar structures to truss bridges to increase its stability.
Lesson 8: Suspension Bridges Lesson�8:�Suspension�Bridges Time: 90 minutes - 2 hours Learning Objectives - Children should learn: • to relate the way things work to their intended purpose and to how materials have been used • how to find information on bridges and the ways in which they support loads • to record their research findings using drawings and labels Vocabulary supporting towers, cables, roadway, deck, compression, tension, anchorage, reinforcing, strengthening, stable, unstable, stabil
Lesson�8:�Suspension�Bridges Teachers Notes To help children understand the different parts of a suspension bridge and to experience the forces that are at work on it you could ask for volunteers to act out the roles of the different bridge elements. See drawing above. • Place a rug or a large piece of paper on the floor and explain to the class that this represents a large river that has to be crossed by a suspension bridge.
Explain that weight will be added to the bucket and the aim is to keep the bucket at the same height above the level of the river. As weight is added the 4 pupils should describe their experiences. • Ask what would happen if one person were to release the end of the rope. Teachers Notes * Those holding the ends of the rope should find that they must pull harder, while the seated pupils will find that more weight is pressing down on their shoulders.
Lesson�8:�Suspension�Bridges Working in Groups of 2-3 • Arrange for the children to see other photographs of suspension bridges. You may want to have the children use some of the web sites listed in this Guide. Encourage them to: • Identify the main components of suspension bridges. • Find out about the locations of suspension bridges. • Discover what types of traffic use them. Teachers Notes The following Internet sites are useful sources of free photographs of bridges: www.freefoto.com www.
• Review their findings by asking: • What is the function of the towers? • What is the function of the cables that are laid across the towers? • Why do these main cables need to be anchored at either end? • What is the function of the vertical cables? • How is the road decking made strong and rigid? Lesson 3: Beam Bridges the outer cables. In real suspension bridges the ends of the cables would be embedded in concrete or bedrock anchorages.
Lesson�8:�Suspension�Bridges Forces acting on a suspension bridge. • Ask the children to record and explain their findings.They should identify the forces involved in the bridge structure using labelled drawings and notes. They should also make use of the correct technical vocabulary. Teachers Notes The children should be encouraged to use technical terms correctly when describing and reporting the results of their investigations.
Teachers Notes A possible sequence might be: 1. Find a good site for the bridge, with trees that can be used to attach the ropes for anchorage. 2. Construct several ropes from vines. 3. Attach the end of one of the ropes to a tree. Climb down the cliff, swim across the river with the other end of the rope and attach it to a second tree. Lesson 3: Beam Bridges Extension Activity 2 • Invite the children to act out an imaginary story about building a suspension bridge.
Lesson�9:�Cable-stayed�Bridges Time: 1 hour Learning Objectives - Children should learn: • to relate the way things work to their intended purpose and to the way materials have been used • how to find information on bridges and the ways in which they support loads • to record their research findings, making use of labelled drawings Vocabulary cable-stayed, tension, compression, suspension bridge, tower, road decking, reinforcing, stable, unstable, stability, balanced and unbalanced, beam, horizonta
See: A Quick Guide to Structures: Bridges for further information. • Draw simple sketches of a suspension bridge and a cable-stayed bridge on the board and/or create a worksheet and ask the children to compare the design features of the bridges. • In what ways are the two designs similar and how do they differ? Lesson 3: Beam Bridges The following Internet sites are useful sources of free photographs of bridges www.freefoto.com www.FreeImages.co.uk www.brantacan.co.
Lesson�9:�Cable-stayed�Bridges • The children should observe and explain what happens when they place a load at the end of either arm or press down on the arms. • Is this model bridge a stable or unstable structure? • To demonstrate the forces and support given by the cables, ask each group to remove the cables from one side of the bridge, place a small load on both ends and observe what happens.
* How is the road decking made strong and rigid? Teachers Notes * i. tower, ii. cables * The cables pull on it to make it slightly arched. The children may find from their research that the deck on some cablestayed bridges include a truss system to add to its strength and rigidity.
Lesson�10:�Design�and�Make�Assignment Time: 2 hours The Design Task To design and make a bridge that can span a 40cms gap and be able to support a 50g load in the middle of its span. The bridge must have a roadway designed to accommodate vehicles. Introduction Discuss how the children will be set a task of building a bridge to carry a specific load. They will work as company design teams comprised of 4-6 children. Each group can decide on their company name.
Lesson 3: Beam Bridges • T he materials can be purchased from the teacher’s store at the following prices. A4 paper £5 per sheet Sellotape £1 per 10cm strip Paper Clips £0.50 each Straws £1 each Pipe cleaners £2 each • No materials can be left at the end. • Any over-purchases will be bought back by the teacher’s store at half the original cost. • If any additional materials need to be purchased to complete the bridge they will cost twice the original price.
Glossary The following is intended as a glossary for the teacher. The age of your pupils, their abilities, their prior knowledge, and your curriculum requirements will determine which of these terms and definitions you introduce into your classroom activities. These items are not presented as a list for children to memorize. Rather, they should be used to formalize and clarify the operational definitions your pupils develop during their investigations.
Glossary Buckle: A condition that occurs when structures bend under compression. Dead Load: The weight of the bridge’s structure. Live Load: The weight of traffic using the bridge. BRIDGE FEATURES: Abutment: The mass of rock or concrete at either end of an arch bridge that keeps the ends of the arch securely in place. Anchorage: Foundations/concrete blocks into which the cables of a suspension bridge are secured. Beam: A rigid, horizontal component of a bridge.
Glossary Tie: A structural support under tension. Tower: A tall, vertical support that carries the main cables of a suspension bridge and cable-stayed bridge. Triangulation: A building concept, using triangles, made from squares, to enhance the strength of a structure. Truss: A framework of girders, some in tension and some in compression, comprising triangles and other stable shapes. Voussoir: A wedge-shaped stone block used in an arch. (French: ‘arch-stone.
Worksheet�1 WORKSHEET 1 BEAM BRIDGES Write short sentences to describe what each of these parts of a beam bridge do. 1. PIERS__________________________________________ _________________________________________________ 2. BEAM__________________________________________ _________________________________________________ 3. SPAN__________________________________________ _________________________________________________ 4.
Worksheet�1 ANSWER KEY: WORKSHEET 1: BEAM BRIDGES PIERS: Vertical supports that hold up the beam bridge. BEAM: Horizontal framework that rests on piers. SPAN: Distance between the piers. DECK: Foundation on which roadway/walkway is built on top of the beam. RAMP: Inclined section that connects land to beam. GUARDRAILS: Protective barriers along the deck which keep things from falling from the bridge.
Worksheet�2 WORKSHEET 2 TRUSS BRIDGES Match the pictures of different truss bridge designs with their correct names. Draw a line from the name of the bridge to its matching diagram.
Worksheet�2 ANSWER KEY: WORKSHEET 2: TRUSS BRIDGES BALTIMORE (PRATT) • WARREN • PENNSYLVANIA (PRATT) • LATTICE • PRATT • WHIPPLE • Education®
Worksheet�3 WORKSHEET 3 ARCH BRIDGES Can you complete the following sentences about ARCH bridges using the words fromthe box? When you have filled in the missing letters for all the sentences, use the ones from the bolded spaces to answer the following question: What were arches used for before bridge building? — — — — — — — — — — 1. The sides of the bridge, where they are attached to the land, which support the arch: t ————————— STEEL 2.
Worksheet�3 ANSWER KEY: WORKSHEET 3: ARCH BRIDGES 1. Abutments 4. Compression 2. Stone, Concrete, Steel 5. Romans 3. Aqueducts 6. Keystone Arches were used for decoration.
Worksheet�4 WORKSHEET 4 SUSPENSION BRIDGES Here are some statements about suspension bridges. Determine if they are true or false. If a statement is false, change it so it becomes true. _______1. All suspension bridges have three things in common: two very tall towers; strong anchorages; cables made of many wires. _______2. The deck is hung from the cables. _______3. Suspension bridges usually have the longest single span of all bridges. _______4.
Worksheet�4 ANSWER KEY: WORKSHEET 4: SUSPENSION BRIDGES 1. True 2. True 3. True 4. False: The longer the suspension bridge, the taller the towers need to be. 5. False: The worst enemy of a suspension bridge is the wind, because it can cause the bridge to sway and twist. 6. True 7. False: The cables on a suspension bridge are in a state of tension 8. False: One of the last steps in building a suspension bridge is suspending the deck.
Worksheet�5 WORKSHEET 5 CABLE-STAYED BRIDGES The following are characteristics of bridges. Mark with a tick the statements that apply to cable-stayed bridges. _______ Cables are strung from the tower to the deck. _______ This type of bridge easily spans distances under 1000 meters. _______ A tower supports a balanced portion of the deck. _______ Anchorages are not necessary at the ends of the cables. _______ The deck lifts up to allow boats to pass safely.
Worksheet�5 ANSWER KEY: WORKSHEET 5: CABLE-STAYED BRIDGES The following principles apply to cable-stayed bridges: 4 Cables are strung from the tower to the deck. 4 These bridges easily span distances under 1000 meters. 4 A tower supports a balanced portion of the deck. 4 Anchorages are not necessary at the ends of the cables. 4 Tension is the force acting on the cables.
Worksheet�6 WORKSHEET 6 NAME THAT BRIDGE Below are facts about the different types of bridges you have investigated. Match the fact with the name of a bridge from the list provided. You may use the bridge names more than once. ARCH BEAM TRUSS BASCULE CANTILEVER SUSPENSION CABLE-STAYED 1. Because bridges like me are long, light in weight, and high in the air, our greatest enemy is the wind. _____________________________________________ 2.
Worksheet�6 ANSWER KEY: WORKSHEET 6: NAME THAT BRIDGE 1. Suspension 2. Arch 3. Cable-stayed 4. Bascule 5. Beam 6. Truss 7. Cantilever 8. Cable-stayed 9 Suspension 10.