CI6 12 Channel Eco-System™ Controller-Amplifier Installation Instructions v3.
Important Safety Instructions: 1) Read these instructions. 2) Keep these instructions. 3) Read all warnings. 4) Follow all instructions. 5) Do not use this apparatus near water. 6) Clean only with dry cloth. 7) Do not block any ventilation openings. Install in accordance with the manufacturer’s instructions. 8) Do not install near any heat sources such as radiators, heat registers, stoves, or other apparatus (including amplifiers) that produce heat.
FCC Warning Note: This equipment has been tested and found to comply with the limits for a Class B digital device, pursuant to part 15 of the FCC Rules. These limits are designed to provide reasonable protection against harmful interference in a residential installation. This equipment generates, uses and can radiate radio frequency energy and, if not installed and used in accordance with the instructions, may cause harmful interference to radio communications.
Introduction: Thank you for your purchase of a Knoll CI6 12 channel controller amplifier and congratulations on your choice. The CI6 features six deluxe digital volume controlled stereo amplifiers with individual seven source selection. This is Knoll's fourth generation of multi-channel, high-quality power amplifiers. The CI6 is designed to meet the amplifier needs of custom installed multi-zone systems where high quality sound is a specific requirement.
CI6 includes a quiet thermostat controlled internal fan to increase its longterm power output capability. controller ports. Each zone or room has its own infrared output jack. An all zone jack is also provided. amplifiers can be connected to these outputs. cupies two rack spaces. Unpacking: The carton and packing materials used in shipping your new amplifier were specially designed to protect it from the shock and vibration of shipping.
Speaker connections The CI6 has six stereo 50 watts per channel amplified outputs. Channels 5 and 6 also have line level outputs to connect to larger powered amplifiers. To ensure that the high quality signals produced by your amplifier are carried to your speakers without loss of clarity or resolution, Knoll advises that you use high-quality speaker wire.
RS232 Connection The RS232 connection is used to control the CI6 by an external controller or computer and can work with our without keypads. The CI6 connects to the RS232 controller with a 9-pin db9 connector. The programming reference follows. 1.
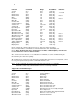
Function Version Reset Channel On Channel Off Mute Un-mute Mute All Un-mute All Volume Request Volume Set Volume All Input Request Input Set Input Select All All Channels On All Channels Vol up All Channels Vol dn Channel Vol up Channel Vol down Bass adjustment Treble adjustment Display treble Display bass Command (vr?) (rx) (#on) (#of) (#mu) (#um) (amu) (aum) (#vl?) (#vl$$) (avl$$) (#sl?) (#sl$) (asl$) (aon) (avlu) (avld) (#vlu) (#vld) (#b$) (#t$) (#b?) (#t?) Range none none 1-6 1-6 1-6 1-6 none none
All Channels Vol up All Channels Vol dn Channel Vol up Channel Vol down Bass adjustment Treble adjustment (avlu) (avld) (#vlu) (#vld) (#b$) (#t$) “All zones volume levels increased” “All zones volume levels decreased” “Zone # volume increased” “Zone # volume decreased” “Bass successfully set to $” “Treble successfully set to $” Example 1.
We recommend the T568A wiring method, which is shown below. The functions of each wire connection are also shown. future use brown future use white/brown Infrared orange ground white/blue +12 vdc blue future use white/orange SDA green SCL white/green Run CAT5 wire from the keypad location to the CI6 location for each keypad or run it from keypad to keypad location. Ideally home runs are used as they leave the installation more “future proof” and reliable.
The procedure to connect the two controller amplifiers is: 1. Connect the “Data Out” jack on CI6 #1 to the “Data In” jack on CI6 #2.using the 3.5mm stereo patch cord. 2. Connect all of the up to seven sources using short as possible good quality RCA patch cords to CI6 #1 source inputs. 3. Connect CI6 #1 source outputs to CI6 #2 source inputs using good quality, short as possible RCA patch cords. Page Inputs On the rear of the CI6 there is a single page input on a stereo 3.5mm jack.
Without pressing any other buttons on the keypad: 1. Press “MUTE” 2. Press and hold “INPUT” for 5 seconds. This keypad can now be assigned a zone. “Source 1” will show on the screen. 3. Press “OFF” 4. Zone change screen will show. Use the up or down arrows to select the correct zone. 5. Press “INPUT” and this zone number will be stored. The screen will display “System Off”. 2. Source input labels. The seven source input labels have to be programmed individually into each keypad.
The LCD display then displays: Source 2 Press the UP or DOWN buttons next to the INPUT buttons again to scroll through the label selections for source 2 on the bottom row of the LCD display. When the correct selection is displayed press the INPUT button to confirm this choice. Continue programming for sources 3, 4, 5, 6 and 7 in the same manner. The keypad labels have been set. To change any of the labels you can re-enter the installer menu and scroll through all seven labels and reset the ones needed.
www.knollsystems.com/contact.html, or by phone at 800 566-5579. It is extremely important that only an authorized service dealer make any repairs. This will ensure proper service and preserve the protection of your warranty. Keep your receipt in a safe place so that it will be available to verify the purchase date, should you experience a problem covered by Knoll System’s warranty. Troubleshooting Your Knoll amplifier is designed from trouble-free operation.
MR164 and MR166 Source Input Labels As of version 1.
Limited Warranty Knoll Systems, Inc. (“Knoll”) warrants that each CI6 and MR164 (“the Product”) sold hereunder will conform to and function in accordance with the written specifications of Knoll. Said limited warranty shall apply only to the first person or entity that purchases the Product for personal or business use and not for the purpose of distribution or resale. Said warranty shall continue for a period of three years from the date of such purchase.