HD102 HDTV DLP Projector Users Manual v1.
FCC Warning Note: This equipment has been tested and found to comply with the limits for a Class B digital device, pursuant to part 15 of the FCC Rules. These limits are designed to provide reasonable protection against harmful interference in a residential installation. This equipment generates, uses and can radiate radio frequency energy and, if not installed and used in accordance with the instructions, may cause harmful interference to radio communications.
TABLE OF CONTENTS Safety Warnings Introduction Positioning the projector Projector and Device Connector Guide Computer connections Video connections Connecting a computer source Required computer connections Optional computer connections Displaying a computer source image Adjusting the image Using the projector with Windows 98 for the first time Connecting a video device Video device connections RCA composite video connection S-video connection RCA component connection DVI connection Displaying video Adj
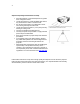
Important Operating Considerations for Safety • • • • • • • • • Place the projector in a horizontal position no greater than 15 degrees off axis. Locate the projector in a well-ventilated area without any obstructions to intake or exhaust vents. Do not place the projector on a tablecloth or other soft covering that may block the vents. Locate the projector at least 4' (1.2 m) away from any heating or cooling vents. Use only Knoll-approved ceiling mounts. Use only the power cord provided.
Introduction Congratulations and thank you for your excellent choice of a superior digital image projection device. Your new Knoll HD102 projector is specifically designed for home cinema applications. The HD102 sets a high standard using the latest DLP™ technology and new DCDi Plus video processing from Faroudja™. Whether you are watching movies or High Definition broadcasts or playing the latest video game, you will enjoy amazing image quality.
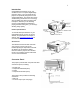
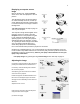
12-volt DC output The 3.5mm mini-jack trigger provides a 12-volt DC output. It provides a constant output while the projector is on. It has numerous uses. For example, if you connect your projection screen to the 12-volt DC output with the cable that came with your screen, when you turn on the projector the screen will move down; when you turn the projector off, the screen will return to the storage position. To use the 12-volt DC output, you must first remove the safety plug.
Video connections The first step for connecting video is deciding what type of output connector you want to connect to the projector. If there is more than one output, select the one with the highest quality. The best quality ranking, with 1 being the highest and 3 being the lowest, is: 1. component video (RCA) 2. S-video 3. audio/visual composite video (RCA) If your video device has a VGA connector, you can use the DVI connector on the back of the projector for very high quality.
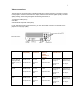
Video Device Video Compatibility If Your Device Connector is Attached to Adapter or Labeled Connector on projector For Setup Instructions see HDTV (High Definition TV) 1035i, 1080i, 720p DVI Computer In (DVI) DVI connection on page 12 Component 480i, 480p, 576i, 576p Component Video Video 1 (component RCA) Component on page 13 1035i, 1080i, 720p DVI Computer In (DVI) DVI connection on page 12 Component 480i, 480p, 576i, 576p Component Video Video 1 (component RCA) Component on page 1
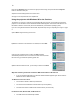
Displaying a computer source image Remove the lens cap. Toggle the Power switch on the side of the projector to the On position. The LED flashes green and the fans start to run. When the lamp comes on, the start up screen displays and the LED is steady green. It can take a minute for the image to achieve full brightness. ? No start up screen? Get help on page 15. Turn on your computer. The computer’s image should appear on the projection screen.
Press the top Keystone button to reduce the upper part of the image, and press the bottom Keystone button to reduce the lower part. Adjust the Contrast or Brightness in the Picture menu. See page 21 for help with these menu adjustments. Using the projector with Windows 98 for the first time The first time you connect a computer running Windows 98 to the projector, the computer recognizes the projector as “new hardware” and the Add New Hardware Wizard appears.
Connecting a video device You can connect video devices such as VCRs, DVD players, camcorders, digital cameras, video game consoles, HDTV receivers, and TV tuners to the projector. There is also an audio input via the red and white A/V connectors. You can connect the audio directly to the projector to get sound from the built-in speaker, or you can connect the audio to your stereo system via the Audio Out connector. You can connect the projector to most video devices that can output video.
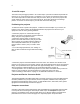
Plug a white connector into the left audio out connector on the video device and plug a red connector into the right audio out connector on the video device. Plug the remaining white connector into the white audio in connector on the projector, and plug the remaining red connector into the red audio in connector on the projector. Keep in mind that video output from composite connections are not as high quality as S-video or component video.
Displaying video Remove the lens cap. Toggle the Power switch on the side of the projector to the On position. The LED flashes green and the fans start to run. When the lamp comes on, the start-up screen is displayed and the LED is steady green. It can take a minute for the image to achieve full brightness. ? No start up screen? Get help on page 15. Plug in and turn on your video device. The video device’s image should appear on the projection screen. If it doesn’t, press the Video button on the keypad.
Adjust the Contrast, Brightness, Color, Tint, or Aspect Ratio in the Picture menu. See page 22 for help with the menus and these adjustments. For Aspect Ratio, keep in mind that DVD players must be configured for 16:9 in order to view the highest quality image. For more information regarding Aspect Ratio, see page 11. Shutting down the projector The projector automatically displays a black screen after no active source is detected for 30 minutes.
Table 1: LED behavior and meaning LED color/behavior Meaning Solid Green The power switch has been toggled on and the software has initialized or the projector has been powered off via the remote. Blinking Green The power switch has been toggled on and the software is initializing, or the projector is powering down and the fans are running to cool the lamp. Blinking Red A fan or lamp failure has occurred. Make sure the vents aren’t blocked (see page 18).
If you still need assistance, visit our website or call us. See the inside of the back cover for support contact information. This product is backed by a limited warranty. When sending the projector in for repair, we recommend shipping the unit in its original packing material, or having a professional packaging company pack the unit. Please insure your shipment for its full value.
Using the remote control The remote uses two (2) provided AAA batteries. They are easily installed by sliding the cover off the remote’s back, aligning the + and - ends of the batteries, sliding them into place, and then replacing the cover. To operate, point the remote at the projection screen or at the projector (not at the video device or computer). The range of optimum operation is up to 30 feet (9.14m). Press the remote’s Menu button to open the projector’s menu system.
Connecting external speakers The projector can be attached to external speakers that have their own power source by plugging a speaker cable (not included) into the projectors Audio Out connector. Using the keypad buttons Most buttons are described in detail in other sections, but here is an overview of their functions: Menu–opens the on-screen menus (page 21). Select–confirms choices made in the menus (page 21). Up/Down arrows–navigates to and adjusts settings in the menus (page 21).
• • Select a different standard if necessary. See page 23. Make sure your DVD player is set for a 16:9 television. See your DVD player’s user’s guide for instructions. Customizing the projector You can customize the projector for your specific setup and needs. • • • • • • • • For rear projection, turn rear mode on in the Settings>System menu. For ceiling mounted projection, turn ceiling mode on in the Settings> System menu.
Picture menu To adjust the following settings, highlight the setting, press Select, use the up and down arrows to adjust the values, then press Select to confirm the changes. Keystone: adjusts the image vertically and makes a squarer image. You can also adjust keystone from the keypad. Contrast: controls the degree of difference between the lightest and darkest parts of the picture and changes the amount of black and white in the image. Brightness: changes the intensity of the image.
CCS: (Cross-Color Suppression) processes the signal to remove any color information from the luma portion of the signal. It is On for all composite signals, and can be turned off for S-video and interlaced component signals. Sharpness: (video sources only) changes the clarity of the edges of a video image. Select a sharpness setting. Color Space: This option applies to computer and component video sources. It allows you to select a color space that has been specifically tuned for the input signal.
Settings menu Audio: allows adjustments to Volume of the internal speaker and allows a chime to play when starting the projector. Adjustments can also be made from the projector’s keypad and the remote. Sources: determines which source the projector checks first for active video during power-up. When Autosource is selected, the Source Enable feature indicates which sources the projector attempts to lock onto.
Service: To use these features, highlight them and press Select. Factory Reset: restores all settings to their default. Lamp Reset: resets the lamp hours used counter in the About menu to zero. Do this only after changing the lamp. Service Code: only used by authorized service personnel. About: provides information about the projector and the active source. Maintenance Cleaning the Lens 1 Apply a non-abrasive camera lens cleaner to a soft, dry cloth.
WARNING: To avoid burns, allow the projector to cool for at least 30 minutes before you replace the lamp. Do not drop the lamp housing or touch the glass bulb! The glass may shatter and cause injury. Be extremely careful when removing the lamp housing. In the unlikely event that the bulb ruptures, small glass fragments may be generated. The lamp housing is designed to contain these fragments, but use caution when removing the lamp housing.
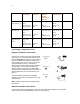
Appendix 1: HD102 Projection Throw Distance (16:9 Aspect Screen) Screen Diagonal 103" 106" 110" 122.5" 146.75" Minimum 139.5" Distance 156.1" 160.7" 166.7" 185.7" 222.5" Maximum 167.2" Distance 187" 192.5" 200" 222.7" 266.8" 8.2" 8.4" 8.8" 9.8" 11.7" Screen offset 92" 7.3" Viewing 45"x80" 50.5"x89.75" 52"x92" 54"x96" 60"x107" 72"x128" Area Maximum distance to screen (16:9) = 1.818 x Screen diagonal size Minimum distance to screen (16:9) = 1.
LIMITED WARRANTY Knoll Systems, Inc. (“Knoll”) warrants that each HD102 (“the Product”) sold hereunder will conform to and function in accordance with the written specifications of Knoll. Said limited warranty shall apply only to the first person or entity that purchases the Product for personal or business use and not for the purpose of distribution or resale. Said warranty shall continue for a period of two (2) years from the date of such purchase.