HDP404 1080p DLP™ Projector Users Manual v1.
FCC Warning Note: This equipment has been tested and found to comply with the limits for a Class B digital device, pursuant to part 15 of the FCC Rules. These limits are designed to provide reasonable protection against harmful interference in a residential installation. This equipment generates, uses and can radiate radio frequency energy and, if not installed and used in accordance with the instructions, may cause harmful interference to radio communications.
TABLE OF CONTENTS Safety Warnings Introduction Positioning the projector Choosing the aspect ratio 4 5 7 8 Video connectors Connecting a video device Composite (RCA) video connection S-video connection Component (RCA) connection SCART RGB connection 8 9 9 9 9 9 Digital connections DVI connection HDMI connection 10 10 10 Computer connections RS-232 connections 10 10 Displaying an image Adjusting the image Shutting down the projector 11 11 12 Troubleshooting your setup 12 Using the remote contr
Important Operating Considerations for Safety • • • • • • • • • Place the projector in a horizontal position no greater than 15 degrees off axis. Locate the projector in a well-ventilated area without any obstructions to intake or exhaust vents. Do not place the projector on a tablecloth or other soft covering that may block the vents. Locate the projector at least 4' (1.2 m) away from any heating or cooling vents. Use only Knoll-approved ceiling mounts. Use only the power cord provided.
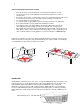
Base Zoom ring Focus ring Receiver (IR) Product specifications To read the latest specifications, be sure to visit our website at www.knollsystems.com as specifications are subject to change. Optional accessories can be found on our website at www.knollsystems.com, or at your retailer or dealer.
• HDMI™ (High Definition Multimedia Interface) • Component (RCA) • SCART RGB (you must enable this connector, see page 9) • S-video • Composite video (RCA) See “Video connectors” on page 9 for details. The projector also provides the following connectors: • RS-232 for serial control (not included on the HD108) • 12-volt DC output (see below) 12-volt DC output The 3.5mm mini-jack trigger provides a 12-volt, 0.25 amp DC output. It provides a constant output while the projector is on. It has numerous uses.
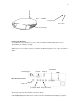
Position the projector the desired distance from the screen. The distance from the lens of the projector to the screen, the zoom setting, and the video format determine the size of the projected image. Projector Positioning The projected image becomes larger as the distance between the unit and screen increases. The manual zoom allows the distance from the screen to be within a minimum and maximum range. See the chart on the next page for details.
Please note the HD404 projectors are designed for use with 16:9 screens. They also have a built in scaler for use with 2.35:1 screens. To display images at the highest definition possible in 2.35:1 or cinemascope (most major movies are filmed in 2.35:1) an anamorphic lens is required. We recommend the Panamorph brand, which has fixed, movable and motorized anamorphic lens for use with the HDP404. Choosing the aspect ratio Aspect ratio is the ratio of the image width to image height.
The first step for connecting video is determining what type of output connectors your video Component RCA device has. If there is more than one output, select the one with the highest quality. The best quality ranking, with 1 being the highest, is: 1. M1-DA/DVI or HDMI (both are digital inputs). With a M1-DA to HDMI adaptor the HDP410, HDP420 and HDP460 have two HDMI inputs. 2. Component /SCART RGB video (RCAs) 3. S-video 4.
Digital connections The M1-DA/DVI and HDMI (High-Definition Multimedia Interface) connectors are digital and yield the highest quality image. It is common for these signals to be encrypted with HDCP (high-band width digital-content protection). Your new projector ships standard with decryption codes so you can enjoy these high quality, all digital images.
When the lamp comes on, the start-up screen is displayed and the LED is steady green. It can take a minute for the image to achieve full brightness. ? No start up screen? Get help on page 13 Plug in, connect, and turn on your video device. The video device’s image should appear on the turn on video device projection screen. If it doesn’t, press the Source button on the remote until the image appears. ? No image? Try pressing the Auto Image button on the remote. Get help on page 13.
Sleep Timer The projector also has a sleep timer feature that automatically turns the projector off after four hours. See page 21. Turning off the projector Press the Power button on the remote or keypad to turn the projector off. The lamp turns off and the LED blinks green for one minute while the fans continue to run to cool the lamp. While the LED is blinking green, the projector does not accept any user input.
The following tables show common problems. In some cases, more than one possible solution is provided. Try the solutions in the order they are presented. When the problem is solved, you can skip the additional solutions.
Still need assistance? If you need assistance, visit our website at www.knollsystems.com, or call us at 1 800 566 5579. during Pacific west coast time. This product is backed by a limited warranty. An extended warranty plan may be purchased from your retailer or dealer. When sending the projector in for repair, we recommend shipping the unit in its original packing material, or having a professional packaging company pack the unit. Please insure your shipment for its full value.
Using the remote control The remote uses two provided AA batteries. They are easily installed by sliding the cover off the remote’s back, aligning the + and - ends of the batteries, sliding them into place, and then replacing the cover. Navigation buttons To operate, point the remote at the projection screen or at the front of the projector (not at the video device or computer). The range of optimum operation is up to 30 feet (9.14m). Press the remote’s Menu button to open the projector’s menu system.
• Turn on Overscan to remove noise on the edges of the video image (page 19). • Change the Aspect ratio (page18). Aspect ratio is the ratio of the image width to image height. TV screens are usually 1.33:1, also known as 4:3. HDTV and most DVDs are 1.78:1, or 16:9 (the projector’s default). Choose the option that best fits your input source in the menus, or press the Resize button on the remote to cycle through the options. See page16. • Select a specific Color Space. See page 20.
Menu options are grayed out only if the source is selected but no signal is present. For example, if the projector is set to a video source but the source, such as a DVD player, is turned off video menu options are grayed out. Picture Menu Increasing keystone To adjust the following settings, highlight the setting, press Select, use the up and down arrows to adjust the values, then press Select to confirm the changes. Keystone: adjusts the image vertically and makes a squarer image.
Gamma: Gamma tables contain preset intensity configurations optimized for the input source. You can select a gamma table that has been specifically tuned for either film, CRT (Cathode Ray Tube), Video, PC, or Bright Room input. (Film input is material originally captured on a film camera, like a movie; video input is material originally captured on a video camera, like a TV show or sporting event.) Gamma White Peaking increases the brightness of whites that are near 100 percent.
Color Space: this option applies to computer and component video sources. It allows you to select a color space that has been specifically tuned for the input signal. When Auto is selected, the projector automatically determines the standard. To choose a different setting, turn off Auto, then choose RGB for computer sources, choose either REC709 or REC601 for component video sources. Color space Color Temperature Color Temperature: changes the intensity of the colors. Select a value.
When Autosource is not checked, the projector defaults to Component initially, then defaults to whatever the last active source was when the projector was powered down. To display another source, you must manually select one by pressing the Source button on the remote or keypad. This cycles through all the sources that are selected in the Source Enable menu. The Source 1, 2, and 3 menus in the Sources menu allow you to assign a source to the Source 1, 2, and 3 buttons on the remote.
Language: allows you to select a language for the onscreen display. • Custom key: allows you to assign a different function to the Custom key on the remote, allowing you to quickly and easily use the effect. Highlight an effect and press Select to choose a different one. • Blank Screen: displays a solid blank image. • Freeze: takes a snapshot of the projected image. If you’re watching video, the source video continues to run but the image is frozen. • Source Info: the default effect.
Maintenance Cleaning the lens 1 Apply a non-abrasive camera lens cleaner to a soft, dry cloth. • Avoid using an excessive amount of cleaner, and don’t apply the cleaner directly to the lens. Abrasive cleaners, solvents or other harsh chemicals might scratch the lens. 2 Lightly wipe the cleaning cloth over the lens in a circular motion. Lamp hours used Replacing the projection lamp The lamp hour’s timer in the Service Info menu counts the number of hours the lamp has been in use.
7. Install the new lamp housing and tighten the screws. 8. Replace the lamp door. 9. Replace the base or ceiling mount plate, if necessary. Service menu 10. Plug in the power cord and press the Power button on the remote to turn the projector back on. 11. To reset the lamp hour timer, navigate to the Settings>Service menu and select Reset Lamp Hours. See page 22 for details. Remote control discrete codes You can use these codes to program another remote to learn the projector’s remote functions.
Supported video formats RS-232 terminal specifications Communication configuration To control the projector from and LCD control panel, connect RS-232 cable to the serial control connector on the projector and set your computer’s serial port settings to match this communication configuration.
RS232 COMMAND FORMAT All commands consist of 3 alpha characters followed by a request, all enclosed in parentheses. The request can be a read request (indicated by a “?”) or a write request (indicated by 1 to 4 ASCII digits).
Supported commands Function Command Range Default Aspect Ratio ARZ 1 Auto Ceiling Enable Auto Color Gamut Enable Auto Color Space Enable ACS Auto Image Auto Power Enable Auto Source Enable Auto Video Standard Enable Black Level Calibration Blank Blank Screen Color ACL AGA Blue Gain Blue Offset Blue Only Enable Boot Version Brightness BrilliantColor Look Ceiling Color Color Coordinate Adjust Color Gamut Enable Color Space BCG BCO BOE BVS BRT BCL CEL CLR CCA CGC CSM Color Temp TMP Computer Ad
Supported commands (continued) Function Command Range Gamma Table GTB Green Color Offset Green Gain HDMI DDC Enable 1 HDMI DDC Enable 3 High Power Enable Horizontal Position Illuminating State Iris ISF Day Saved Status ISF Night Saved Status Keycode Entry Lamp Hours (Read only) Lamp Power Language GCO GCG EE1 EE3 HPE HPS LML IRI IDS INS KEY LMP IPM LAN Menu Enable Menu Navigation MNU NAV Language LAN Noise Reduction Level Noise Reduction Mode NRL NRE Overscan Perform Lamp Reset Phase Power
SUPPORTED COMMANDS (CONTINUED) Function Command Range Default Power Up Source Presets DSC PST 2 0 Rear Project Red Color Offset Red Gain Screen Trigger Enable Sharpness Sleep Timer Sync Threshold Adjust Source REA RCO RCG STE SHP SLT STH SRC Source 1 Program Source 2 Program Source 3 Program Source 4 Program Source 5 Program Source Advance Source Enable 0 Source Enable 1 Source Enable 2 Source Enable 3 Source Enable 4 Source Enable 5 Startup Logo Sync Threshold Adjust System State Test Pattern
LIMITED WARRANTY Knoll Systems, Inc. (“Knoll”) warrants that each HDP404 (“the Product”) sold hereunder will conform to and function in accordance with the written specifications of Knoll. Said limited warranty shall apply only to the first person or entity that purchases the Product for personal or business use and not for the purpose of distribution or resale. Said warranty shall continue for a period of two (2) years from the date of such purchase.