
EX-NEXT Manual


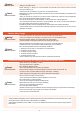


Table Of Contents

A
B
6
Attach the monitor bracket to the master unit.
*[A ]mark to the steering side.
Attach the monitor bracket to the master unit.
*Apply mark to the steering side.
Attach a monitor base parallel to Xpansion unit.
*Factory setting.
*The disassembly method is the same as side and front
positions
Attach the monitor base at a right angle to Xpansion
Unit. *Different Factory setting.
Attention to the marker.
Attention to the marker.
M2.6-6BH
M2.6-6BH
M2-6
Cap screw
M2-6
cap screw
screw used.
screw used.
screw used.
screw used.
screw used
screw used
x 2
x 2
x 1
x 1
x 4
x 4
2.6-8BH
Tapping
2.6-8BH
Self tapping
screw
Nut Holder
Connect the wire of the
Xpansion unit to the
master unit.
Connect the wire of the
Xpansion unit to the
master unit.
Attach expansion unit to a master unit.
Attach the Xpansion unit to the master unit.
*Attach the monitor base and bracket as shown in gure.
1. Remove M2-6 Cap Screw.
2. Slide the Xpansion like shown in the gure below
and take off.
While matching the edge of the base with the
dent of the bracket, slide it until the Xpansion unit
locks.
Set M2-6 Cap Screw for
xed.
1
1
2
A : Setting to the front
Xpansion unit can be mounted facing the
front or the side. The factory setting is
mounted to the front.
▼B : When mounting sideways
How to disassemble the Xpansion unit.
Remove the connector cover before use.
When assembling or disassembling the Xpansion unit to
EX-NEX, please turn off the EX-NEXT.
Be careful to not misuse the M2.6-6BH and 2.6-8BH tapping
screws.
Xpansion unit can be mounted in two different directions using
the monitor base and bracket.
P
●Installation of Xpansion unit
1
2
2