KOALA KARE PRODUCTS Installation and Operation Instructions KB200 Baby Changing Station Cambiador Plegable Table à Langer Babywickeltisch Your unit can be installed to meet ADA regulations when and where applicable. Refer to Federal Register, Volume 56, No 144 28 CFR Part 36. You are responsible for the safe operation of this unit. IMPORTANT. RETAIN FOR FUTURE REFERENCE. READ CAREFULLY. IMPORTANTE. GUÁRDELO PARA FUTURAS CONSULTAS. LEER ATENTAMENTE. IMPORTANT. À CONSERVER POUR INFORMATION.
OPERATING INSTRUCTIONS Please Note: To assure proper installation, it is suggested that a qualified person or carpenter install the Koala Baby Changing Station. Koala Kare Products will not be responsible if the station is not installed properly. Koala Baby Changing Stations have been tested to hold a substantial static load. The unit must be attached to a permanent wall that is capable of holding a substantial load.
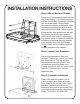
INSTALLATION INSTRUCTIONS Horizontal Baby Changing Station Surface Mounted Model Number KB200 Keyhole Slot Bed and Metal Mounting Chassis Wall Mount Liner Dispenser Step 1. Inspect Contents Remove changing station from the shipping container and check for any freight damage. If damage is found, please call Koala Kare Products’ Customer Service at 888.733.3456. Remove “Installation Kit” and “Operator Kit” from box. Please give “Operator Kit” to facility manager or operator.
INSTALLATION INSTRUCTIONS Step 2. Prepare Mounting Surface 9½” (241 mm) For Standard Installation Remove the bed and chassis from the box and select the wall area where the unit will be installed. Make sure you have taken into consideration the operating clearance of 9½” (241 mm) on both sides of the exposed chassis and 233/16” (589 mm) from wall surface when open. Measure from the floor 42¼” (1073 mm) on stud center and mark the wall. The mounting holes are designed for 16” stud centers.
INSTALLATION INSTRUCTIONS Step 3. Mount Bed and Chassis Screw two of the mounting screws into the pilot holes leaving ¼” (6.35 mm) exposed to allow keyhole slots to be easily mounted over the screw heads. Place chassis over screws as shown in illustration. After securing the unit using the keyhole slots, verify that the unit is level. Tighten top two screws so that they are flush with the wall. Use the four lower holes as a guide to mark and drill pilot holes.
ASTM F 2285-04 WARNING: Never leave child unattended. WARNING: Avoid serious injury from enfant sans surveillance. WARNING: Designed for Infants Only. occasionnées par une chute ou une glissade. Utilisez toujours le système de retenue. falling or sliding out. Always use restraint system. Age up to 3.5 years and weighing less than 50 lbs. Keep one hand on the child at all times. ATTENTION : Ne laissez jamais un ATTENTION : Évitez les blessures ATTENTION : Conçue uniquement pour les jeunes enfants.
EN 12221:2008+A1:2013 WARNING: Do not leave the child unattended. ATTENTION : Ne laissez pas l’enfant sans All assembly fittings shall always be correctly surveillance. Tous les éléments d’assemblage doivent être tightened and checked regularly. correctement fixés et vérifiés régulièrement. Be aware of the risk of open fire and other Faites attention aux risques présentés par sources of strong heat, such as electric bar un feu ouvert ou des sources de chaleur fires, gas fires, etc.
INSTRUCCIONES DE USO Atención: Para garantizar una instalación correcta, se sugiere que una persona capacitada o un carpintero instale el cambiador de pañales Koala Baby Changing Station. Koala Kare Products no se responsabilizará si el cambiador no se ha instalado adecuadamente. Las bases para el cambiador de pañales Koala Baby Changing Station se han probado para garantizar que soportan un peso estático considerable. La unidad debe ponerse en una pared inmóvil capaz de soportar un peso considerable.
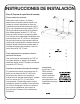
INSTRUCCIONES DE INSTALACIÓN Cambiador montado en superficie horizontal Número de modelo KB200 Ranura de agujero de cerradura Chasis de montaje de base y metal Dispensador de forros de pared Paso 1. Inspeccione el contenido Saque la base del cambiador de pañales de la caja de embalaje y compruebe que no haya sufrido daños durante el transporte. Si observa daños, póngase en contacto con el Servicio de atención al cliente de Koala Kare Products en el 888.733.3456.
INSTRUCCIONES DE INSTALACIÓN Paso 2. Prepare la superficie de montaje 9½” (241 mm) Para instalación estándar Retire de la caja la cama y el chasis y seleccione la zona de la pared donde va a instalar la unidad. Asegúrese de tener en cuenta la holgura de funcionamiento de 9½” (24.1 cm) a ambos lados del chasis y 233/16” (58.9 cm) desde la superficie de la pared al abrir. Mida desde el suelo 42¼” (107 cm) sobre el centro del taco y marque la pared.
INSTRUCCIONES DE INSTALACIÓN Paso 3. Montaje de la cama y el chasis Atornille dos de los tornillos de montaje en los orificios de muestra dejando 1/4” (6,3 mm) abierto para permitir que las ranuras del agujero de cerradura se monten con facilidad sobre las cabezas de los tornillos. Coloque el chasis sobre los tornillos como muestra la ilustración. Tras apretar la unidad usando las ranuras de agujero de cerradura, verifique si la unidad está nivelada.
MODE D’EMPLOI Veuillez noter : La table à langer Koala doit être installée par une personne qualifiée ou un menuisier afin de garantir une installation correcte. La responsabilité des produits Koala Kare n’est pas engagée si la table n’est pas bien installée. Les tables à langer Koala ont été testées pour supporter une charge statique importante. La table à langer doit être fixée à un mur permanent pouvant supporter un poids important.
INSTALLATION Table à langer horizontale montée en surface Référence modèle KB200 Encoche en trou de serrure Lit et cadre de montage métallique Distributeur d’alaises à installation murale Étape 1. Inspectez le contenu Retirez la table à langer du carton d’emballage et vérifiez qu’elle n’a pas été endommagée durant le transport. Si le contenu est endommagé, veuillez appeler le Service clientèle de Koala Kare Products au 1.888.733.3456.
INSTALLATION Étape 2. Préparez la surface de montage 9½” (241 mm) Pour une installation standard Retirez le lit et le cadre du carton, puis sélectionnez l’emplacement sur le mur où la table à langer sera montée. Réservez une distance de dégagement de 9 ½ po (24,1 cm) de chaque côté du cadre exposé et de 233/16 po (58,9 cm) par rapport à la surface du mur en position d’ouverture. Mesurez une distance de 42 ¼ po (107 cm) du sol jusqu’au poteau de cloison et marquez le mur.
INSTALLATION Étape 3. Montez le lit et le cadre Vissez deux vis de montage dans les trous pilotes en exposant ¼ po (6,35 mm) afin de pouvoir monter facilement les encoches en trou de serrure sur les têtes de vis. Placez le cadre sur les vis conformément à l’illustration. Après avoir fixé la table à langer à l’aide des encoches en trou de serrure, vérifiez que la table est à niveau. Serrez les deux vis supérieures de sorte qu’elles affleurent contre le mur.
GEBRAUCHSANLEITUNG Bitte beachten: Um die sachgerechte Montage der Koala Babywickeltisch zu gewährleisten, empfehlen wir, diese Tätigkeit von einer Fachkraft bzw. einem Tischler ausführen zu lassen. Koala Kare Products haftet nicht bei Schäden, die durch die unsachgemäße Montage der Wickeltisch entstehen. Koala Babywickeltischen wurden mit erheblicher statischer Last getestet. Das Produkt muss an einer festen Wand montiert werden, die für eine erhebliche Belastung geeignet ist.
MONTAGEANLEITUNG Horizontale Babywickeltisch für Aufbaumontage Modellnummer KB200 Befestigungsloch Auflage- und Metallmontagechassis Auflagenspender für Wandbefestigung Schritt 1. Prüfen des Inhalts Nehmen Sie die Wickeltisch aus dem Versandkarton und prüfen Sie das Produkt auf Transportschäden. Sollten Sie Schäden feststellen, wenden Sie sich unter +1-888-7333456 an den Koala Kare Products Kundendienst. Nehmen Sie das „Monteur-“ und das „Bedienpersonalpaket“ aus dem Karton.
MONTAGEANLEITUNG Schritt 2. Vorbereitung der Montageoberfläche 9½” (241 mm) Standardmontage Nehmen Sie die Auflage und das Chassis aus dem Karton und bestimmen Sie den Wandbereich, an dem das Produkt montiert werden soll. Stellen Sie sicher, dass der für den Gebrauch erforderliche Platz von 9½ Zoll (24,1 cm) auf beiden Seiten des Chassis und 233/16 Zoll (58,9 cm) geöffnet ab Wand vorhanden ist.
MONTAGEANLEITUNG Schritt 3. Montageauflage und Chassis Schrauben Sie zwei der Montageschrauben in die vorgebohrten Löcher, wobei die Schrauben ca. ¼ Zoll (6,35 mm) herausragen sollten, sodass die Befestigungslöcher leicht über die Schraubenköpfe geschoben werden können. Bringen Sie das Chassis über den Schrauben an, wie in der Abbildung dargestellt. Sobald Sie das Produkt mithilfe der Befestigungslöcher angebracht haben, stellen Sie sicher, dass es horizontriert ist.
KB200 Domestic Installation Instructions October 2014