ITEM #1694007 AREA LIGHT MODEL #KAL124B-03 Español p. 11 ATTACH YOUR RECEIPT HERE Serial Number Purchase Date Questions, problems, missing parts? Before returning to your retailer, call our customer service department at 1-888-3KOBALT (1-888-356-2258), 8 a.m. - 8 p.m., EST, Monday - Sunday.
TABLE OF CONTENT Product Specifications....................................................................................... 2 Package Content............................................................................................... 3 Safety Information............................................................................................. 4 Preparation........................................................................................................ 6 Operating Instructions................
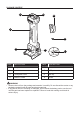
PACKAGE CONTENT B A G C H D PART E DESCRIPTION PART F DESCRIPTION A Carry hook E Area switch B Lock button F USB port cover C Transparent cover G Belt clip D ON/OFF switch H Screw WARNING • Remove the tool from the package and examine it carefully. Do not discard the carton or any packaging material until all parts have been examined. • If any part of the tool is missing or damaged, do not attach the battery pack or use the tool until the part has been repaired or replaced.
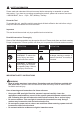
SAFETY INFORMATION Please read and understand this entire manual before attempting to assemble or operate this product. If you have any questions regarding the product, please call customer service at 1-888-3KOBALT, 8 a.m. - 8 p.m., EST, Monday - Sunday. Know the Tool To operate this tool, carefully read this manual and all labels affixed to the tool before using it. Keep this manual available for future reference. Important This tool should be serviced only by a qualified service technician.
SAFETY INFORMATION • Do not direct the area light beam at persons or animals and do not stare into the area light beam yourself (not even from a distance). Avoid direct eye exposure. The area light can cause flash blindness. • Do not use the area light in road traffic. The cordless area light is not approved for illumination in road traffic. • Disconnect the battery pack from the area light before making any adjustments, changing accessories, or storing power tools, etc.
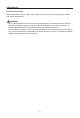
PREPARATION Know Your Area Light Before attempting to use the area light, familiarize yourself with all of its operating features and safety requirements. WARNING • Do not allow familiarity with the tool to cause carelessness. Remember that one careless moment is enough to cause severe injury. Before attempting to use any tool, be sure to become familiar with all of the operating features and safety instructions.
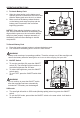
OPERATING INSTRUCTIONS 1. To Attach Battery Pack a. b. Align the raised portion on the battery pack with the grooves on the bottom of the tool, then slide the battery pack onto the tool, as shown. Make sure that the battery-release buttons on the battery pack snap into place and the battery pack is secured to the tool before beginning operation.
OPERATING INSTRUCTIONS 3. Area Switch a. b. c. d. Press the ON/OFF switch (D) to turn the area light on. When the area light is first turned ON, it will be set at maximum brightness and 360°area. To reduce the bright area, press the area switch once. To go back to 360°area, press the area switch again. 3 D 4. Carry Hook a. b. c. The area light is equipped a carry hook (A). The area light can be carried or fastened to an object with the carry hook.
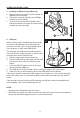
OPERATING INSTRUCTIONS 5. Installing and Removing the Belt Clip a. b. c. Align the rib of the belt clip (G) with the hole on the base of the area light. Tighten the screw (H) securely with a Phillips screwdriver (not included). To remove the belt clip with bit holder, use a Phillips screwdriver to loosen the screw holding the belt clip to the area light. 5 H G 6.
CARE AND MAINTENANCE All maintenance should only be carried out by a qualified service technician. Cleaning Before cleaning or performing any maintenance, remove the battery pack from the tool. For safe and proper operation, always keep the tool and its ventilation slots clean. Always use only a soft, dry cloth to clean the plastic transparent cover; never use detergent or alcohol. Always wear safety goggles when cleaning tools with compressed air.
ARTÍCULO #1694007 LUZ DE ÁREA MODELO #KAL124B-03 ADJUNTE SU RECIBO AQUÍ Número de serie Fecha de compra ¿Preguntas, problemas, piezas faltantes? Antes de volver a la tienda, llame a nuestro Departamento de Servicio al Cliente al 1-888-3KOBALT (1-888-356-2258), de lunes a domingo de 8 a.m. a 8 p.m., hora estándar del Este.
ÍNDICE Especificaciones del producto......................................................................... 12 Contenido del paquete.................................................................................... 13 Información de seguridad................................................................................ 14 Preparación..................................................................................................... 16 Instrucciones de funcionamiento...................................
CONTENIDO DEL PAQUETE A B G C H D PIEZA E DESCRIPCIÓN PIEZA F DESCRIPCIÓN A Gancho para transportar E Interruptor de área B Botón de bloqueo F Cubierta de puerto USB C Cubierta transparente G Sujetador para cinturón D Interruptor de encendido/ apagado H Tornillo ADVERTENCIA • Retire la herramienta del paquete y examínela cuidadosamente. No deseche la caja ni ningún material de embalaje hasta después de examinar todas las piezas.
INFORMACIÓN DE SEGURIDAD Lea y comprenda completamente este manual antes de intentar ensamblar u operar este producto. Si tiene preguntas relacionadas con el producto, llame al Departamento de Servicio al Cliente al 1-888-3KOBALT, de lunes a domingo de 8 a.m. a 8 p.m., hora estándar del Este. Conozca la herramienta Para operar esta herramienta, lea cuidadosamente este manual y las etiquetas fijadas a la herramienta antes de usarla. Guarde este manual para referencia futura.
INFORMACIÓN DE SEGURIDAD Guarde todas las advertencias e instrucciones para referencia futura • Conozca su luz de área LED. Lea el manual del operador con atención. Conozca las aplicaciones y las limitaciones, así como también los posibles peligros específicos relacionados con esta herramienta. Al seguir esta norma, se disminuirá el riesgo de descargas eléctricas, incendios o lesiones graves. • No use el producto en exteriores. Esta luz de área está destinada solo para uso doméstico.
INFORMACIÓN DE SEGURIDAD ADVERTENCIA • Al usar electrodomésticos, siempre se deben respetar las siguientes medidas de precaución básicas: • Lea todas las instrucciones antes de usar el artefacto. • Para reducir el riesgo de lesiones, es necesario supervisar cuando los niños están cerca del artefacto. • Para reducir el riesgo de lesiones, no mire fijamente la lámpara encendida. Esto podría • producir lesiones oculares graves. • No use el producto bajo la lluvia.
INSTRUCCIONES DE FUNCIONAMIENTO 1. Para fijar el paquete de baterías a. b. Alinee la parte elevada del paquete de baterías con las ranuras de la parte inferior de la herramienta y luego deslice el paquete de baterías en la herramienta, como se muestra. Asegúrese de que los botones de liberación de la batería del paquete de baterías encajen en su lugar y que el paquete de baterías quede fijo a la herramienta antes de comenzar la operación.
INSTRUCCIONES DE FUNCIONAMIENTO 3. Interruptor de área a. b. c. d. Presione el interruptor de encendido/apagado (D) para encender la luz de área. Cuando la luz de área se enciende por primera vez, está configurada al brillo máximo y en un área de 360°. Para reducir el área iluminada, presione el interruptor de área una vez. Para volver al área de 360°, presione el interruptor de área nuevamente. 4. Gancho para transportar a. b. c. La luz de área está equipada con un gancho para transportar (A).
INSTRUCCIONES DE FUNCIONAMIENTO 5. Cómo instalar y retirar la presilla para cinturón a. b. c. Alinee la pestaña de la presilla para cinturón (G) con el orificio en la base de la luz de área. Apriete el tornillo (H) con firmeza con un destornillador Phillips (no se incluye). Para retirar la presilla para cinturón con soporte para brocas, utilice un destornillador Phillips para aflojar el tornillo que fija la presilla para cinturón a la luz de área. 5 H G 6 6.
CUIDADO Y MANTENIMIENTO do. Todo el mantenimiento debe estar a cargo únicamente de un técnico de servicio califica- Limpieza Antes de limpiar o realizar cualquier mantenimiento, retire el paquete de baterías de la herramienta. Para un uso seguro y adecuado, siempre mantenga limpias la herramienta y sus ranuras de ventilación. Siempre use solamente un paño suave y seco para limpiar la cubierta de plástico transparente; nunca utilice detergente ni alcohol.