ITEM #2624981 40V BACKPACK BLOWER MODEL #KBB 6540-06/KBB 4240-06 Español p. 19 ATTACH YOUR RECEIPT HERE Serial Number Purchase Date Questions, problems, missing parts? Before returning to your retailer, call our customer service department at 1-888-3KOBALT (1-888-356-2258), 8 a.m. - 8 p.m., EST, Monday - Sunday.You could also contact us at partsplus@lowes.com or visit www.lowespartsplus.com.
TABLE OF CONTENTS Package Contents................................................................................................................3 Hardware Contents...............................................................................................................4 Symbols................................................................................................................................ 4 Safety Information.............................................................................
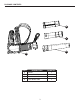
PACKAGE CONTENTS B C D A PART DESCRIPTION A Blower QUANTITY 1 B Connection tube 1 C Rear blower tube 1 D Front blower tube 1 3
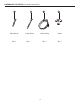
HARDWARE CONTENTS (not shown actual size) AA Short Screw Qty. 1 BB Long Screw CC DD Hose Clamp Knob Qty. 1 Qty. 1 Qty.
SYMBOLS Some of the following symbols may be used on this product. Please study them and learn their meaning. Proper interpretation of these symbols will allow you to operate the product better and safer. SYMBOLS NAME V Volts A DESIGNATION/EXPLANATION Voltage Amperes Current Hz Hertz Frequency (cycles per second) W Watts Power Minutes Time Alternating Current Type of current Direct Current Type or a characteristic of current Per Minute Revolutions, strokes, surface speed, orbits etc.
SYMBOLS The following signal words and meanings are intended to explain the levels of risk associated with this product. SYMBOL SIGNAL DANGER WARNING CAUTION CAUTION MEANING Indicates an imminently hazardous situation, which, if not avoided, will result in death or serious injury. Indicates a potentially hazardous situation, which, if not avoided, could result in death or serious injury. Indicates a potentially hazardous situation, which, if not avoided, may result in minor or moderate injury.
SAFETY INFORMATION WHEN USING THIS BLOWER • Do not operate power tools in an explosive atmosphere, such as in the presence of flammable liquids, gases, or dust. Power tools create sparks that may ignite the dust or fumes. • To reduce the risk of electric shock, the battery charger has a polarized plug (one blade is wider than the other) and will require the use of a polarized extension cord. The plug will only fit into a polarized extension cord one way.
SAFETY INFORMATION FOR BATTERY-OPERATED EQUIPMENT: • Prevent unintentional starting. Ensure the switch is in the off-position before connecting to battery pack, picking up or carrying the equipment. Carrying the equipment with your finger on the switch or energizing equipment that have the switch on invites accidents. • Disconnect the battery pack from the equipment before making any adjustments, changing accessories, or storing equipment.
SAFETY INFORMATION CHILD SAFETY Tragic accidents can occur if the operator is not aware of the presence of children. • Keep children out of the working area and under the watchful care of a responsible adult. • Do not allow children under the age of 14 to operate this blower. Children who are 14 years of age and older must read and understand the operating instructions and safety rules in this manual and must be trained and supervised by a parent.
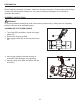
PREPARATION Before beginning assembly of product, make sure all parts are present. Compare parts with package contents list and hardware contents list. If any part is missing or damaged, do not attempt to assemble the product. ASSEMBLY INSTRUCTIONS WARNING To prevent accidental starting that could cause serious personal injury, always remove the battery pack from the tool when assembling parts. ASSEMBLING THE TIGGER HANDLE 1. Turn knob (DD) clockwise to loosen the trigger handle (E). 2.
ASSEMBLY INSTRUCTIONS ASSEMBLING THE CONNECTION TUBE 1. Align the raised ribs (F) with the slot (G). 2. Insert the shorter end of the connection tube (B) into the flex tube (G) at a slight angle. 3. Use one end of the tube as a pivot point, and press the other side into the flex tube. This may require some force. E H B G F 4. Place the hose clamp (CC) around the flex tube. CC 5. Insert and tighten the short screw (AA) into the hose clamp (CC).
ASSEMBLY INSTRUCTIONS ASSEMBLING THE REAR BLOWER TUBE 1. Align either of the grooves (H) in the rear blower tube (D) with the tabs (I) on the blower. 2. Push the tube into the blower until the tabs (I) engage the grooves (H). 3. Turn the rear blower tube in the direction of the slot until the tabs lock into position. 4. Repeat the steps above to install the front blower tube (C). D H Note: The front blower tube has two fixed positions (N).
ASSEMBLY INSTRUCTIONS BATTERY a. To install the battery: • Align the battery with the cavity in the backpack housing. • Grasp the backpack firmly. • Insert the battery in the opening until the battery release button (J) locks into place. You should hear a “click” once it is installed. Note: For better performance and usage time, inserting two batteries at the same time and using the batteries with large battery capacity are recommended. b. To remove the battery: • Press the battery release button (J).
OPERATING INSTRUCTIONS 1. HARNESS ADJUSTMENT A well-adjusted backpack blower and harness makes work easier. Adjust the harness to give you the best working stance. Adjust the side straps so the weight is equally distributed across your shoulders. 1 a. Once the blower is properly fitted on your back, pull the ends of the straps downward to tighten the harness. b. Connect the horizontal chest strap, and pull the end of the strap to tighten. Repeat the step to connect and tighten the waist strap. c.
OPERATING INSTRUCTIONS 4. STARTING/STOPPING THE BLOWER • Ensure that the battery is installed in the blower. • Squeeze the trigger (K) to start the blower. • To change speed, squeeze the trigger to increase the speed and release the trigger slightly to decrease the speed. • Release the trigger completely to stop the blower. 5. USING THE CRUISE CONTROL LEVER This blower is equipped with a cruise control function. • Squeeze the trigger (K) to start the unit.
CARE AND MAINTENANCE WARNING In order to avoid personal injury and the risk of fire and electric shock, remove the battery pack before adjusting, inspecting, or cleaning the blower. CLEANING • Remove the battery pack. • Brush or blow dust and debris out of the air vents using compressed air or a vacuum. Keep the air vents free of obstructions, sawdust, and wood chips. Do not spray, wash, or immerse the air vents in water. • Wipe off the housing and the plastic components using a moist, soft cloth.
WARRANTY 5-YEAR LIMITED WARRANTY This 40 V Lithiuim-Ion Backpack blower is warranted to the original purchaser from the original purchase date for five (5) years subject to the warranty coverage described herein. This 40 V Lithiuim-Ion backpack blower is warranted for the original user to be free from defects in material and workmanship.
REPLACEMENT PARTS LIST For replacement parts, call our customer service department at 1-888-3KOBALT (1-888-356-2258), 8 a.m. - 8 p.m., EST, Monday - Sunday. You could also contact us at partsplus@lowes.com or visit www.lowespartsplus.com.
ARTÍCULO # 2624981 SOPLADOR CON SIN CEPILLO DE 40V MODELO #KBB 6540-06/KBB 4240-06 ADJUNT E SU RECIBO AQUÍ Número de serie Fecha de compra ¿Preguntas, problemas, piezas faltantes? Antes de volver a la tienda, llame a nuestro Departamento de Servicio al Cliente al 1-888-3KOBALT (1-888-356-2258), de lunes a domingo de 8 a.m. a 8 p.m. (hora del Este).También puede ponerse en contacto con nosotros en partsplus@lowes.com o visitar www.lowespartsplus.com.
ÍNDICE Contenido del paquete........................................................................................................21 Aditamientos........................................................................................................22 Símbolos................................................................................................................................ 23 Información de seguridad ............................................................................................
CONTENIDO DEL PAQUETE B C D A PIEZA DESCRIPCIÓN A Soplador CANTIDAD 1 B Tubo de conexión 1 C Tubo posterior del soplador 1 D Tubo frontal del soplador 1 21
ADITAMIENTOS (no se muestran en el tamaño real) AA Tornillo corto Cant. 1 BB Tornillo largo Cant. 1 CC DD Abrazadera para manguera Perilla Cant. 1 Cant.
SÍMBOLOS Algunos de estos símbolos pueden ser usados en este producto. Léalos y aprenda su significado. La interpretación correcta de estos simbolos permite una operación mejor y más segura.
SÍMBOLOS La simbología y los significados siguientes fueron diseñados para explicar los niveles de riesgo asociados con este producto. SÍMBOLO SEÑAL PELIGRO ADVERTENCIA PRECAUCIÓN PRECAUCIÓN SIGNIFICADO Indica una situación de peligro inminente que, si no es prevenida, causará la muerte o lesiones severas. Indica una situación de peligro potencial que, si no es prevenida, podría causar la muerte o lesiones severas.
INFORMACIÓN DE SEGURIDAD DURANTE EL USO DEL SOPLADOR • No utilice herramientas eléctricas en una atmósfera en la que exista riesgo de explosión, como por ejemplo en presencia de líquidos inflamables, gases o polvo. Las herramientas eléctricas producen chispas que podrían encender el polvo o humo. • Para reducir el riesgo de descarga eléctrica, el cargador de batería posee un enchufe polarizado (una clavija es más ancha que la otra) y requiere el uso de una extensión eléctrica polarizada.
INFORMACIÓN DE SEGURIDAD PARA UN ELECTRODOMÉSTICO QUE FUNCIONE A BATERÍA: • Evite el arranque no intencional, asegúrese de que el interruptor esté en la posición de apagado antes de conectarlo al paquete de baterías, levantarlo o transportar el electrodoméstico. Transportar el electrodoméstico con el dedo en el interruptor o enchufar los electrodomésticos que tienen el interruptor encendido aumenta las posibilidades de accidentes.
INFORMACIÓN DE SEGURIDAD SEGURIDAD INFANTIL Pueden ocurrir accidentes trágicos si el operario no tiene conocimiento de la presencia de los niños. • Mantenga a los niños fuera del área de trabajo y bajo la estricta vigilancia de un adulto responsable. • No permita que los niños menores de 14 años operen este soplador.
PREPARACIÓN Antes de empezar a usar este producto, asegúrese de tener todas las piezas. Compare las piezas con la lista del contenido del paquete, si hubiera alguna pieza faltante o dañada, no intente usar el producto. INSTRUCCIONES DE ENSAMBLAJE ADVERTENCIA Para evitar un arranque accidental que podría causar lesiones graves, retire siempre la batería de la herramienta durante el ensamblaje de las piezas. ENSAMBLE DE LA MANIJA DEL GATILLO 1.
INSTRUCCIONES DE ENSAMBLAJE ENSAMBLAJE DEL TUBO DE CONEXIÓN 1. Alinee las varillas elevadas (F) con la ranura (G). 2. Inserte el extremo más corto del tubo de conexión (B) en el tubo flexible (G) en un ángulo ligero. 3. Use un extremo del tubo como punto de rotación y presione el otro extremo del tubo flexible. Es posible que se necesite cierta fuerza para hacerlo. E H B G F 4. Coloque la abrazadera para manguera (CC) alrededor del tubo flexible. CC 5.
INSTRUCCIONES DE ENSAMBLAJE ENSAMBLAJE DEL TUBO POSTERIOR DEL SOPLADOR 1. Alinee cualquiera de las ranuras (H) del tubo posterior del soplador (D) con las lengüetas (I) del soplador. 2. Presione el tubo en el soplador hasta que las lengüetas (I) encajen en las ranuras (H). 3. Gire el tubo posterior del soplador en la dirección de la ranura hasta que las lengüetas se bloqueen en su posición. 4. Repita los pasos anteriores para instalar el tubo frontal del soplador (C).
INSTRUCCIONES DE ENSAMBLAJE BATERÍA a. Para instalar la batería: • Alinee la batería con la cavidad de la carcasa tipo mochila. • Tome firmemente la mochila. • Inserte el baterías en la abertura hasta que el botón de liberación de la batería (J) se trabe en su lugar. Deberá escuchar un “clic” una vez que está instalado. Nota: para un mejor rendimiento y tiempo de uso, se recomienda insertar dos baterías al mismo tiempo y usar baterías con gran capacidad. b.
INSTRUCCIONES DE USO 1. AJUSTE DEL ARNÉS Un soplador tipo mochila y un arnés bien ajustados facilitan el trabajo. Ajuste el arnés para que le ofrezca la mejor postura de trabajo. Ajuste las correas laterales para que el peso se distribuya uniformemente en los hombros. 1 a. Una vez que el soplador se ajuste bien en su espalda, tire de los extremos de las correas hacia abajo para apretar el arnés. b. Conecte la correa horizontal del pecho y jale el extremo de la correa para apretar.
INSTRUCCIONES DE USO 4. CÓMO ENCENDER Y APAGAR EL SOPLADOR • Asegúrese de que la batería esté instalada en el soplador. • Presione el gatillo (K) para encender el soplador. • Para cambiar la velocidad, apriete el gatillo para aumentar la velocidad y suelte ligeramente el gatillo para disminuir la velocidad. • Suelte el gatillo completamente para detener el soplador. 4 M L K 5. USE LA PALANCA DE CONTROL DE CRUCERO Este soplador está equipado con función de control de crucero.
CUIDADO Y MANTENIMIENTO ADVERTENCIA Para evitar una lesión severa y el riesgo de incendio y descargas eléctricas, quite la batería antes de ajustar, inspeccionar o limpiar el soplador. PARA LIMPIAR • Quite la batería. • Cepille o sople el polvo o escombros que estén en las aberturas de ventilación usando un compresor de aire o una aspiradora. Mantenga las aberturas de ventilación libres de obstrucciones, aserrín y virutas de madera. No rocíe, lave o sumerja las aberturas en agua.
GARANTÍA 5 AÑOS DE GARANTÍA LIMITADA Este soplador tipo mochila de iones de litio de 40 V tiene cinco (5) años de garantía para el comprador original a partir de la fecha de compra original según la cobertura de la garantía descrita a continuación. Este soplador tipo mochila de iones de litio de 40 V tiene una garantía para el usuario original contra defectos en los materiales y la mano de obra.
LISTA DE REPUESTOS Para encargar piezas de repuesto, llame a nuestro Departamento de Servicio al Cliente al 1-888-3KOBALT (1-888-356-2258) de lunes a domingo de 8 a.m. a 8 p.m. , hora estándar del Este. También puede ponerse en contacto con nosotros en partsplus@lowes.com o visitar www.lowespartsplus.com.