ITEM #0506891 40 V LITHIUM-ION POLE SAW MODEL #KPS 80-06 Français p. 21 Español p. 41 ATTACH YOUR RECEIPT HERE Serial Number Purchase Date Questions, problems, missing parts? Before returning to your retailer, call our customer service department at 1-888-3KOBALT (1-888-356-2258), 8 a.m. - 8 p.m., EST, Monday - Friday. kobalttools.
TABLE OF CONTENTS Product Specifications .............................................................................................................. 3 Package Contents ..................................................................................................................... 3 Symbols......................................................................................................................................4 Safety Information ...........................................................
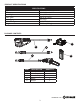
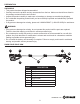
PRODUCT SPECIFICATIONS SPECIFICATIONS Cordless, Battery-powered 40 V Lithium-ion 8 in. (20.3 cm) 3/8 in. (9.5 mm) 91PJ033 080NDEA318 7.96 lbs. (3.6 kg) Type Battery Bar Length Chain Pitch Chain Type Guide Bar Type Weight PACKAGE CONTENTS E A B C PART A B C D E D DESCRIPTION Handle pole Extension pole Power head pole Battery Charger QUANTITY 1 1 1 1 1 kobalttools.
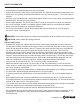
SymbolS Some of the following symbols may be used on this product. Please study them and learn their meaning. Proper interpretation of these symbols will allow you to operate the product better and safer. Symbols V A Hz W hrs no /min DESIGNATION EXPLANATION Volts Amperes Hertz Watts Hours No Load Speed Voltage Current Frequency (cycles per second) Power Time Rational speed, at no load Class II Construction Double-insulated construction Revolutions, strokes, surface speed, orbits, etc., per minute.
SymbolS Save these Instructions The following signal words and meanings are intended to explain the levels of risk associated with this product. SYMBOL SIGNAL MEANING DANGER Indicates an imminently hazardous situation, which, if not avoided, will result in death or serious injury. WARNING Indicates a potentially hazardous situation, which, if not avoided, could result in death or serious injury.
SAFETY INFORMATION • • • • • • • • Keep firm footing and balance. Do not overreach. Overreaching can result in loss of balance. Keep all parts of your body away from any moving part. Inspect the unit before each use for loose fasteners, etc. Replace any damaged parts before use. When not in use, product should be stored indoors in a dry, locked up place — out of the reach of children. Use only original manufacturer’s replacement parts.
SAFETY INFORMATION • Use extreme caution when cutting small sized brush and saplings because slender material may catch the saw chain and be whipped toward you or pull you off balance. • When cutting a limb that is under tension, be alert for spring back so that you will not be struck when tension in wood fibers are released. • To avoid accidental starting, never carry a battery operated product with your finger on the switch. Be sure switch is off when inserting the battery. • Maintain product with care.
PREPARATION UNPACKING • This product has been shipped unassembled. • Carefully remove the product and any accessories from the box. Make sure that all items listed in the package contents section are included. • Inspect the product carefully to make sure no breakage or damage occurred during shipping. • Do not discard the packing material until you have carefully inspected and satisfactorily operated the product.
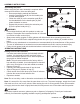
ASSEMBLY INSTRUCTIONS Connecting the poles Before using the pole saw, assembly is required. When removed from the box, there are three parts. • Remove packaging material and discard. • Insert the extension pole (B) into the handle pole (A) and slide together. • Lower the collar (H) on the extension pole (B) to the threaded base on the handle pole (A) and rotate clockwise to secure. • Repeat this process to attach the extension pole (B) to the power head pole (C).
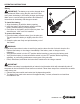
OPERATING INSTRUCTIONS Battery IMPORTANT: The battery may not be charged when it is purchased. Before using the pole saw for the first time, place the battery in the battery charger and charge. Make sure to read all safety precautions and follow the instructions in the battery and charger manuals. D To install the battery: 1. Align the battery (D) with the battery opening. 2. Insert the battery into the battery opening until the battery release button (I) locks into place. 3.
OPERATING INSTRUCTIONS Starting and stopping A. To start the motor: • Press the safety lock button (G). Squeeze the trigger switch (J) to start. • Release the trigger switch (J) to stop. Note: To lock out the trigger, you can pull back the safety lock with your thumb. To unlock the safety lock, push it forward. When the trimmer is not in use, you can use the safety lock to prevent activation during storage or transport. G J Adjusting pole saw height • Rotate the collar (H) counterclockwise to loosen.
OPERATING INSTRUCTIONS • • • • Release the trigger as soon as the cut is completed. Failure to follow proper cutting procedures will result in the bar and chain binding and becoming pinched or trapped in the limb. If this should happen: Stop the motor and remove the battery from the pole saw. If the limb can be reached from the ground, lift the limb while holding the saw. This should release the “pinch” and free the saw. If the saw is still trapped, call a professional for assistance.
• • • m • 50 • Keep the tree between you and the chain while limbing. Cut from the side of the tree opposite of the branch you are cutting. Do not cut from a ladder; this is extremely dangerous. Leave this operation for professionals. Do not make the flush cut next to the main limb or trunk until you have cut off the limb further out to reduce the weight. Following proper cutting procedures will prevent stripping the bark from the main member. Do not use the pole saw for felling or bucking.
CARE AND MAINTENANCE Chain tension • Stop the motor and remove the battery before setting the chain tension. Turn the bar cover knob counterclockwise to loosen the bar cover but do not remove the bar cover. Turn the chain tensioning screw clockwise to tension chain. Turn the guide bar knob clockwise to tighten. Refer to the Replacing the bar and chain section for additional information.
CARE AND MAINTENANCE • Loosen the bar cover knob (K) by turning counterclockwise and remove the bar cover (L). • The bar contains a bar stud slot that fits over the bar stud. The bar also contains a chain tensioning pin hole which fits over the chain tensioning pin. • Place the bar onto the bar stud so that the chain tensioning pin fits into the chain tensioning pin hole. • Fit the chain over the sprocket and into the bar groove.
CARE AND MAINTENANCE • Hold the tip of the bar up and tighten the bar cover knob (K) securely. • Chain is correctly tensioned when there is no slack on the underside of the bar, the chain is snug, but it can be turned by hand without binding. Note: If chain is too tight, it will not rotate. Loosen the bar cover (L) slightly and turn adjusting screw 1/4 turn counterclockwise. Lift the tip of the bar up and retighten bar cover knob (K).
CARE AND MAINTENANCE Chain maintenance For smooth and fast cutting, the chain needs to be maintained properly. The following conditions indicate that the chain requires sharpening: • Wood chips are small and powdery. • Chain must be forced through the wood during cutting. • Chain cuts to one side. During maintenance of the chain, consider the following: • Improper filing angle of the side plate can increase the risk of a severe kickback.
CARE AND MAINTENANCE • Using light but firm pressure, stroke towards the front corner of the tooth. Lift file away from the steel on each return stroke. • Put a few firm strokes on every tooth. File all left hand cutters in one direction. Then move to the other side and file the right hand cutters in the opposite direction. Occasionally remove filings from the file with a wire brush.
TROUBLESHOOTING PROBLEM Bar and chain running hot and smoking. POSSIBLE CAUSE 1. Check chain tension for overtightened condition. CORRECTIVE ACTION 1. Tension chain. Refer to Chain Tension earlier in this manual. 2. Bar lube reservoir empty. 2. Check bar lube reservoir. Motor runs, but chain is not rotating. 1. Chain tension too tight. 1. Re-tension chain. Refer to Chain Tension earlier in this manual. 2. Check guide bar and chain assembly. 3. Check guide bar and chain for damage. 2.
REPLACEMENT PARTS LIST For replacement parts, call our customer service department at 1-888-3KOBALT (1-888-356-2258), 8 a.m. - 8 p.m., EST, Monday - Friday. D E PART D E F O F DESCRIPTION Battery Charger Oil tank cap Side cover O PART # 31101825 29413 341071071 341021071 Printed in China Kobalt® is a registered trademark of LF, LLC. All Rights Reserved. kobalttools.