
Use and Care Guide


10
OPERATING INSTRUCTIONS
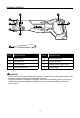
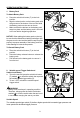
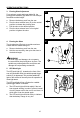
3. Pivoting Shoe Adjustment
For maximum control and longer blade life, the
pivoting shoe assembly (B) slides in or out to adjust
the effective stroke length.
a. Remove the battery pack from the saw.
b. Pivot the shoe-release lever (D) to the vertical
position to release the pivoting shoe.
c. Pull the shoe to the desired position.
d. Pivot the shoe-release lever to its original
position to tighten the shoe.
4. Pivoting the Shoe
The pivoting shoe (B) pivots to provide maximum
contact with the surface being cut.
a. Remove the battery pack from the saw.
b. Hold the saw securely, then pivot the shoe to
the desired angle.
WARNING
• To avoid injury and damage, do not operate
the saw without the pivoting shoe in place. The
spindle may strike against the work piece and
damage the reciprocating mechanism.
5. LED Work light
The LED work light (C), located on the front of the
saw, will illuminate when the variable-speed trigger
switch (G) is depressed. This provides additional
light on the surface of the work piece for operation in
lower-light areas.
The LED worklight will turn off when the variable-
speed trigger switch is released.
a. The LED work light will blink rapidly if the tool
has stopped working in order to protect internal
circuits; please wait for the tool to cool down, at
which point it can be started again.
b. The LED work light will blink slowly to indicate
that the battery charge is very low.
4
B
5
C
3
B D