
Operating Guide


9
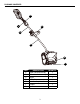
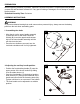
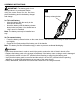
• Align the pin on the upper handle assembly
(A) with the hole on the lower handle as-
sembly (B). Insert the upper handle assem-
bly into the lower handle assembly until the
pin clicks into the hole.
• Once the two shafts are secured, turn the
lock knob clockwise until it is fully tightened.
1
ASSEMBLY INSTRUCTIONS
WARNING
To prevent accidental starting that could cause serious personal injury, always remove the battery
pack from the tool when assembling parts.
1. Assembling the shafts
A
B
Pin
Hole
PREPARATION
Before beginning assembly of product, make sure all parts are present. Compare parts with package
contents list and hardware contents list. If any part is missing or damaged, do not attempt to assem-
ble the product.
Estimated Assembly Time: 5 minutes
2. Adjusting the auxiliary handle position
• Position the front/auxiliary handle (E) onto the
upper portion of the shovel section by sliding
over the rubber sleeve (J).
• Once the front handle is in the desired position,
slide the bolt (CC) through the underside of the
handle and secure with the fastening knob (AA).
Tighten until there is no movement in the handle.
• The front handle can be adjusted to a suitable
position.
2
AA
E
J
CC
Lock knob