ITEM #0533630 80 V CORDLESS SNOW SHOVEL MODEL #KSS 2080A-06 Español p. 19 ATTACH YOUR RECEIPT HERE Serial Number Purchase Date Questions, problems, missing parts? Before returning to your retailer, call our customer service department at 1-888-3KOBALT (1-888-356-2258), 8 a.m. - 8 p.m., EST, Monday - Friday.
TABLE OF CONTENTS Product Specifications............................................................................................................2 Package Contents................................................................................................................3 Symbols................................................................................................................................ 5 Safety Information ...........................................................................
PACKAGE CONTENTS C A B D PART DESCRIPTION A Upper Handle Assembly QUANTITY 1 B Lower Handle Assembly 1 C Battery 1 D Charger 1 3
HARDWARE CONTENTS (not shown actual size) AA Fastening Knob Qty. 1 BB CC Screws (preassembled) Bolt Qty. 1 Qty.
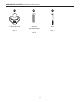
SYMBOLS Some of the following symbols may be used on this product. Please study them and learn their meaning. Proper interpretation of these symbols will allow you to operate the product better and safer. SYMBOLS NAME DESIGNATION/EXPLANATION V Volts Voltage A Amperes Current Hz Hertz Frequency (cycles per second) Wh Watt Hour Energy Storage Capacity Ah Amp Hour Current Capacity Direct Current Type or a characteristic of current Class II Construction Double-insulated construction.
SYMBOLS The following signal words and meanings are intended to explain the levels of risk associated with this product. SYMBOL SIGNAL DANGER WARNING CAUTION CAUTION MEANING Indicates an imminently hazardous situation, which, if not avoided, will result in death or serious injury. Indicates a potentially hazardous situation, which, if not avoided, could result in death or serious injury. Indicates a potentially hazardous situation, which, if not avoided, may result in minor or moderate injury.
SAFETY INFORMATION • Use the power tool in daylight or in good artificial light. • To avoid accidental start-ups, remain in the starting position when turning the power tool on. The operator and the power tool must be in a stable position during start-up. See the section titled Starting/Stopping Instructions. • Use this power tool only for the purposes it was designed. • Hold the power tool with both hands while it is in use. Keep a firm grip on the handles.
SAFETY INFORMATION GENERAL SAFETY RULES • Verify that the power tool is secure while transporting. • Store the power tool in a dry area that will prevent unauthorized use or damage. Keep out of the reach of children. • Keep handles dry, clean, and free of debris. Clean the power tool after each use. Refer to the Maintenance Section in this manual for more information. • If the labels on the power tool become defaced or start to lift off, contact customer service at 1-888-356-2258.
PREPARATION Before beginning assembly of product, make sure all parts are present. Compare parts with package contents list and hardware contents list. If any part is missing or damaged, do not attempt to assemble the product. Estimated Assembly Time: 5 minutes ASSEMBLY INSTRUCTIONS WARNING To prevent accidental starting that could cause serious personal injury, always remove the battery pack from the tool when assembling parts. 1. ASSEMBLING THE SHAFTS 1a a.
ASSEMBLY INSTRUCTIONS WARNING Follow these instructions in order to avoid injury and to reduce the risk of electric shock or fire: • Replace the battery pack or the charger immediately if the battery case or charger cord is damaged. • Verify that the switch is in the OFF position before inserting or removing the battery pack. • Verify that the battery pack is removed and the switch is in the OFF position before inspecting, adjusting, or performing maintenance on any part of the snow shovel.
OPERATING INSTRUCTIONS 1. ADJUSTING THE AUXILIARY HANDLE POSITION • Position the front/auxiliary handle (I) onto the upper portion of the shovel section by sliding over the rubber sleeve (J). • Once the front handle is in the desired position, slide the bolt (CC) through the underside of the handle and secure with the fastening knob (AA). Tighten until there is no movement in the handle. • The front handle can be adjusted to a suitable position. 1 CC AA I J 2.
OPERATING INSTRUCTIONS 3. STOPPING THE SNOW SHOVEL • Release the trigger switch. • The lock-out button will pop out and the snow shovel will stop. 3 4. USING THE SNOW SHOVEL 4 • Start the snow shovel by following the starting instructions. The depth and weight of the snow will determine the forward speed. • Push the snow shovel forward so that it rides on the scraper.
CARE AND MAINTENANCE 1 1. TRANSPORTING THE SNOW SHOVEL • Allow the motor to cool down before transporting. • Secure the snow shovel while transporting. • When moving the snow shovel, grasp it by the top handle and auxiliary handle. 2. SCRAPER REPLACEMENT 2 IMPORTANT: Always remove the battery from the tool before performing any maintenance on it. BB • Place the snow shovel on the ground or on a work bench. Position the snow shovel so that the impeller is facing up.
CARE AND MAINTENANCE 3. IMPELLOR REPLACEMENT 3a • Remove the right side cover by removing 6 screws. 3d • Remove the 4 screws . 3g • Remove the impellor shaft with pulley assembly attached. 3b 3c • Pull the belt tensioner (idler arm) away from the drive pulley. Be sure not to lose the washer and screw left. • Remove the belt. 3f 3e • Remove the left side cover by removing 6 screws. 3h • R emove the nut that s ecures the left side plate. 3i • Discard the old/damaged impellor.
CARE AND MAINTENANCE 3j • Replace and tighten the remaining nut to secure the left side plate assembly. 3m • Place the belt back into its place. 3l 3k • Replace and tighten the remaining screws to secure the left side cover. • Replace and tighten the remaining screws to secure the pulley assembly. 3n • Place the belt tensioner (idler arm) back into its place. 3o • Replace and tighten the remaining screws to secure the right side cover.
CARE AND MAINTENANCE WARNING In order to avoid personal injury and the risk of fire and electric shock, remove the battery pack before adjusting, inspecting, or cleaning the snow shovel. STORAGE • Allow the motor to cool down before storing. • Store the snow shovel in a locked location in order to prevent unauthorized use or damage. • Store the snow shovel in a dry, well-ventilated area. • Store the snow shovel out of the reach of children.
WARRANTY 5-YEAR LIMITED WARRANTY This 80 V Lithiuim-Ion snow shovel is warranted to the original purchaser from the original purchase date for five (5) years subject to the warranty coverage described herein. This 80 V Lithiuim-Ion snow shovel is warranted for the original user to be free from defects in material and workmanship.
REPLACEMENT PARTS LIST For replacement parts, call our customer service department at 1-888-3KOBALT (1-888-356-2258), 8 a.m. - 8 p.m., EST, Monday - Friday.