
Operating Guide


11
ASSEMBLY INSTRUCTIONS
To avoid injury, adjust the auxiliary handle for optimum control and balance. Do not overreach when
operating grass trimmer/edger. Keep proper balance at all times for better control of the tool in
unexpected situations.
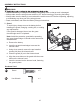
3. Connect upper/lower trimmer tubes
Push in the release button located on the lower
tube (K). Align the release button with the
positioning hole on the upper tube (J) and slide the
two tubes together. Rotate the lower tube until the
release button locks into the positioning hole.
3
WARNING
J
K
F
a.
Tighten the screw with the hex wrench (DD).
b.
Release button
Positioning hole
Hardware Used
Hex Wrench
x 1
DD
DD
2. Front handle
a. Position the front/auxiliary handle (E) onto the
upper portion of the trimmer section by sliding over
the upper tube (J).
c. The front handle can be adjusted to a suitable
position.
Note: Do not overtighten the fastening knob. It could
cause the fastening clamp to break.
b. Once the front handle is in the desired position,
slide the bolt (CC) through the top of the
handle and secure with the fastening knob (BB).
Tighten until there is no movement in the handle.
2
CC
E
BB
Hardware Used
Fastening knob
x 1
BB
Bolt
x 1
CC
J