
Use and Care Guide

11
10
12
10
L
H
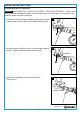
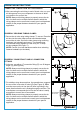
10. At the bottom, or where you intend to have your air tube end,
connect a tube clamp to secure the air tube.
CONNECTING TUBING CLAMPS AND WALL MOUNTS
NOTE:
Always use tube clamps to properly secure the air
tube. As there can be multiple surface areas in which the
tube clamps can be connected, consult your local hardware
retailer for the proper fasteners needed for your specific
application.
NOTE: Never secure wall mounted outlet near electrical
outlets. Avoid any wires, pipes or other obstructions behind
wall, which may present a hazard. Make sure wall mounted
outlet end has enough clearance to attach fittings or air hose
properly. Consult your local hardware retailer for the proper
fasteners needed for your specific application.
kobalttools.com
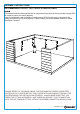
OPERATING INSTRUCTIONS
N
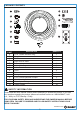
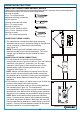
Please use the manufacturer's recommended fittings guide to properly secure tube clamps and
wall mounted outlet to the various surface applications:
Securing to drywall:
#8 x 2.5 in. drywall screws.
Additional mounting accessories
may be required.
Securing to wooden wall studs:
#8 x 1.5 in. wood screws
Securing to masonry:
3/16 x 5 1/2 in. masonry drill bit
3/16 x 5 1/2 in. masonry screws
Securing to metal:
#8 1 1/2 in. sheet metal screws
CONNECTING TUBING CLAMPS
8. The manufacturer recommends that tubing clamps be
attached at either end of a connection fitting for a proper and
secure connection of both the air tube and fitting
(See Figure 10).
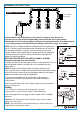
CONNECTION OF UNION CONNECTIONS
9. For drop down air line sections, the manufacturer
recommends the use of a union connector. From the top hose
connection, use either a T connection, or a 90° angle
connection (See Figure 8). Run the air line down. At the
desired height, cut the air tubing and connect a union
connection (See Figure 11).
NOTE: Contact your local hardware retailer for proper
fasteners needed for your specific application. The use of
multiple types of fasteners may be needed for proper
installation.
Air accessories
not included
Secure the wall mounted outlet (L) with mounting hardware
(not included) (See Figure 12). The manufacturer
recommends that a quick connect coupler be secured into the
threaded end of the wall mounted outlet for proper operation.
Wrench(es) (not included) may be needed to properly secure.
8 x 2.5 inch
8 x 1 1/2 inch
8 x 1.5 inch
3/16 x 5 1/2 inch