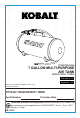
ITEM #0470444 7 GALLON MULTI-PURPOSE AIR TANK MODEL #SGY-TANK3 Français p. 12 Español p. 23 Kobalt® is a registered trademark of LF, LLC. All rights reserved. ATTACH YOUR RECEIPT HERE Serial Number Purchase Date Questions, problems, missing parts? Before returning to your retailer, call our customer service department at 1-888-3KOBALT, 8 a.m. - 8 p.m., EST, Monday - Friday.
TABLE OF CONTENTS Product Specifications ............................................................................................2 Package Contents ..................................................................................................3 Safety Information ..................................................................................................3 Preparation.............................................................................................................
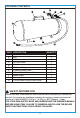
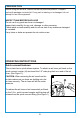
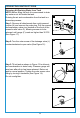
PACKAGE CONTENTS E F K G I H A D PART A B C D E F G H I J K B J DESCRIPTION Air Tank Leg Air Hose Air Tire Chuck Handle Pressure Gauge Pressure Relief Valve 1/4 inch Quick Connect Connector Intake Valve Drainage Valve 1/4 inch Male Plug w/Check Valve C QUANTITY 1 2 1 1 1 1 1 2 1 1 1 SAFETY INFORMATION Please read and understand this entire manual before attempting to operate the product. If you have any questions regarding the product, please call customer service at 1-888-3KOBALT, 8:00 a.m.
SAFETY INFORMATION WARNING WEAR PROPER PROTECTIVE GEAR Keep loose hair, loose clothing, or any hanging jewelry away from all moving parts. Wear protective safety glasses or face shield to protect eyes. To reduce the risk of hearing damage, use proper ear protection. Dress properly and wear protective clothing when needed. KEEP CHILDREN AWAY FROM WORK AREA AND TOOL: Keep tool out of reach of children and never allow children to handle equipment or tool.
SAFETY INFORMATION RISK OF BURSTING DO NOT exceed rated pressure of 185 PSI. DO NOT alter, modify, adjust or tamper with factory preset pressure relief valve. DO NOT attempt to weld or repair a damaged tank. Replace tank if it is dented, cracked, rusted or otherwise damaged in any way. Always wear safety glasses. Store indoors. DO NOT expose to severe moisture or extreme heat. RISKS FROM COMPRESSED AIR Compressed air can be dangerous and can cause soft tissue injuries.
PREPARATION Before using this air tank, make sure that all parts are present. Compare parts with package contents list. If any part is missing or is damaged, do not attempt to use this equipment. INSPECT TANK BEFORE EACH USE Do not use if any parts are loose or damaged. Inspect tank carefully for any rust, damage, or other corrosion. Check welds on tank carefully and do not use tank if any welds are damaged or corroded. If any holes or leaks are present do not continue use.
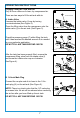
OPERATING INSTRUCTIONS Properly Filling Air Tank with Air Only fill from a source of clean, dry compressed air. 2 I There are two ways to fill the air tank with air: Counterclockwise A. Intake Valve Unscrew the intake valve (I) cap by turning counterclockwise (See Figure 2). Place the filling valve from the compressor onto the intake valve (I) on the air tank (See Figure 3).
OPERATING INSTRUCTIONS Air Tank Uses Once the air tank has been filled with air, there are multiple ways it can be used: 6 A. Independently for Inflation NOTE: This air tank may be used to inflate tires and other air-filled items when a compressor cannot be used (See Figure 6). Connect the plug end of air hose (C) to 1/4 in. quick connect coupler (H). Press ball chuck (D) onto valve stem of object being inflated (See Figure 7).
OPERATING INSTRUCTIONS B. Independently with Low-Consumption Air Tool NOTE: This air tank may be used with a low-consumption air tool (not include) when a 9 compressor cannot be used. Connect the plug end of air hose (not included to 1/4 in. quick connect coupler (H). Connect coupler end of air hose to air tool (See Figure 9). NOTE: Depending on the requirements of the tool, it may be necessary to add an in-line air regulator (not included) to control the air pressure between the air tank and the tool.
OPERATING INSTRUCTIONS Releasing Air/Draining Water from Tank NOTE: Before filling the tank it is recommend to drain any water or air left inside the tank. Draining the air and condensation from the tank is a three step process: 11 G Step 1: Remove all attachments from quick connect coupler (H) and remove the male plug.
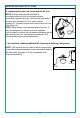
CARE AND MAINTENANCE To discharge air for maintenance and storage, pull the 15 manual decompression valve ring (located on the front of the pressure relief valve G) until gauge (F) reads 30 PSI (Fee Figure 15). NOTE: Follow the proper draining instructions. To help prevent surface rust, use and store tank in dry, clean area out of reach of children. F G Clean exterior of tank with a mild detergent and dampened cloth. Dry completely before storage.