KOBE Range Hoods Premium Series Milo CH27 Series Model No.
IMPORTANT READ THIS FIRST READ BEFORE INSTALLATION 1. Carefully check all contents of packages. 2. Thoroughly inspect the unit for any shipping damages, cosmetic damages or defects. 3. Have a certified contractor/electrician test the unit before installation. IF THERE IS ANY PROBLEM: 1. DO NOT INSTALL THE UNIT AND KEEP ALL ORIGINAL PACKAGING MATERIAL. 2. Have your original invoice as proof of purchase and product serial number ready. 3.
[ENGLISH] - READ AND SAVE THESE INSTRUCTIONS CONTENTS IMPORTANT SAFETY INSTRUCTIONS ......................................................................... 1 COMPONENTS OF PACKAGE....................................................................................... 3 INSTALLATION ............................................................................................................... 5 OPERATING INSTRUCTIONS......................................................................................
IMPORTANT SAFETY INSTRUCTIONS - PLEASE READ THIS SECTION CAREFULLY BEFORE INSTALLATION - WARNING: TO REDUCE THE RISK OF FIRE, ELECTRIC SHOCK OR PERSONAL INJURY, OBSERVE THE FOLLOWING. 1) Installation and electrical wiring must be done by qualified professionals and in accordance with all applicable codes and standards, including fire-rated construction. 2) When cutting or drilling into wall or ceiling, be careful not to damage electrical wiring or other hidden utilities.
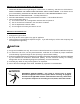
What to Do In The Event Of a Range Top Grease Fire • • • • SMOTHER FLAMES with a tight fitting lid, cookie sheet, or metal tray, and then turn off the burner. KEEP FLAMMABLE OR COMBUSTIBLE MATERIAL AWAY FROM FLAMES. If the flames do not go out immediately, EVACUATE THE AREA AND CALL THE FIRE DEPARTMENT or 911. NEVER PICK UP A BURNING PAN – You May Get Burned. DO NOT USE WATER, including wet dishcloths or towels – a steam blast will result.
COMPONENTS OF PACKAGE (Must keep all material for returns or refunds) For Under Cabinet Application CH2730SQ3-XX (30”) / CH2736SQ3-XX (36”) Range Hood Box {A} {B} {C} {D} {E} {F} {G} {H} KOBE Range Hood Warranty Registration Card Quick Reference Guide Airflow Efficiency Panel x 1 (30” hood) x 3 (36” hood) 6” Round Plastic Collar Wire Cap x 3 Screws Package Stainless Steel Filter x 1 {A} {B} {C} {D} {E} {F} Wire caps (3) *Pre-Installed {G} {H} M4 x 1-1/2” (4) *Pre-Installed • FOR MORE INFORMATIO
(Must keep all material for returns or refunds) For Wall Mount Application CH2730SQ3-WM-XX (30”) / CH2736SQ3-WM-XX (36”) / CH2748SQ3-WM-XX (48”) Range Hood Box {A} {B} {C} {D} {E} {F} {G} {H} {I} {J} {K} KOBE Range Hood Warranty Registration Card Quick Reference Guide Airflow Efficiency Panel x 1 (30” hood) x 3 (36” & 48” hood) 6” Round Plastic Collar Duct cover Mounting Bracket Adjustable Duct Cover Screws Package Wire Cap x 3 Screws Package Stainless Steel Filter x 1 {A} {B} {C} {D} {E} {F} {G} {
INSTALLATION PLEASE READ ENTIRE INSTRUCTIONS BEFORE PROCEEDING Calculation before Installation To calculate installation, please refer to TABLE 1 and TABLE 2. (All calculation in inches).
SAFETY WARNING HOOD MAY HAVE VERY SHARP EDGES; PLEASE WEAR PROTECTIVE GLOVES IF REMOVING ANY PARTS FOR INSTALLING, CLEANING OR SERVICING. NOTE: DO NOT USE AN ELECTRIC SCREWDRIVER. USE HAND TOOLS ONLY. DO NOT OVER TIGHTEN SCREWS AS THIS MAY CAUSE DAMAGE TO THE HOOD.
UNDER CABINET INSTALLATION Applicable Model: CH2730SQ3-XX (30”) / CH2736SQ3-XX (36”) Figure 1 Preparation before Installation NOTE: TO AVOID DAMAGE TO YOUR HOOD, PREVENT DEBRIS FROM ENTERING THE VENT OPENING. - - - Decide the location of the venting pipe from the hood to the outside. (Figure 1) A straight, short vent run will allow the hood to perform more efficiently. Try to avoid as many transitions, elbows, and long run as possible. This may reduce the performance of the hood.
Figure 5 Ductwork Installation 5. Use steel pipe to connect the 6” round plastic collar {F} on the hood to the ductwork above. Use duct tape to make all joints secure and air tight. Refer to Figure 6. Wiring to Power Supply THIS RANGE HOOD MUST BE PROPERLY GROUNDED. MAKE SURE THIS IS DONE BY QUALIFIED ELECTRICIAN IN ACCORDANCE WITH ALL APPLICABLE NATIONAL AND LOCAL ELECTRICAL CODES.
WALL MOUNT INSTALLATION Applicable Model: CH2730SQ3-WM-XX (30”) / CH2736SQ3-WM-XX (36”) / CH2748SQ3-WM-XX (48”) Figure 8 Preparation before Installation NOTE: TO AVOID DAMAGE TO YOUR HOOD, PREVENT DEBRIS FROM ENTERING THE VENT OPENING. - Decide the location of the venting pipe from the hood to the outside. Refer to Figure 8. - A straight, short venting run will allow the hood to perform more efficiently. - Try to avoid as many transitions, elbows, and long run as possible.
Figure 12 Wiring to Power Supply THIS RANGE HOOD MUST BE PROPERLY GROUNDED. MAKE SURE THIS IS DONE BY QUALIFIED ELECTRICIAN IN ACCORDANCE WITH ALL APPLICABLE NATIONAL AND LOCAL ELECTRICAL CODES. BEFORE CONNECTING WIRES, SWITCH POWER OFF AT SERVICE PANEL AND LOCK SERVICE PANEL TO PREVENT POWER FROM BEING SWITCHED ON ACCIDENTALLY. 4. If hood is operating normally, connect three wires (black, white and green) to house wires and cap with wire connectors. 5. Store wires in wiring box.
OPERATING INSTRUCTIONS Control Panel Light Indicator Q L H D ON Standby QuietMode™ speed Low speed High speed Delay Shut-Off On Mode Auto Mode Auto Mode • The hood has advanced built-in temperature sensors. When the sensor detects by ~7°F degrees** of temperature differential between the hood and the surrounding environment, the fan and lights on the hood will turn on automatically. • The hood has 3 speeds - QuietMode™ (Q), Low (L), and High (H).
*Please note the sensor will override this automatically when the sensor detects the 7°F-degree** temperature differential; and the hood and lights will turn on again. Power Button • To manually turn on the hood, press the power button once. • To Manually Activate the delay shut-off: When the ON light is green, you can manually activate the delay shut-off by pressing the power button and you will see the D + ON light turn on to indicate delay shut-off is activated.
MAINTENANCE For optimal performance, clean the range hood surface and filters regularly. To Clean Hood Surface CAUTION: NEVER USE ABRSIVE CLEANERS, PADS, OR CLOTHS. ***Regular care will help preserve its fine appearance. 1. Use only mild soap or detergent solutions. Dry surfaces using soft cloth. 2. If hood looks splotchy (stainless steel hood), use a stainless steel cleaner to clean the surface of the hood. Avoid getting cleaning solution onto or into the control panel.
SPECIFICATIONS MODEL / SIZE Under Cabinet Application CH2730SQ3-XX (30”) CH2736SQ3-XX (36”) COLOR 18-Gauge Commercial Grade Stainless Steel CONSUMPTION / AMPERE 420W / 3.
MEASUREMENTS & DIAGRAMS ***All inch measurements are converted from millimeters. Inch measurements are estimated. ***All measurements in ( ) are millimeters. - FOR UNDER THE CABINET – MODEL NO.: CH2730SQ3-XX (30”) / CH2736SQ3-XX (36”) - FOR WALL MOUNT – MODEL NO.
***Hood-Mounting Bracket ***Duct Cover-Mounting Bracket 16
PARTS LIST MODEL NO.: NO. 1 2 3 4 5 6 7 8 CH2730SQ3-XX (30”) CH2736SQ3-XX (36”) DESCRIPTION 6” Round Plastic Exhaust Blower System Stainless Steel Filter Control Unit Capacitor x 1PCS LED Light Driver Temperature Sensor Processor Board 9 Light Panel Support 10 LED Light (3W) 11 Airflow Efficiency Panel MODEL / SIZE CH2730SQ3-XX CH2736SQ3-XX CH2730SQ3-XX CH2736SQ3-XX 17 PART NO.
MODEL NO.
MODEL NO.: NO. 1 2 3 4 5 6 7 8 9 10 CH2730SQ3-WM-XX (30”) CH2736SQ3-WM-XX (36”) CH2748SQ3-WM-XX (48”) DESCRIPTION Duct Cover-Mounting Bracket Duct Cover 6” Round Plastic Exhaust Blower System Stainless Steel Filter Control Unit Capacitor x 1PCS LED Light Driver Temperature Sensor Processor Board 11 Light Panel Support 12 LED Light (3W) 13 Airflow Efficiency Panel MODEL / SIZE CH02DC-1 CH2730SQ3-XX CH2736SQ3-XX CH2748SQ3-XX CH2730SQ3-WM-XX CH2736SQ3-WM-XX CH2748SQ3-WM-XX 19 PART NO.
MODEL NO.
CIRCUIT DIAGRAM MODEL NO.
TROUBLE SHOOTING Issue Possible Cause Solution After installation, both motors and lights are not working. The power is not on. The wire connection is not secure. Make sure the circuit breaker and the unit’s power is ON. Use a voltage meter to check the power supply. Check and tighten wire connection. The control panel is defective. Replace the control panel. The motor(s) is defective. Replace the motor(s). The capacitor(s) is defective. Replace the capacitor(s). The control panel is defective.
WARRANTY WARRANTY CERTIFICATE In order to obtain warranty service, you must provide proof of original purchase from a KOBE authorized Dealer. Please keep a copy of your original invoice as proof of purchase. TWO-YEAR LIMITED LABOR WARRANTY ON KOBE PREMIUM SERIES: For two years from the date of your original invoice from a KOBE authorized dealer, we will repair any parts or components free of charge that failed due to manufacturing defects.
THIS WARRANTY WILL BE VOIDED BY: 1. Improper installation and failure to follow installation instructions. 2. Any repair, alteration, modification not authorized by KOBE. 3. Duct alteration, medication and connection. 4. Incorrect electric current, voltage or wiring. 5. Improper usage of the product such as commercial, outdoor or other usage other than residential indoor usage. 6. Purchasing this product from an unauthorized KOBE dealer. 7. Damaging the product due to negligence, misuse, abuse or accident.
WARRANTY INFORMATION FORM Fill in the blanks and keep this paper with the original invoice in a safe place for future service purpose. 1. Date of purchase : ______________________________ 2. Model No. : ______________________________ 3. Serial No. : ______________________________ For warranty service or spare parts purchase in US, contact: KOBE Service Center Email (best): customer.service@koberangehoods.
KOBE Range Hoods 11775 Clark Street Arcadia, CA 91006 USA www.koberangehoods.com This KOBE hood is made for use in the USA and CANADA only. We do not recommend using this hood overseas as the power supply may not be compatible and may violate the electrical code of that country. Using a KOBE hood overseas is at your own risk and will void your warranty. Cette hotte KOBE est fabriquée pour usage aux États-Unis et au Canada seulement.