
User Guide


7
Duct Work Installation
18. Determine and make all necessary cuts in the wall or ceiling for
the ductwork. Note: Install the ductwork before installing the
insert.
19. Use steel pipe to connect the exhaust on the hood to the
ductwork above. Use duct tape to make all joints secure and
air tight.
20. Please refer to local codes for the usage of a damper (not
included).
Wiring to Power Supply
SAFETY WARNING
RISK OF ELECTRICAL SHOCK. THIS RANGE HOOD MUST BE
PROPERLY GROUNDED. MAKE SURE THIS IS DONE BY
QUALIFIED ELECTRICIAN IN ACCORDANCE WITH ALL
APPLICABLE NATIONAL AND LOCAL ELECTRICAL CODES.
BEFORE CONNECTING WIRES, SWITCH POWER OFF AT SERVICE
PANEL AND LOCK SERVICE PANEL TO PREVENT
POWER FROM
BEING SWITCHED ON ACCIDENTALLY.
21. Connect electrical wires.
22. Connect three wires (black, white and green) to house wires
and cap with wire connectors. Connect wires according to their
colors (i.e. black to black, white to white, and green to green).
23. Store wires in the wiring box.
Hood Installation
NOTE: USE HAND TOOLS ONLY. DO NOT OVER TIGHTEN
SCREWS. IT MIGHT CAUSED DAMAGED TO THE HOOD.
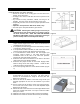
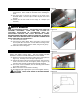
24. Remove 10 screws located at the bottom of the insert (Refer to
Figure 11). Carefully remove the light support panel.
25. Position the insert inside the custom wood frame, and secure the
insert to the front and rear stud support ( Refer to Figure 2) by
using the front and rear mounting holes (Screws included).
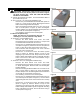
26. For a more secure installation, use the mounting holes located
on the side of the insert
27. Make sure insert is secure before releasing.
28. Re-install the light support panel. (Do not over tighten screws.)
CAUTION
: MAKE SURE HOOD IS SECURE BEFORE
RELEASING.
Figure 9
Figure 10
Figure 11
Figure 12
*Note: Sample image only. May not be actual model.
*Note: Sample image only. May not be actual model.