
Owners Manual

6
UNDER CABINET INSTALLATION
Before Installation
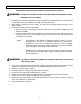
1. Read any provided document(s).
2. Test the range hood by temporarily connecting it to an outlet and turning ON the fan and lights.
3. If you run into any problems, contact KOBE Range Hoods.
Venting Requirements
4. The range hood has top 6” round exhaust (default).
5. Decided the location of the venting pipe from the hood to the outside. A straight, short vent run
will allow the hood to perform more efficiently. Try to avoid elbows, transitions, and long run as
much as possible as this may reduce the performance of the hood. Make sure that the duct work
leads to the outside.
6. It is recommended to use metal/aluminum duct/pipe with a uniform size (ex. 6” round pipe from
range hood to the outside).
7. If an elbow is necessary, a minimum of 12” straight run is necessary before the elbow.
Clearance
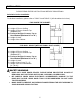
8. Clearance is the distance between the cooktop and the bottom of the range hood. The
recommended minimum clearance for this model is 26” and the maximum clearance is 30”.
9. It is important to install the hood at the recommended clearance. Installing too low could result in
damage and/or fire hazard while installing too high may result in reduced performance and
efficiently.
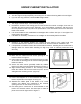
Hood Installation
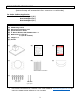
10. Make sure the cabinet has full access opening for the
hood as shown on Figure 1.
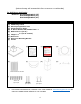
11. Using reference on TABLE 1 and measurements on page
XX to mark the leveling point for hood-mounting bracket
inside the cabinet.
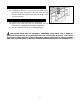
12. Secure two 4*35 screws (provided) inside the cabinet
leaving 1/8” away from the cabinet as shown on Figure 2.
13. Align hood-mounting bracket to the mounting screws
inside the cabinet and hook the hood into place. Secure
and tighten the mounting screws. (Figure 2).
Ductwork
14. Put the two flappers on 6” round exhaust vent adapter.
NOTE: striped side of the flapper is facing out.
15. Attached the rubber plate to the bottom of 6” round
exhaust vent adapter then attached to the exhaust
opening and use six 4*6 screws to secure it.
16. Use steel pipe to connect the 6” round exhaust on the
hood to the ductwork above. Use duct tape to make all
joints secure and air tight. Refer to Figure 3.
Figure 1
Figure 2