EasyShare 5100 All-in-One Printer User’s Guide
Eastman Kodak Company Rochester, New York 14650 © Eastman Kodak Company, 2008 P/N 1K3224 Kodak and EasyShare are trademarks of Eastman Kodak Company. The Bluetooth word mark and logos are owned by the Bluetooth SIG, Inc. and any use of such marks is under license. ©1989-2007 I.R.I.S.
Table of Contents Product Overview.................................................................................................................................... 1 Main Components.............................................................................................................................................. 1 Control Panel Layout......................................................................................................................................... 2 Status Lights..........
Table of Contents Maintenance ......................................................................................................................................... 43 General Care..................................................................................................................................................... 43 Clean the Scanner Glass................................................................................................................................
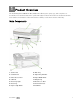
1 Product Overview Product Overview The Kodak EasyShare 5100 All-in-One (AiO) Printer allows you to print, copy, and scan photos or documents. The functions that can be operated directly from the Control Panel are documented in this User Guide. For information on the Home Center software, see the Home Center online help.
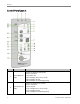
Chapter 1 Control Panel Layout Number Name 1 2 2 Description Check Black Ink Light Flashes fast when low on black ink Flashes slow when: • Out of black ink • Black cartridge not inserted correctly • Black cartridge missing • Black cartridge not functioning properly Check Color Ink Light Flashes fast when low on color ink Flashes slow when: • Out of color ink • Color cartridge not inserted correctly • Color cartridge missing • Color cartridge not functioning properly Kodak EasyShare 5100 AiO
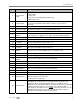
Product Overview Number Name Description 3 Check Paper Light Flashes when: • Out of Paper • Paper Jam • Rear Access Door/Duplexer Missing or Ajar • Wrong Paper Size 4 Tagged Light This green LED lights when a DPOF print file is found on the photo source connected to 5100 AiO. It will remain on until the source has been removed. 5 Photos Light On when Photos is selected by Photo Action button. 6 Proofsheet Light On when Proofsheet is selected by Photo Action button.
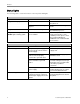
Chapter 1 Status Lights The following tables contain information on the EasyShare AiO lights. Control Panel Light Status Cause Action/Solution All lights and displays are off. The printer is turned off. Press the On/Off button to turn the printer on. The Printer does not have power applied. Check the Power Cord Light status. All lights Flash once. The Printer is Initializing. None: Allow the Printer to finish the initialization process.
Product Overview On/Off Light Light Status Cause Action/Solution On/Off light is off. The printer is turned off. Press the On/Off button to turn the printer on. The printer does not have power applied. Check the power cord light status. The printer needs attention. Check to see if the Photo Tray light is on. If the Photo Tray light is on for more that 20 seconds and the On/Off light does not come on, disconnect the power for 5 seconds and reconnect the power.
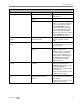
Chapter 1 Photo Tray Status Light Light Status Cause Action/Solution Photo tray light is off. The photo tray is not engaged. Push the photo tray in to engage if you want to print 4 x 6 inch pictures. The printer is not turned on. Press the On/Off button to turn the printer on. The photo tray is engaged. Pull the photo tray out to disengage if you do not want to print 4 x 6 inch pictures. The printer is powering up. None: Please wait and allow the printer to complete the initialization process.
Product Overview Check Paper Light Light Status Cause Action/Solution Check Paper light is off. Normal operation. This light should be off when paper has been properly loaded in the main paper tray. None. Check Paper light is flashing red. The paper tray you are trying to print to is out of paper. Load the paper tray with paper and press Start to continue. Check Paper light is on (red). The printer has a Duplexer attached and the Duplexer is in manual mode. None.
Chapter 1 Proofsheet Light Light Status Cause Action/Solution Light is off. Proofsheet mode is not selected. Press the Photo Action button until the Proofsheet light is lit if you want to print a proofsheet. Light is on. A camera is connected to the printer with images and you have selected to print a proofsheet of those image. Press Start to print a proofsheet. Transfer Light Light Status Cause Action/Solution Light is on. The printer is ready to transfer pictures.
Product Overview Black and Color Lights Light Status Cause Action/Solution Color light is on. Black light is off. Indicates a document will be copied color. These lights work when the printer is in Copy mode. Press the Copy Color button to toggle between these two modes for the action you prefer. Color light is off. Black light is on. Indicates a document will be copied black and white. These lights work when the printer is in Copy mode.
Chapter 1 AiO Home Center (Windows) The AiO Home Center software is an application that runs on the computer. It enables you to print, copy, scan, and configure your AiO printer from the computer. The six large icons on the AiO Home Center main window let you: Scan Pictures and Documents Copy Pictures Print Pictures Configure Settings for Printing and Scanning.
2 Getting Started Getting Started It is important to find a good location for your AiO Printer. Place the printer on a clean flat surface, in a dry location, and out of direct sunlight. Make sure the printer has proper ventilation. Avoid areas where ventilation ducts, open doors, or high traffic might expose the EasyShare AiO and paper to high levels of dust and debris. Airborne particles can affect picture quality.
Chapter 2 3 Remove the printhead from its bag. 4 Remove and discard the clear plastic casing and the orange protective cap. 5 Place the printhead into the carriage. 6 Push against the back wall of the printhead until it clicks into place. 7 Install the ink cartridges.
Getting Started Install Ink Cartridges After installing the printhead, you need to install the black and color ink cartridges. 1 Printhead 2 Color ink cartridge 3 Black ink cartridge 1 Tear open the black ink cartridge bag at the notch and remove the ink cartridge. IMPORTANT: Insert the ink cartridge immediately to prevent any drying of the ink. 2 Remove and discard the orange cap. IMPORTANT: Handle ink cartridge carefully to avoid ink transfer. 3 Insert the black ink cartridge into the printhead.
Chapter 2 4 Press down on the ink cartridge until you hear it snap into position. 5 Tear open the color ink cartridge bag at the notch and remove the ink cartridge. 6 Remove and discard the orange cap. 7 Insert the color ink cartridge into the printhead. 8 Press down firmly on the cartridge until you hear it snap into position. 9 Close the printer access door. NOTE: For the best quality prints, store ink cartridges in a location where the temperature does not exceed 85° F (30° C).
Getting Started Install the Duplexer The Kodak EasyShare AiO supports an optional duplexer (Kodak EasyShare 5000 Series Two-Sided Printing Accessory) that enables printing on both sides of the paper. When installed, the duplexer is automatically detected by the printer and computer system software. The duplexer is limited to plain paper ( no photo paper). The paper dimensions that can be used are from 6.9 to 8.5 inches (17.5 to 21.6 cm) wide and from 9.8 to 11.7 inches (24.9 to 29.7 cm) long.
Chapter 2 Transfer Photos After you take photos with your digital camera, you can print them immediately or transfer them directly to your computer. You can transfer from memory cards, PTP cameras, and USB mass storage devices. 1 Connect a USB device or PTP camera to the USB Port. 2 Press the Photo Action button to enter transfer mode (Transfer Light lit). 3 Press Start to transfer. 4 Complete the transfer with the Select Device dialog and Scanner and Camera Wizard on your computer.
3 Handling and Loading Paper Handling and Loading Paper Use the following guidelines when handling paper. To avoid fingerprints, handle the paper by the edges as much as possible. Avoid touching the glossy side of photo paper. Keep the input and 4x6 paper trays closed to keep out dust and debris. Store paper flat. Keep paper away from direct sunlight, and out of high-temperature environments (such as a vehicle parked in the sun).
Chapter 3 You can copy or scan oversized originals by completely removing the lid from your EasyShare AiO. To remove the lid, lift the lid to the open position, grasp the sides of the lid, and then pull the lid upward. Your EasyShare AiO functions normally with the lid removed. Replace the lid by inserting the tabs on the hinge back into the appropriate slots. Load Main Tray You can load the main paper tray with various types of paper from 3 to 8.
Handling and Loading Paper 4 Slide the paper-width and paper-length guides inward until they stop at the edges of the paper. 5 Lower the output tray. 6 Pull the extender tray out. Load Photo Tray You can load up to 20 sheets of 10 mil thick 4x6 inch (101x150 mm) photo paper into the photo tray. TIP: To avoid fingerprints, handle the paper by the edges or by the perforated tabs. Avoid touching the glossy side of the paper. 1 Lift the photo tray lid.
Chapter 3 2 Slide the photo tray towards you until it stops. NOTE: When the photo tray is disengaged, the main paper tray is active. 3 Insert the stack of photo paper into the photo tray glossy side down. 4 Slide the photo tray with the stack of photo paper in until it stops. Engaging the photo tray turns the photo tray light on. 5 Close the photo tray lid. Load Envelopes You can load plain envelopes into the main input tray of your Kodak EasyShare AiO.
Handling and Loading Paper 4 Slide the stack of envelopes forward until it stops. 5 Slide the paper guides inward against the stack of envelopes until they stop. 6 Close the output tray. Load Labels Use letter or A4 (designed for use with ink jet printers) label sheets. 1 Ensure that none of the pages are sticking together. 2 Place a stack of label sheets on top of standard paper in the input tray, label side down.
4 Print Print You can print pictures on your Kodak 5100 EasyShare All-in-One directly from a camera or by a Proofsheet. When you print from an application, the EasyShare AiO printer driver provides the following features. Non-photo Paper Print Quality Draft Produces the fastest print speed, but the lowest quality. Normal Delivers high-quality output and is the default setting. Normal prints faster than Best.
Chapter 4 Print with Control Panel 1 Connect your camera to the EasyShare AiO. 2 Load the photo tray with photo paper. 3 Use your camera to select and print photos. Print Photos from a Proofsheet A proof sheet is a simple and convenient way to select photos and make prints directly from a camera or USB storage device without the need for a computer. 1 Connect a PTP camera or to the USB port, or insert a flash drive into the USB port.
Print Range The recommended maximum distance between Bluetooth devices for the highest transfer speed is 10 meters or 32.81 feet. However, Bluetooth will work beyond this distance. User-friendly Name Your EasyShare AiO has a serial number that is used to construct name for Bluetooth printing. The default name is Kodak5100+XXXX, where XXXX represents the last four digits if the AiO printer's serial number.
Chapter 4 ISO 216 paper sizes A4 (21 X 30 centimeters) A5 (15 X 21 centimeters) A6 (10 X 15 centimeters) B5 (17.6 X 25 centimeters) The international paper size standard, ISO 216, consists of an A series and a less common B series. This standard has been adopted by all countries in the world except the United States and Canada. The most widely used size in the ISO format is A4. The charts on the following pages compare the most common paper sizes.
Print User Guide 27
Chapter 4 28 Kodak EasyShare 5100 AiO
Print 3.
Chapter 4 4x6 Inch Paper 30 1 per page borderless 1 per page bordered 2 per page 3 per page 4 per page 9 per page Kodak EasyShare 5100 AiO
Print 5x7 Inch Paper 1 per page borderless 1 per page bordered 2 per page 3 per page 4 per page 9 per page User Guide 31
Chapter 4 8x10 Inch Paper 32 1 per page borderless 1 per page bordered 2 per page 3 per page 4 per page 9 per page Kodak EasyShare 5100 AiO
Print US Letter 1 per page borderless 1 per page bordered 2 per page 3 per page 4 per page 9 per page User Guide 33
Chapter 4 Panoramic 34 Kodak EasyShare 5100 AiO
Print A4 Paper 1 per page borderless 1 per page bordered 2 per page 3 per page 4 per page 9 per page User Guide 35
Chapter 4 A5 Paper 36 1 per page borderless 1 per page bordered 2 per page 3 per page 4 per page 9 per page Kodak EasyShare 5100 AiO
Print A6 Paper 1 per page borderless 1 per page bordered 2 per page 3 per page 4 per page 9 per page User Guide 37
Chapter 4 B5 Paper 38 1 per page borderless 1 per page bordered 2 per page 3 per page 4 per page 9 per page Kodak EasyShare 5100 AiO
5 Copy Copy The Kodak EasyShare AiO allows you to produce high-quality color and black-and-white copies on a variety of paper types, including transparencies. Once copying has started, you may at any time abort a copy operation by pressing the Cancel button. Copy with Control Panel The Kodak EasyShare AiO allows you to produce high-quality color and black-and-white copies on a variety of paper types, including transparencies. When you lift the cover, the EasyShare AiO scanning lamp begins to warm up.
Chapter 5 Copy to Photo Tray 1 Load the photo tray with photo paper (see Load Photo Tray). 2 Place a 4x6 photo face down on the right front corner of the scanner glass with the 6 inch side towards the front. 3 If necessary, press the Copy button to enter Copy mode. 4 Press the + and - buttons to select the number of copies. 5 Press the Copy Print Size button to select between 100% of Fit to page. Selecting 100% produces a 1:1 copy. Selecting Fit to page fits the original to the paper size loaded.
6 Scan Scan Scanning is the process of converting text and pictures into an electronic format for your computer. The Scan mode becomes active when you press Scan. The Scan status light is always on when your AiO printer is in Scan mode. To use the scan features, your AiO printer must be connected to a computer. IMPORTANT: Use the Kodak AiO Home Center software to configure scan settings for the control panel.
7 Maintenance Maintenance The Kodak EasyShare All-in-One requires little maintenance. However, you should clean the glass and lid backing to remove dust and fingerprints. Fingerprints and other debris on the glass or lid backing could slow down performance and affect the accuracy of scanning. This section covers the Settings menu, printhead installation, printhead calibration, checking ink levels, and changing ink cartridges. General Care IMPORTANT: Always disconnect the power before cleaning.
Chapter 7 Clean the Scanner Glass To ensure that your copies and scans remain clear, keep the scanner glass and lid backing clean and dust the exterior. 1 Turn off the EasyShare AiO and raise the lid. 2 Clean the glass with a soft cloth or sponge slightly moistened with a nonabrasive glass cleaner. WARNING Do not use abrasives, acetone, benzene, or carbon tetrachloride on the glass, since they can damage it. Do not place or spray liquid directly on the glass.
Maintenance Check Ink Levels You can easily check the ink levels to determine how soon you might need to replace an ink cartridge. The Control Panel has two ink level indicators, one for the black ink cartridge and one for the color ink cartridge. These indicators blink slow when ink levels are low, and fast when the ink cartridge should be replaced. Replace Ink Cartridges When the ink level in an ink cartridge is low, its Ink Level indicator on the Control Panel blinks slow.
Chapter 7 3 Open the box of the new ink cartridge. 4 Remove the bagged ink cartridge from the box and tear open the bag at the notch and remove the ink cartridge. IMPORTANT: Insert the ink cartridge immediately to prevent any drying of the ink. 5 Remove the orange cap from the cartridge by grasping the top edge and pulling/rotating it off the ink cartridge. 6 Slide the ink cartridge into the printhead. 7 Press down on the tab until you hear a click and feel the latch snap into position.
Maintenance Printhead Calibration The Kodak EasyShare AiO performs a calibration every time you install or replace a printhead. However, you can run a calibration if you are seeing changes in the image quality. Calibration aligns the printheads and performs a nozzle health check to enable high-quality prints. 1 Load the main tray or photo tray with photo paper. IMPORTANT: If you don't have any photo paper, you can use plain paper, but photo paper is highly recommended for calibrations.
Chapter 7 5 Remove the old printhead. 6 Remove the printhead from its bag. 7 Remove and discard the clear plastic casing and the orange protective cap. 8 Place the printhead into the carriage. 9 Push against the back wall of the printhead until it clicks into place.
Maintenance 10 Reinstall the ink cartridges.
Chapter 7 50 Kodak EasyShare 5100 AiO
8 Support Support If you have a problem with your AiO printer, refer to the Troubleshooting topics in this book. Additional technical information is available in the ReadMe file located on the Kodak EasyShare software CD. For online support, visit www.kodak.com/go/support. Contact Kodak Kodak Resource Center www.kodak.com/go/resourcecenter Printer Get support for your product (FAQs, troubleshooting information, etc.). www.kodak.
Chapter 8 Kodak along with proof of the purchase price paid. Repair, replacement, or refund of the purchase price are the sole remedies under this warranty. If replacement parts are used in making repairs, those parts may be remanufactured. or may contain remanufactured materials. If it is necessary to replace the entire Product, it may be replaced with a remanufactured Product.
Support Outside the United States and Canada In countries other than the United States and Canada, the terms and conditions of this warranty may be different. Unless a specific Kodak warranty is communicated to the purchaser in writing by a Kodak company, no warranty or liability exists beyond any minimum requirements imposed by law, even though defect, damage, or loss may be by negligence or other act. EASTMAN KODAK COMPANY Rochester, NY 14650 U.S.A. © Eastman Kodak Company, 2006.
Chapter 8 Customer Support Phone Numbers Australia 1 800 793 895 Austria 0179 567 357 Belgium 02 713 14 45 Brazil 1 800 891 4213 Canada 1 800 465 6325 Denmark 3 848 71 30 Finland 0800 1 17056 France 01 55 1740 77 Germany 069 5007 0035 International Toll Fax +44 131 458 6962 International Toll Line +44 131 458 6714 Ireland 01 407 3054 Italy 02 696 33452 Japan 03 5540 9002 Mexico 01 800 288 56325 Netherlands 020 346 9372 New Zealand 0800 880 175 Norway 23 16 21 33 Portugal
Support Troubleshooting AiO Fails to Power On The power supply is not properly connected. 1 Make sure the power cord is connected to the power supply and plugged into a grounded power outlet or power strip. 2 If you are using a power strip, make sure it is turned on. 3 If you are using a switched power outlet, make sure the switch is on. 4 Make sure the power outlet is supplying power. 5 If none of the above corrects the problem, contact Kodak support.
Chapter 8 Ink Cartridge Color/Black Cartridge Not Recognized The ink cartridge installed was not recognized. Generic ink cartridges can potentially damage the printhead if the actual ink level is lower than that indicated. To correct the problem, install a genuine Kodak ink cartridge. Ink Cartridge out of Ink One of the ink cartridges has reached the end of its life and needs to be replaced. To correct the problem, replace the expired ink cartridge.
Support For more information on connecting your Kodak AiO printer to your computer, see the Setup Poster that came with your unit. No Paper Feed Paper does not feed. Paper light may be flashing red. IMPORTANT: For best result, use only Kodak Ink cartridges and paper for your printer. The paper tray(s) may be empty. Load paper into the paper tray(s), then press Start. Check the paper 1 Disengage the Photo tray. 2 Inspect the paper and make sure paper no sheets are damaged in any way.
Chapter 8 5 Reload the paper tray(s). Do not overfill. 6 Re-engage the Photo tray if desired. Printer not Responding If you receive a Printer not Responding message 1 Turn the printer off and turn it back on. 2 If the problem still persists, unplug the power cord from power supply and plug it back in. 3 If the problem continues to persist, restart your computer. Transfer Pictures Failure Nothing happens when you try to transfer pictures to the computer. 1 Press the Transfer button, on the printer.
Support Print Troubleshooting Envelope Printing Incorrect The envelopes are not loaded correctly. 1 Remove the envelopes from the main paper tray. 2 Straighten the stack of envelopes against a flat surface, and reload it into the main paper tray. 3 Slide the paper-width and paper-length guides inward until they stop at the edges of the envelopes. Multiple-page Document in Reverse Order The printing settings are set to print the first page of your document first.
Chapter 8 Poor Print Quality 1 Clean the printhead. 2 Run a calibration. If the problem persists, repeat as often as necessary. Print Skewed or Slanted Probable Cause 1 The paper is not properly loaded in the tray. 1 Remove the stack of paper from the main paper tray, and slide the paper guides to the outermost position. 2 Remove the paper and check for wrinkles and tears. 3 Straighten the stack of paper against a flat surface, and reload it into the main paper tray.
Support Print Too Light IMPORTANT: For best results, use only Kodak Ink cartridges and paper for your printer. Make sure the paper is loaded with the Kodak logo facing up. Reload if necessary. Try re-taking the picture with the flash off. See your camera user’s guide for details. Adjust the exposure compensation on your camera, and try re-taking the picture. See your camera user’s guide for details. Edit the picture using Kodak EasyShare software on your computer.
Chapter 8 Copy Troubleshooting Copies Faded or Dull Colors Probable Cause 1 The copy quality is set to Draft. Set the copy quality to Normal or Best. See Copy Settings. Probable Cause 2 The brightness setting for copies is set too light. Adjust the brightness setting to darker. See Copy Settings. Copies too Light or Dark The brightness setting for copies is set too light or dark. Adjust the brightness setting for copies See Copy Settings. Copy Cut Off The original is larger than the paper loaded.
Support Probable Cause 4 Your computer system resources may be low. 1 Turn off your computer and EasyShare AiO and then turn them back on. 2 If the problem still persists, try scanning at a lower resolution. Scanned Image Blank Your original is not placed correctly on the scanner glass. Place your original face down on the right front corner of the scanner glass. Proofsheet Scan Unsuccessful Probable Cause 1 The scanner glass is dirty.
Chapter 8 64 Kodak EasyShare 5100 AiO
9 Appendix Appendix All-in-One Specifications B&W plain paper print speed (Draft/Normal/Best) 32 / 10.5 / 5 ppm Color plain paper print speed (Draft/Normal/Best) 22 / 6 / 3 ppm Photo print speed - 4X6 Kodak Studio Gloss Photo print speed - 8X10 Kodak Studio Gloss 2.14 ppm [28 sec/print] 0.86 ppm [70sec/print] B&W plain paper copy speed (Draft/Normal/Best) 30 / 10 / 5 ppm Color plain paper copy speed (Draft/Normal/Best) 20 / 6 / 3 ppm Scan Resolution 1200 dpi Size 18.8”W x 14.7”D x 8.8”H (47.
Chapter 9 Computer Requirements Requirement Minimum Recommended Operating System XP SP1 XP SP2, XP 64, Vista CPU Celeron Pentium 4 Clock Speed 1.2 GHz 3 GHz Memory 128 MB 512 MB Available Disk Space 200 MB 200 MB Monitor Resolution 800 x 600 pixels 1024 x 768 pixels Color Depth 16 bit 24 bit Interface USB 1.1 USB 2.0 Removable Drive CD-ROM CD-ROM Paper Types The following tables show the paper types and sizes the Kodak EasyShare AiO supports for copying and printing.
Appendix Supported Paper Sizes Usage Size Tray Document page sizes Labels A4 (210x297 mm) A5 (148x210 mm) A6 (105x148 mm) US Executive (7.25x10.5 in.) (184x266 mm) US Legal (8.5x14 in.) (216x356 mm) US Letter (8.5x11 in.) (216x280 mm) Custom sizes Main Index Card Stock 3x5 in. index cards (76.2x127 mm) 4x6 in. index cards (101x152 mm) 5x7 in. index cards (127x178 mm) Main Transparency Iron-on Transfers A4 (210x297 mm) US Letter (8.5x11 in.) (216x280 mm) Main Envelopes B5 (6.92x9.84 in.
Chapter 9 Safety Read and follow these cautions and warnings before using KODAK products. Always follow basic safety procedures. Follow all warnings and instructions marked on the equipment. Parts CAUTION Do not disassemble this product; there are no user-serviceable Part(s) inside. Refer servicing to Kodak qualified service personnel. WARNING Keep out of reach of children. Ink is harmful if swallowed.
Appendix CAUTION Do not use your EasyShare AiO near water, or spill liquid on it. WARNING Do not place your EasyShare AiO on an unstable cart, stand, bracket, or table. Injury to persons and damage to the equipment may occur. Environment CAUTION Excessive dust levels may damage internal parts. CAUTION Unplug the equipment from the wall outlet before cleaning.
Chapter 9 Any changes or modifications not expressly approved by the party responsible for compliance could void the user's authority to operate the equipment. Where shielded interface cables have been provided with the product or specified additional components or accessories elsewhere defined to be used with the installation of the product, they must be used in order to ensure compliance with FCC regulation.
Appendix This equipment has been certified by the manufacturer in accordance with Directive 1999/5/EC (Annex II) for Pan-European single-terminal connection to the public switched telephone network (PSTN). However, due to differences between the individual PSTNs provided in different countries, the approval does not, of itself, give an unconditional assurance of successful operation on every PSTN network termination point.
Chapter 9 72 Kodak EasyShare 5100 AiO
Glossary Glossary A ADF: Automatic Document Feeder AES: Advanced Encryption Standard C CHAP: Challenge Handshake Authentication Protocol D dBa: Decibel measured with a "weighting filter" dBm: A measured power level in decibels relative to 1mW. Dongle: A small electronic device that plugs into a USB port. DPOF: Digital Print Order File - An ASCII order file that you can generated in a camera that supports DPOF. DPOF files enable you to request simple reprints of the photos in the file.
Glossary W WEP: Wired Equivalent Privacy Wi-Fi: Wireless Fidelity WLAN: Wi-Fi Local Area Network WPA: Wi-Fi Protected Access 74 Kodak EasyShare 5100 AiO
Index Index 2 2-Sided Printing Accessory ..................................... 15 A A6 Paper...................................................................... 37 B B5 Paper....................................................................... 38 Bluetooth ..............................................................24, 55 Borderless ....................................................................61 C Calibration...................................................................47 Cleaning.........
Glossary *1K3234* *1K3234* 1K3224 76 Kodak EasyShare 5100 AiO