Start Here Commencez ici Comience aquí EasyShare 5100 All-in-One Printer Imprimante tout-en-un Impresora Multifunción Photo Copy Scan Start Ea EasyShare 5100 All-in-One Printer Print Copy Scan Impression Copie Numérisation Imprime Copia Escanea Check Black Ink Check Color Ink Check Paper DPOF Photos Tagged PictBridge Proofsheet Transfer Photo Scan Copy + Color Black Ink Cartridge Quantity Black 100% Fit to Page Color Ink Cartridge 10 10 Cancel Start EasyShare 5100 All-in-One Printer
Identify Main Components Identification des principaux composants Componentes principales 1. 2. 10. 14. 9. Photo Copy Scan Kodak EasyShare printer 5100 all-in-one Cancel Start Start Check Paper 4. Check Color Ink 11. Kodak Check Black Ink Ea EasyShare 5100 All-in-One Printer Photo Scan Copy 3. 12. 5. 6. EN 13. 8. 7. ENGLISH FR FRANÇAIS ES ESPAÑOL 1. Scanner glass 1. Vitre du numériseur 1. Vidrio del escáner 2. Printer access door 2. Porte d'accès de l'imprimante 2.
1 Unpack Printer and Install Control Panel Déballage de l'imprimante et Installation du panneau de commande Desempaque la impresora y Instale el panel de control IMPORTANT: Do not connect the USB cable to the printer until instructed during software installation. IMPORTANT: ne branchez pas le câble USB dans l'imprimante avant que cela ne vous soit indiqué au cours de l'installation du logiciel.
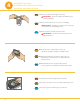
2 Load Paper Chargez le papier Cargue el papel Start Ea EasyShare 5100 All-in-One Printer EN a) Load photo paper into the photo tray. Lift the photo tray lid until it remains standing without support. Insert the photo paper glossy side down. IMPORTANT: Do not overload the photo tray. Max 20 sheets. FR a) Chargez le papier photo dans le plateau à papier photo. Soulevez complètement le couvercle du plateau à papier photo jusqu'à ce qu'il reste en position.
Load Paper Chargez le papier Cargue el papel EN c) Load plain white paper into the main tray. FR c) Chargez du papier blanc ordinaire dans le plateau principal. ES c) Coloque papel blanco en la bandeja principal. www.kodak.
3 Install Printhead Installation de la tête d'impression Instale el cabezal de impresión EN IMPORTANT: The printhead is fragile. Handle carefully. a) Lift the printer access door. Make sure the orange tape is removed from the carriage. FR IMPORTANT: la tête d'impression est fragile. Manipulez-la avec précaution. a) Soulevez la porte d'accès de l'imprimante. Assurez-vous que le ruban orange a bien été retiré du chariot. ES IMPORTANTE: el cabezal es una pieza frágil. Tómelo con cuidado.
Install Printhead Installation de la tête d'impression Instale el cabezal de impresión EN d) Carefully remove and discard the black plastic shield and the orange protective cap. IMPORTANT: Do not touch the copper-colored contacts. FR d) Retirez avec précaution la pellicule en plastique noir et le capuchon protecteur orange, puis jetez-les. IMPORTANT: ne touchez pas aux contacts de couleur cuivre. ES d) Cuidadosamente retire el protector plástico y la tapa naranja de protección y bótelos.
Install Ink Cartridges Installation des cartouches d'encre Instale los cartuchos de tinta 4 EN a) Remove the black ink cartridge from its bag. IMPORTANT: Insert ink cartridges immediately upon opening sealed bag. Black Ink Cartridge 10 FR a) Retirez la cartouche d'encre noire de son emballage. IMPORTANT: installez les cartouches d'encre aussitôt après avoir ouvert l'emballage scellé. ES a) Retire el cartucho de tinta negra de la bolsa.
Install Ink Cartridges Installation des cartouches d'encre Instale los cartuchos de tinta EN d) Press down on the ink cartridge until you hear it click into position. FR d) Poussez la cartouche d'encre vers le bas pour la mettre en place, jusqu'à ce que vous entendiez un clic. ES d) Presiónelo hacia abajo hasta que calce. EN e) Open and uncap the color ink cartridge. Insert it into the printhead. FR e) Déballez la cartouche d'encre couleur et retirez le capuchon.
5 Connect Power Branchement de l'alimentation Conecte la alimentación EN a) Connect the power supply and adapter. FR a) Branchez le cordon d’alimentation et l'adaptateur. ES a) Conecte el adaptador y el cable de conexión. EN b) Press ON. FR b) Appuyez sur ON (Marche). ES b) Pulse ON (ENCENDIDO). Kodak EasyShare printer 5100 all-in-one Cancel Start Photo Scan Copy Check Black Ink Check Color Ink Check Paper -ON Photo Copy Scan Start EasyShare 5100 Ea All-in-One Printer 10 www.kodak.
6 Calibrate Printer Étalonnage de l'imprimante Calibre la impresora EN Start EEasyShare 5100 All-in-One Printer IMPORTANT: Make sure that the photo tray is pushed in. The photo tray light should be lit. a) Press Start. Wait two minutes for the calibration sheet to print. Tip: If the calibration sheet does not print properly, see the Troubleshooting section in this setup guide. FR IMPORTANT: assurez-vous que le plateau à papier photo est en place. Le voyant du plateau doit être allumé.
Calibrate Printer Étalonnage de l'imprimante Calibre la impresora EN c) Lower the scanner lid and press Start. Remove the sheet from the scanner glass when the calibration is complete. FR c) Abaissez le couvercle du numériseur et appuyez sur Start (Démarrer). Une fois l'étalonnage terminé, retirez la page de la vitre du numériseur. ES c) Baje la cubierta del escáner y pulse Start (INICIAR). Retire la hoja del escáner finalizada la calibración.
7 Windows Install Windows Software Installation du logiciel pour Windows Instale el software en Windows IMPORTANT: Do not connect the USB cable to the printer until instructed during software installation. IMPORTANT: ne branchez pas le câble USB à l'imprimaavant que cela ne vous soit indiqué au cours de l'installation du logiciel. IMPORTANTE: no conecte el cable USB a la impresora hasta que así se le indique durante la instalación del software.
Macintosh MACINTOSHMACINTOSH MACINTOSHMACINTOSH MACINTOSHMACINTOSH MACINTOSHMACINTOSH MACINTOSHMACINTOSH MACINTOSHMACINTOSH MACINTOSHMACINTOSH MACINTOSHMACINTOSH MACINTOSHMACINTOSH MACINTOSHMACINTOSH MACINTOSHMACINTOSH MACINTOSHMACINTOSH MACINTOSHMACINTOSH MACINTOSHMACINTOSH MACINTOSHMACINTOSH MACINTOSHMACINTOSH MACINTOSHMACINTOSH MACINTOSHMACINTOSH MACINTOSHMACINTOSH MACINTOSHMACINTOSH MACINTOSHMACINTOSH MACINTOSHMACINTOSH 14 Install Macintosh Software Installation du logiciel pour Macintosh Instale el so
Control Panel Features Fonctions du panneau de commande Funciones del panel de control Check Black Ink Check Color Ink 1. Check Paper DPOF Photos Tagged PictBridge 2. Proofsheet Transfer Photo 3. Scan Copy 4. Quantity Black 100% Fit to Page + Color 5. - 6. Cancel Start EasyShare 5100 All-in-One Printer EN ENGLISH 1. Indicates that a source with a DPOF print file is detected. 2. Indicates PictBridge connectivity. 3. If photo tray is engaged, toggles between Transfer and Proofsheet.
Getting Started Démarrage Procedimientos iniciales EN You can access and use the AiO Home Center by double-clicking on the icon on your desktop. FR Vous pouvez accéder au Centre tout-en-un en double-cliquant sur l'icône affichée sur votre bureau. ES Para usar el centro AiO Home Center, haga doble clic en el icono correspondiente que aparece en el escritorio de la computadora.
Troubleshooting Dépannage Solución de problemas EN If you have additional questions about troubleshooting this device, please visit www.kodak.com/go/5100aiosupport PROBLEM: I cannot print anything, the printer is locked-out after printing the calibration sheet. SOLUTION: 1. Are both the Black and Color lights solid red? YES 2. Did you already scan the Calibration Sheet? NO - proceed to step 3. YES - proceed to step 5. 3. Place calibration sheet on the scanner glass. 4. Press START.
Troubleshooting Dépannage Solución de problemas PROBLEM: I cannot print to my desired paper type. SOLUTION: Check to see if the photo tray is pushed in. You can do this by checking if the green photo tray light is illuminated. If it is, all prints will be produced from this tray. If you want to print from the main tray, pull out the photo tray by lifting the lid and sliding the paper tray toward you. PROBLEM: I have a paper jam. SOLUTION: 1. Press in the tabs on the rear access door to remove the door. 2.
Troubleshooting Dépannage Solución de problemas PROBLÈME : J'ai placé la page d'étalonnage sur la vitre du numériseur, mais il ne s'est rien passé. SOLUTION : L'une ou l'autre des situations suivantes peut s'être produite. La page d'étalonnage n'est pas correctement placée sur la vitre du numériseur (la flèche ne pointe pas vers le coin avant droit) ou bien elle est placée de travers (mal alignée) sur la vitre. 1. Vérifiez si la page d'étalonnage est correctement placée sur la vitre du numériseur. 2.
Troubleshooting Dépannage Solución de problemas Votre problème persiste? Si vous n'avez pas trouvé la réponse à vos questions, veuillez contacter le service d'assistance technique (conservez votre numéro de service Kodak à portée de main). Ce numéro figure sur l'appareil; vous le trouverez en soulevant la porte d'accès de l'imprimante, comme illustré. ES KODAK SERVICE NUMBER F330065 *F330065* *F330065* Si tiene más preguntas sobre cómo solucionar problemas, vaya a www.kodak.
Troubleshooting Dépannage Solución de problemas PROBLEMA: La página de calibración se imprimió en papel blanco normal. SOLUCIÓN: Siga lo indicado en el paso 1-2. La calibración será correcta en papel fotográfico o en papel blanco normal. PROBLEMA: No puedo imprimir la hoja de calibración. SOLUCIÓN: Cuando sea necesario, puede forzar la impresión de la hoja de calibración de la siguiente manera: 1. Asegúrese de que la bandeja para papel fotográfico esté bien instalada. 2.
Safety Sûreté Seguridad - Read and follow these instructions before using KODAK products. - Always follow basic safety procedures. - Follow all warnings and instructions marked on the equipment. WARNING STATEMENTS - Do not expose this product to liquid, moisture, or extreme temperatures. KODAK AC adapters are intended for indoor use only. The use of controls, adjustments, or procedures other than those specified herein may result in exposure to shock and/or electrical or mechanical hazards.
Safety Sûreté Seguridad - La source d'alimentation de l'adaptateur c.a. est munie de fiches à mise à la terre à trois fils. Si vous ne parvenez pas à brancher la fiche sur la prise de courant, communiquez avec un électricien afin qu'il vérifie ou remplace cette prise. - Ne branchez pas l'adaptateur c.a. à une rallonge domestique.
Limited Warranty Garantie Limitée Garantía Limited Warranty Kodak warrants Kodak consumer electronic products and accessories ("Products"), excluding batteries, to be free from malfunctions and defects in both materials and workmanship for one year from the date of purchase. Retain the original dated sales receipt. Proof of the date of purchase will be required with any request for warranty repair.
Limited Warranty Garantie Limitée Garantía Garantie limitée Kodak garantit que les appareils et accessoires électroniques grand public Kodak (les « produits »), exception faite des piles, seront exempts de toute défaillance ou défaut matériel et de fabrication pendant un an à compter de la date d'achat. Conservez l'original daté de la preuve d'achat. Une preuve de la date d'achat sera requise lors de toute demande de réparation sous garantie.
Limited Warranty Garantie Limitée Garantía Garantía completa por un año Aplica sólo a México Periodo de garantía Kodak garantiza que esta impresora multifunción funcionará debidamente durante un año a partir de la fecha de compra. Esta garantía ampara al comprador contra defectos en materiales y mano de obra empleados en la fabricación del equipo, durante el período de la garantía.
Registration has its rewards— including a terrific offer. Register your KODAK All-in-One Printer and get great support, expert tips, free software downloads—plus a phenomenal deal on inkjet supplies to get you started. Simply register right away when prompted during software installation or on the web at www.kodak.com/go/register. Registration takes a minute—but the rewards are lasting. Inkjet supplies offer valid for U.S. residents only.
Any Questions? N'importe quelles Questions? ¿Alguna Pregunta? EN Look here for answers: www.kodak.com/go/5100aiosupport User Guide - The User Guide is installed with your Kodak AiO Software and is located: Windows: Program Files Kodak Printer Center Help Macintosh: Library Documentation Kodak AiO Printers Techincal Support - For printer support, please call 1-800-421-6699 FR Nous avons les réponses: www.kodak.